
Operational FAQ for BryteFlow Ingest

How to restart BryteFlow Ingest
Steps to perform on how to restart Ingest.
- Turn off Ingest Schedule and wait for load to complete, then stop the BryteFlow Windows service.
- Restart BryteFlow Windows service and wait for the Ingest dashboard to appear (refresh the page).
- Go to Schedule tab, then turn on the schedule.
- BryteFlow Ingest will pick up the correct sequence for processing, but it is good to do a sanity check and ensure that the last sequence number loaded correctly and the new sequence number started correctly, otherwise perform “Rollback” to the correct sequence number for processing.
Rollback
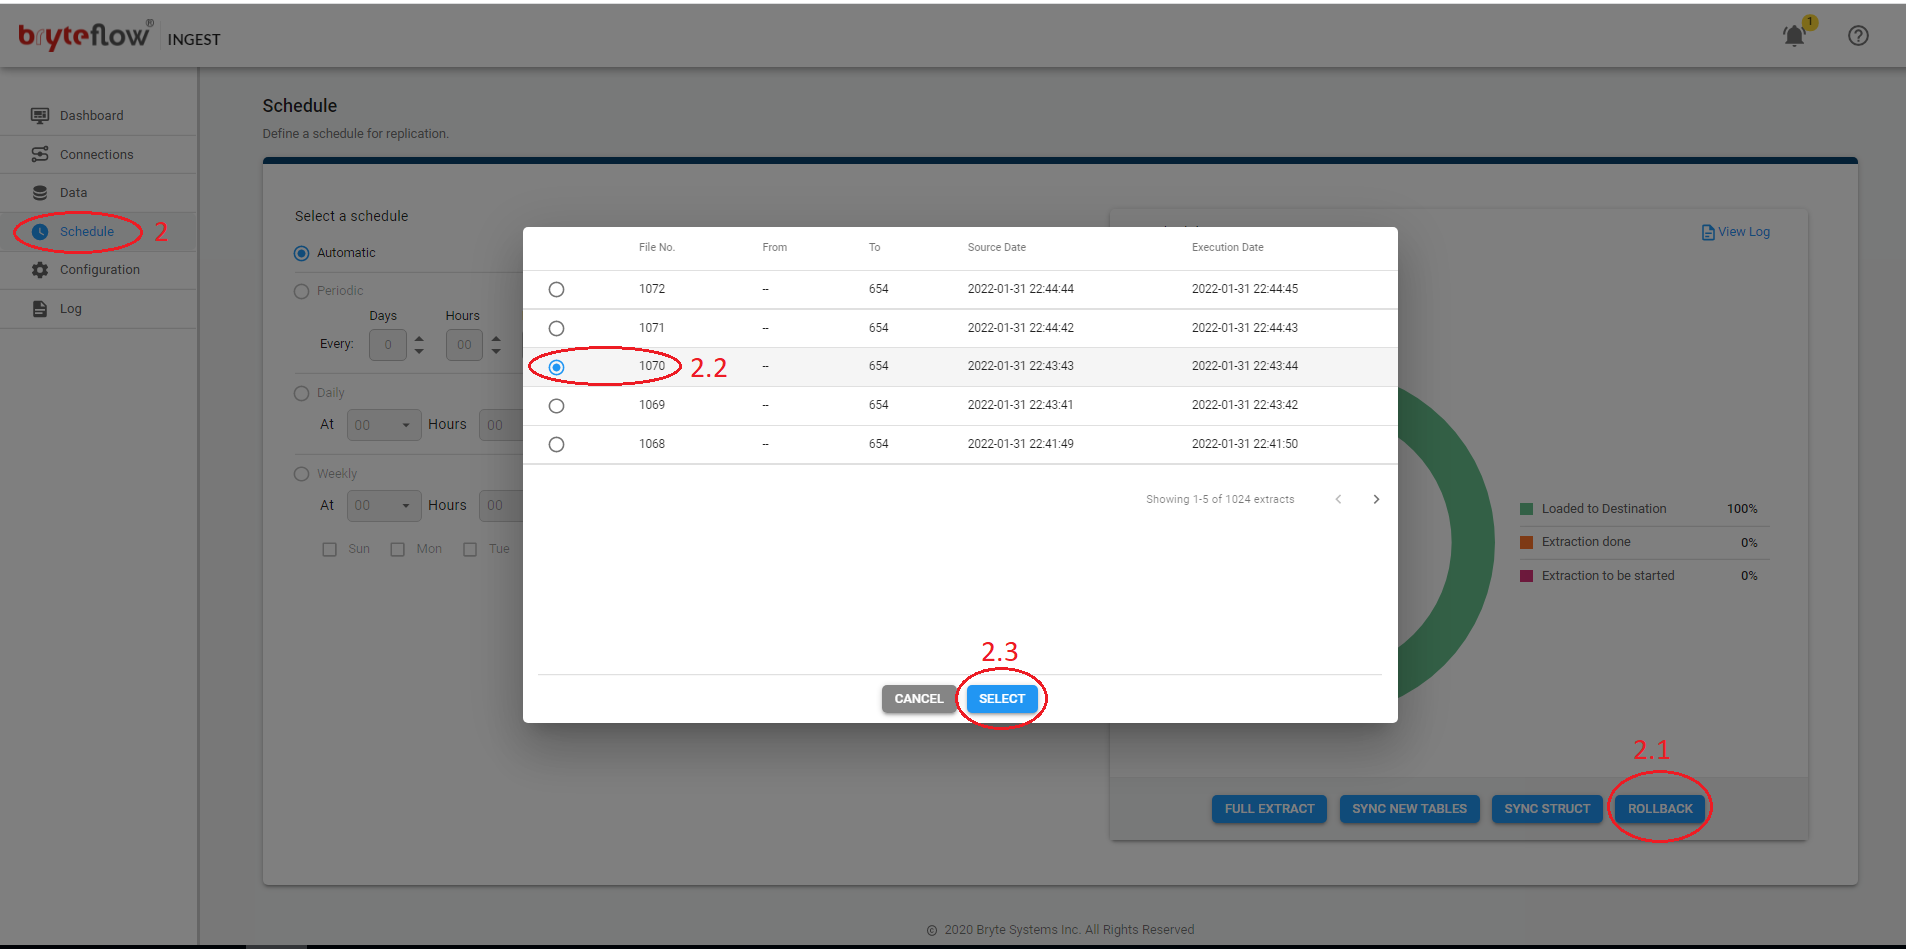
Steps to perform Rollback in Ingest.
- Turn off Ingest Schedule and wait for the load to complete.
- From the Schedule tab:
- Click Rollback
- In the pop-up screen, select sequence number from where you want to replay the log files. Please note Log files should be available on the source server.
- Click Select
- Turn on the Schedule.
Full Extract
Steps to perform Full Extract when an Initial Sync needs to be performed for all tables configured in a pipeline.
- Turn off Ingest Schedule and wait for the load to complete.
- From the Data tab:
- Select the tables (one or more) where you want the Full extract.
- Ensure Primary key (PK) column(s) are applied
- Select Delta extract (PK or PK Hist).
- Click Apply.
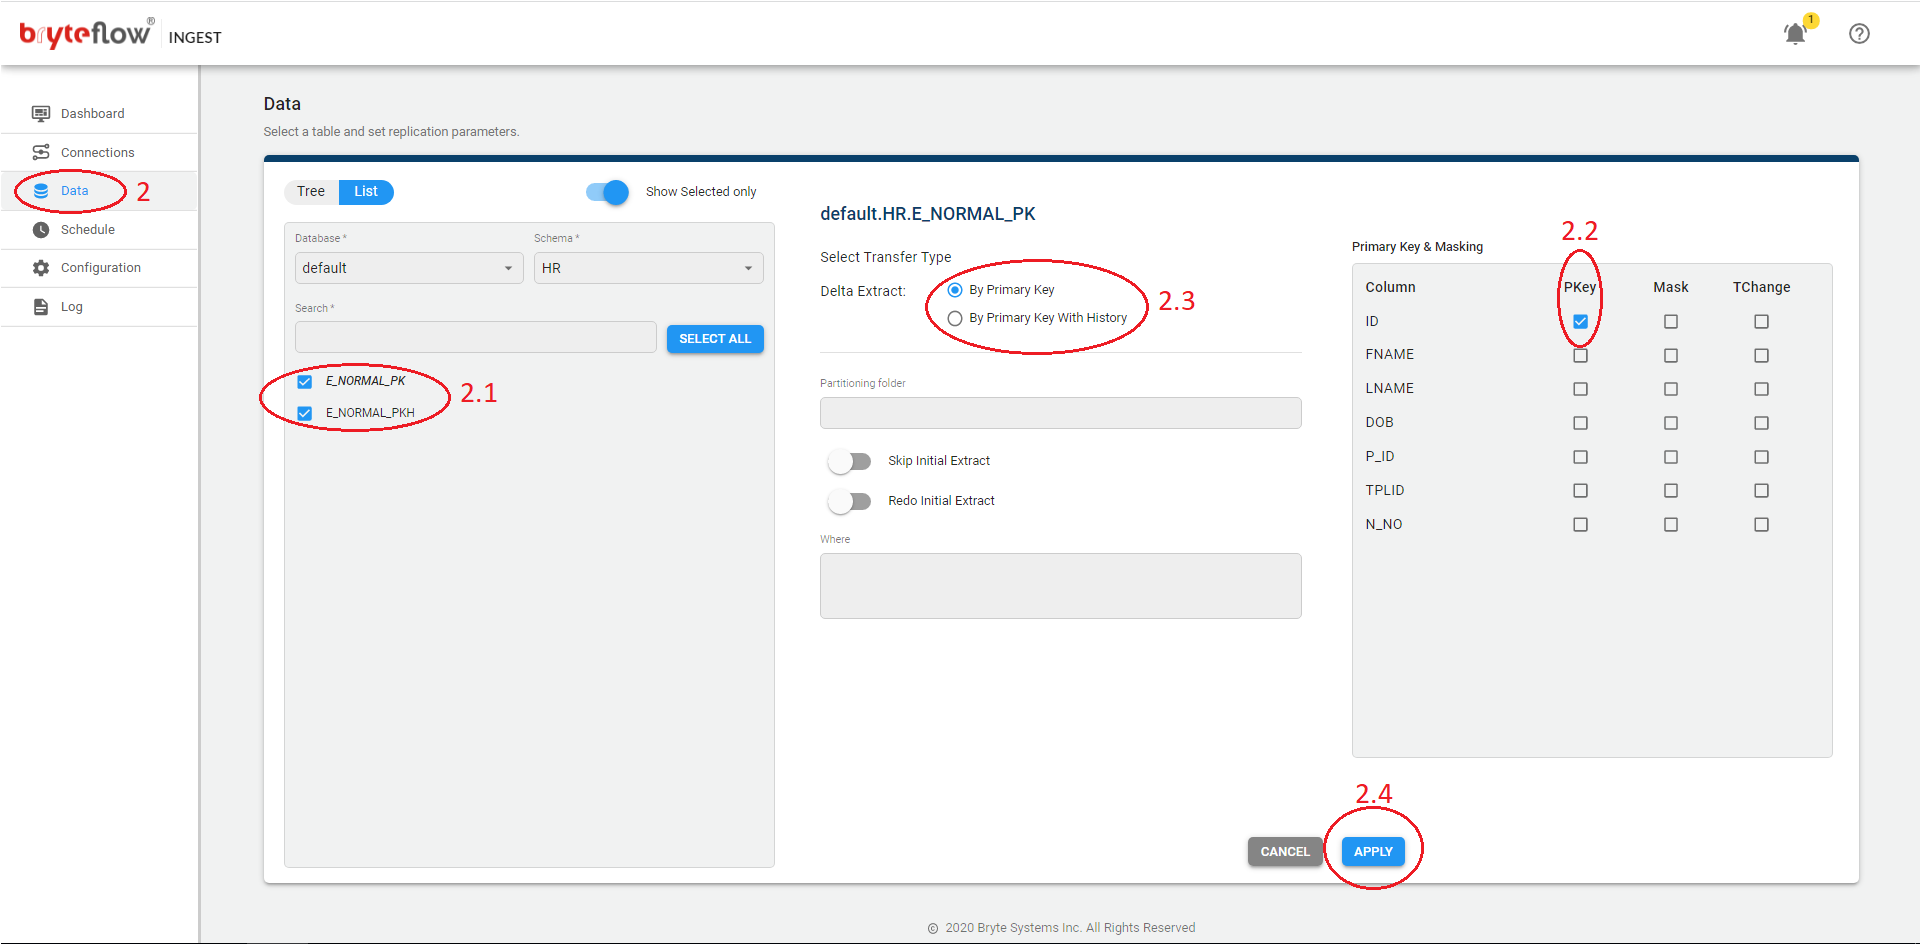
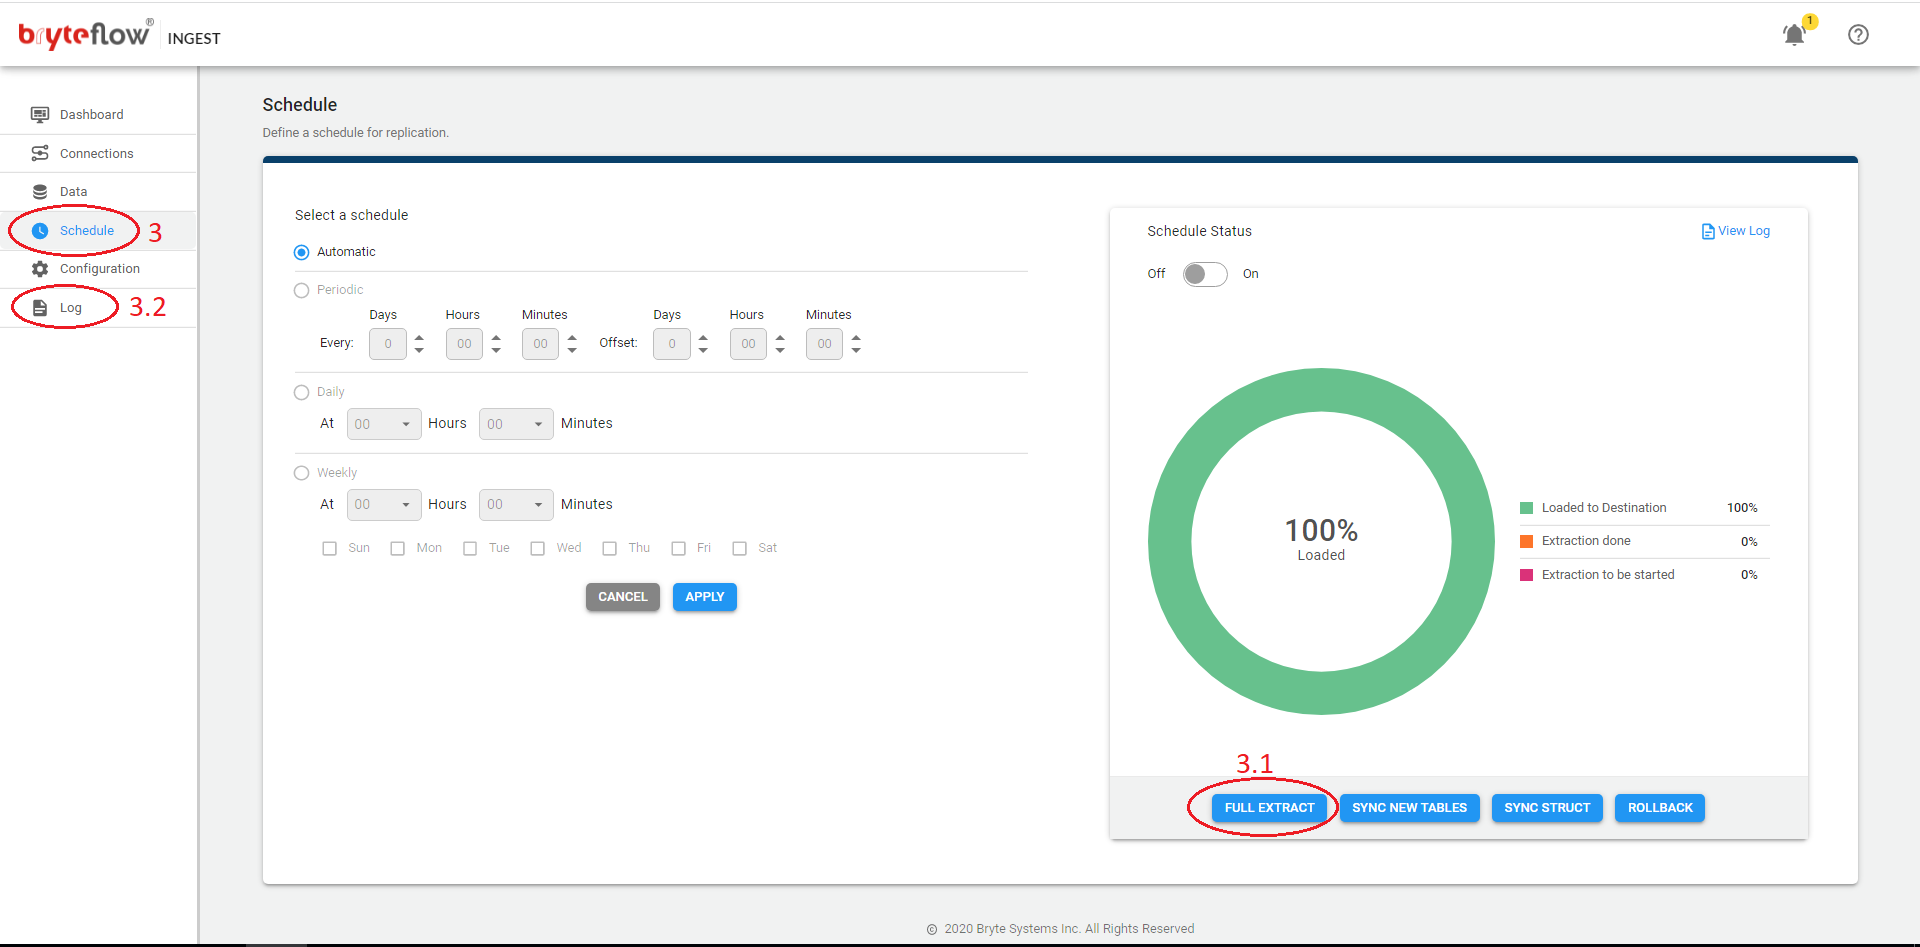
- Goto Schedule tab:
- Click Full Extract.
- Check logs and ensure that selected tables started full extract.
Redo Initial Extract
Steps to perform Redo Initial Extract for existing tables.
- Turn off Ingest Schedule and wait for the load to complete.
- From the Data tab:
- Select the table(s) where you want to redo the initial extract.
- Ensure Primary key (PK) column(s) are applied.
- Select Delta extract (PK or PK Hist).
- Enable Redo Initial Extract toggle button
- Click Apply.
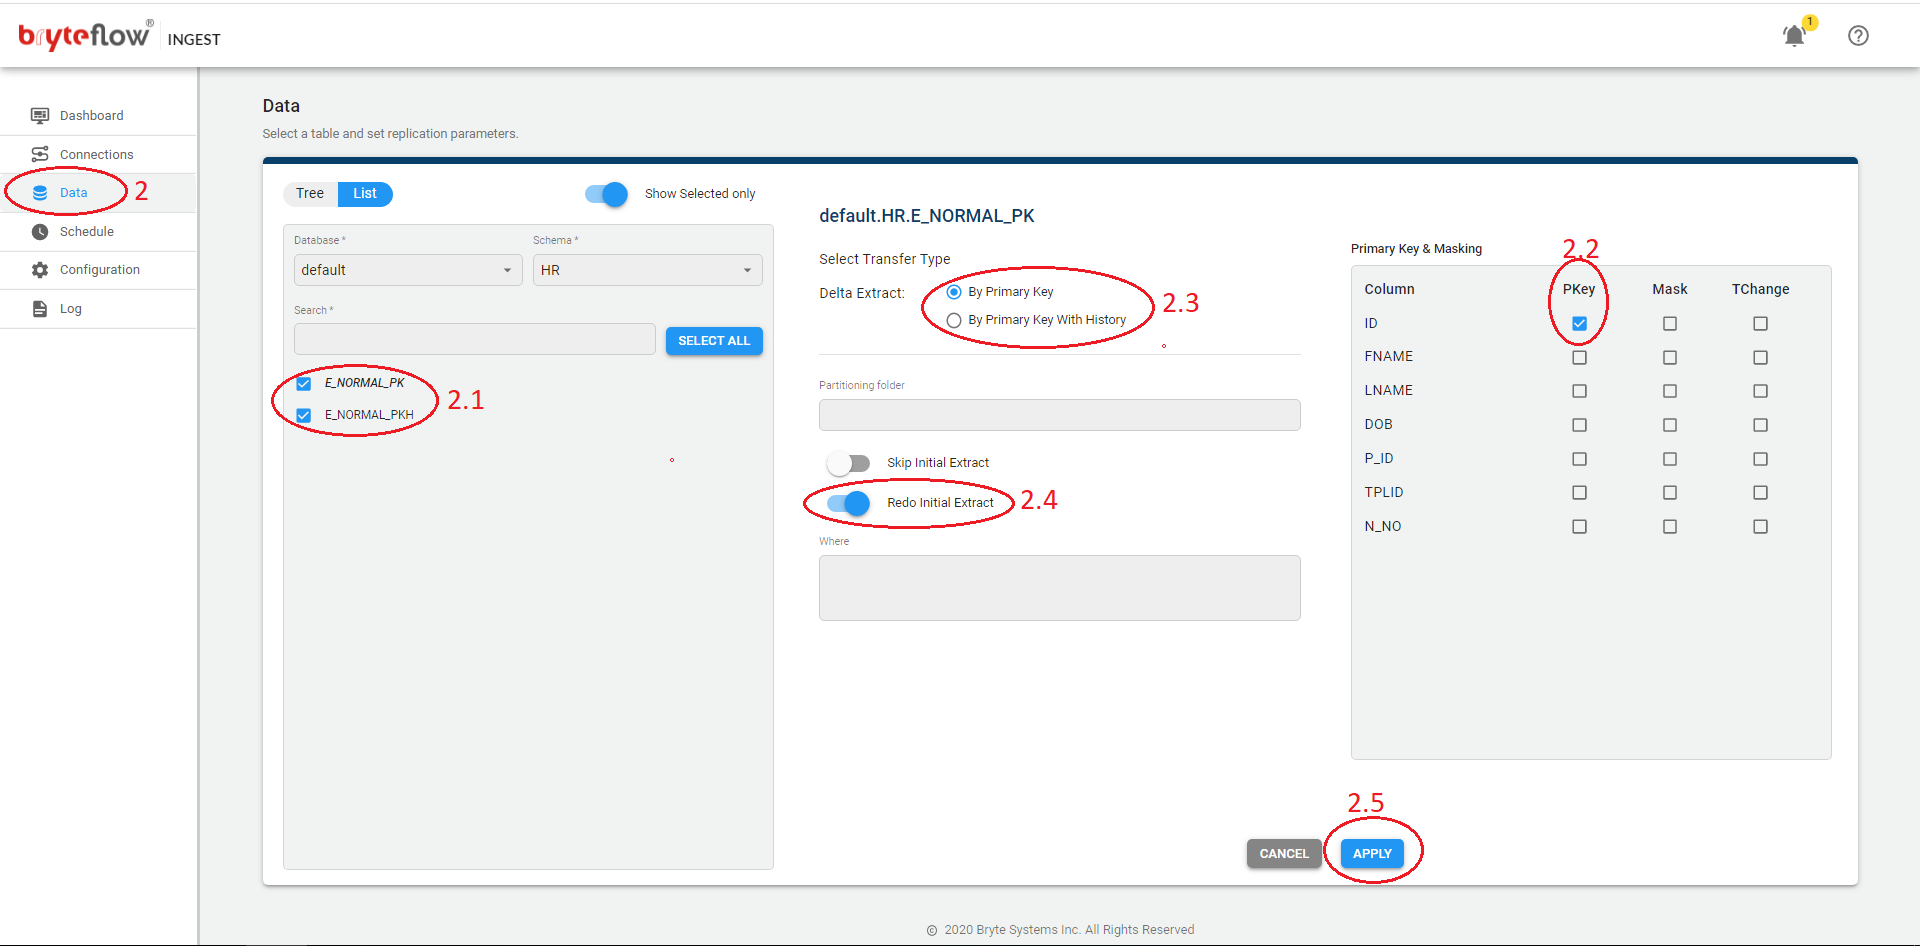
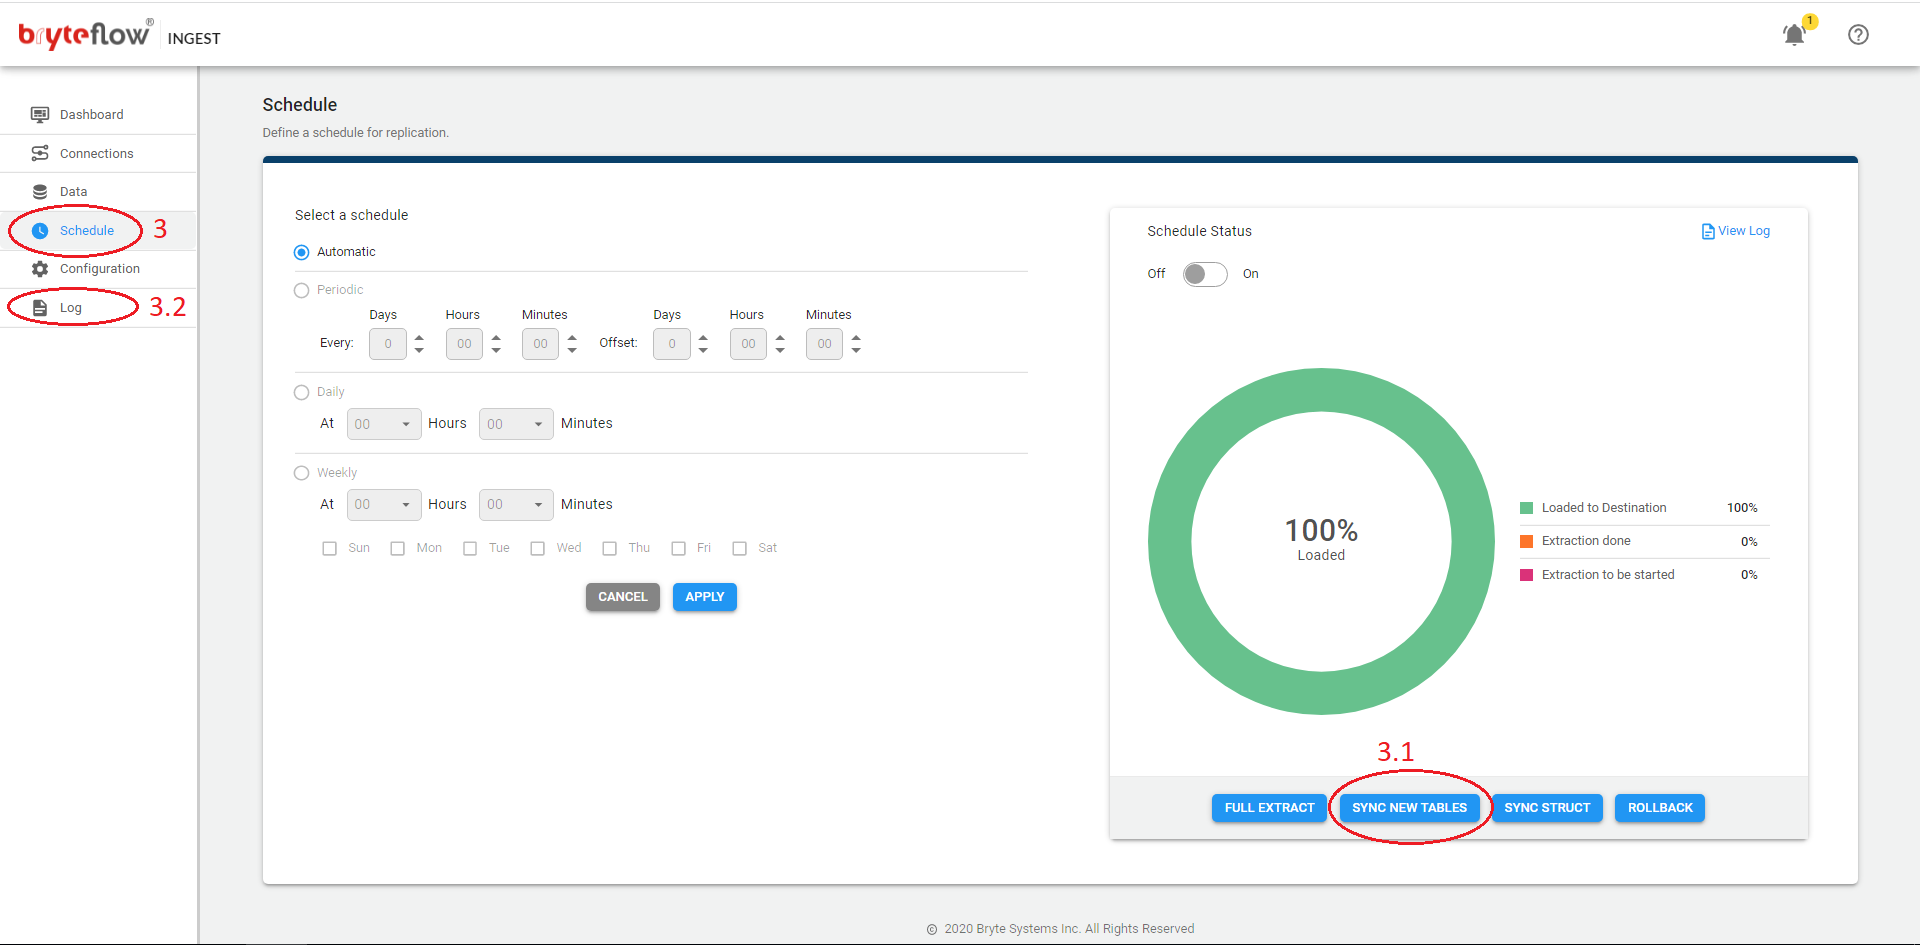
- Go to Schedule tab:
- Click Sync New Tables.
- Check logs and ensure the selected table(s) started full extract.
Skip Initial Extract
Steps to perform deltas without an Initial Sync of the data or for XL-Ingest.
- Turn off Ingest Schedule and wait for the load to complete.
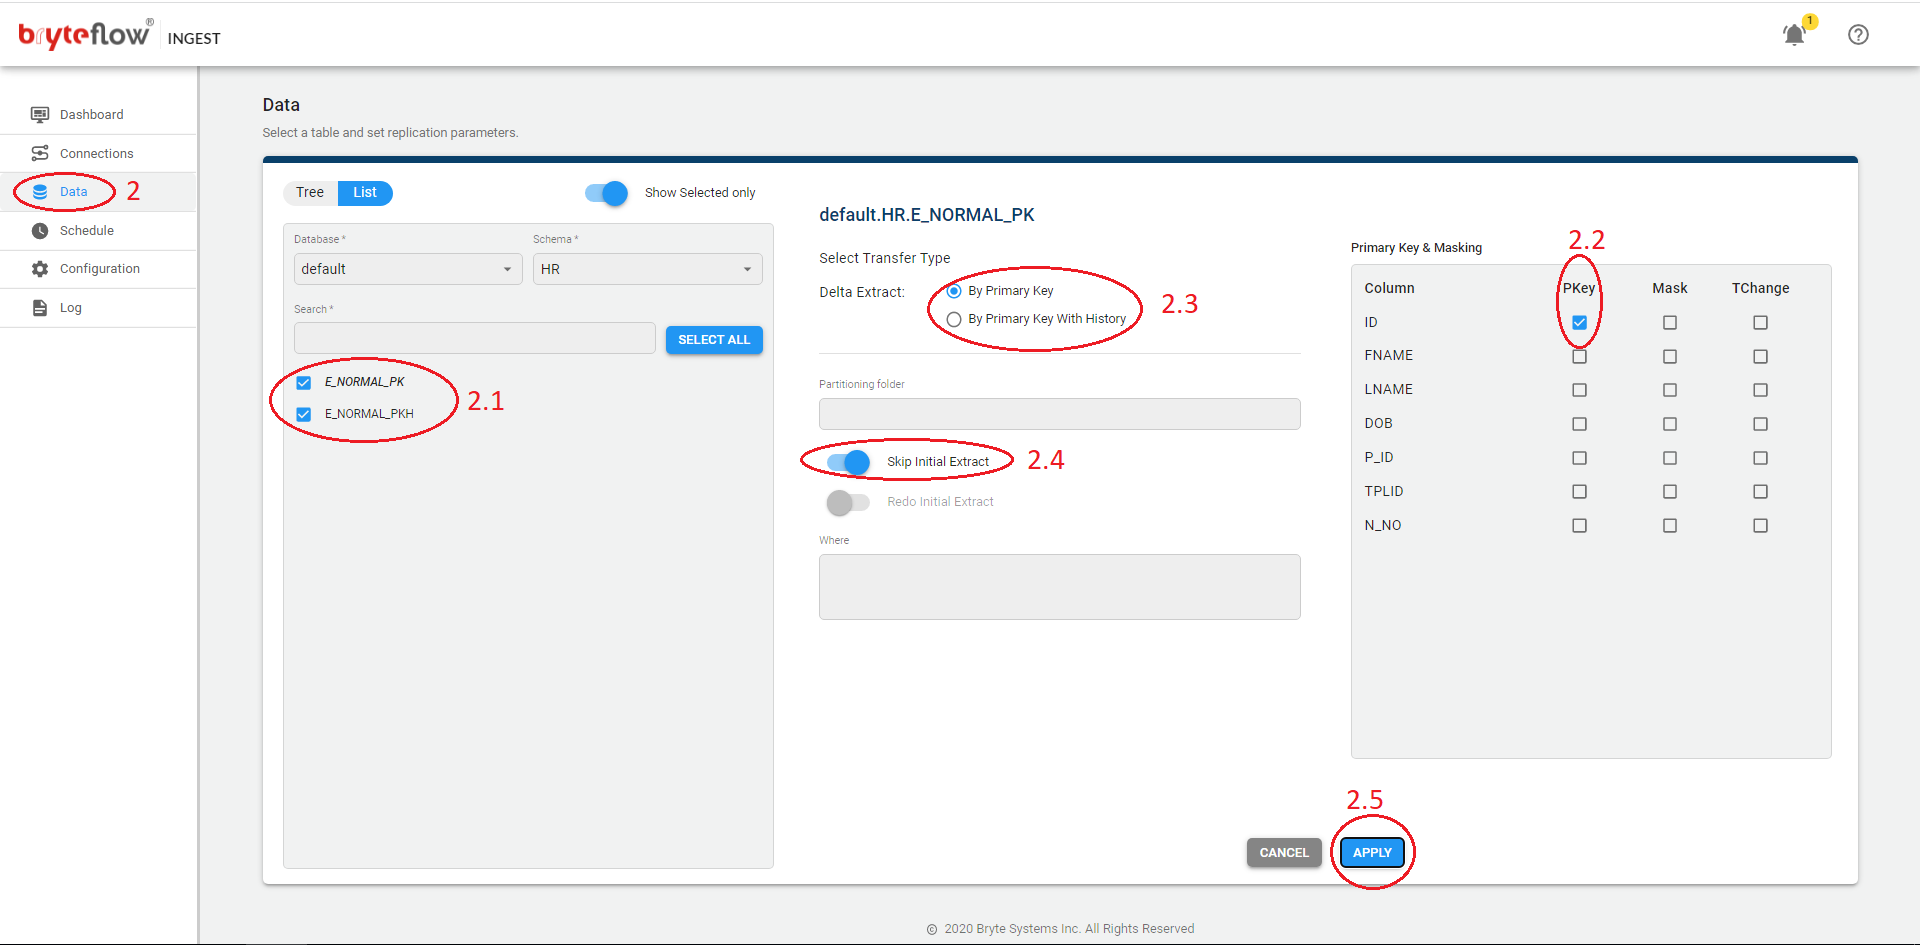
- From the Data tab:
- Select the table(s) where you want to perform deltas without an Initial Sync of the data.
- Ensure Primary key (PK) column(s) are applied
- Select Delta extract (PK or PK Hist).
- Enable Skip Initial Extract toggle button
- Click Apply.
- Goto Schedule tab:
- Click Full Extract.
- Check logs and ensure the selected table(s) skipped full extract.
Add New tables into Existing Pipeline
Steps to perform adding only new tables into existing pipelines.
- Turn off Ingest Schedule and wait for the load to complete.
- From the Data tab:
- Select new tables (one or more) as per requirement.
- Ensure Primary key (PK) column(s) are applied
- Select Delta extract (PK or PK Hist).
- Click Apply.
- Go to Schedule tab:
- Click Sync New Tables.
- Check logs and ensure that existing tables were ignored and new table(s) started to sync.
Synchronize Schema changes using Sync Struct
Steps to perform Sync Struct for existing tables when source structure changes.
- Turn off Ingest Schedule and wait for the load to complete.
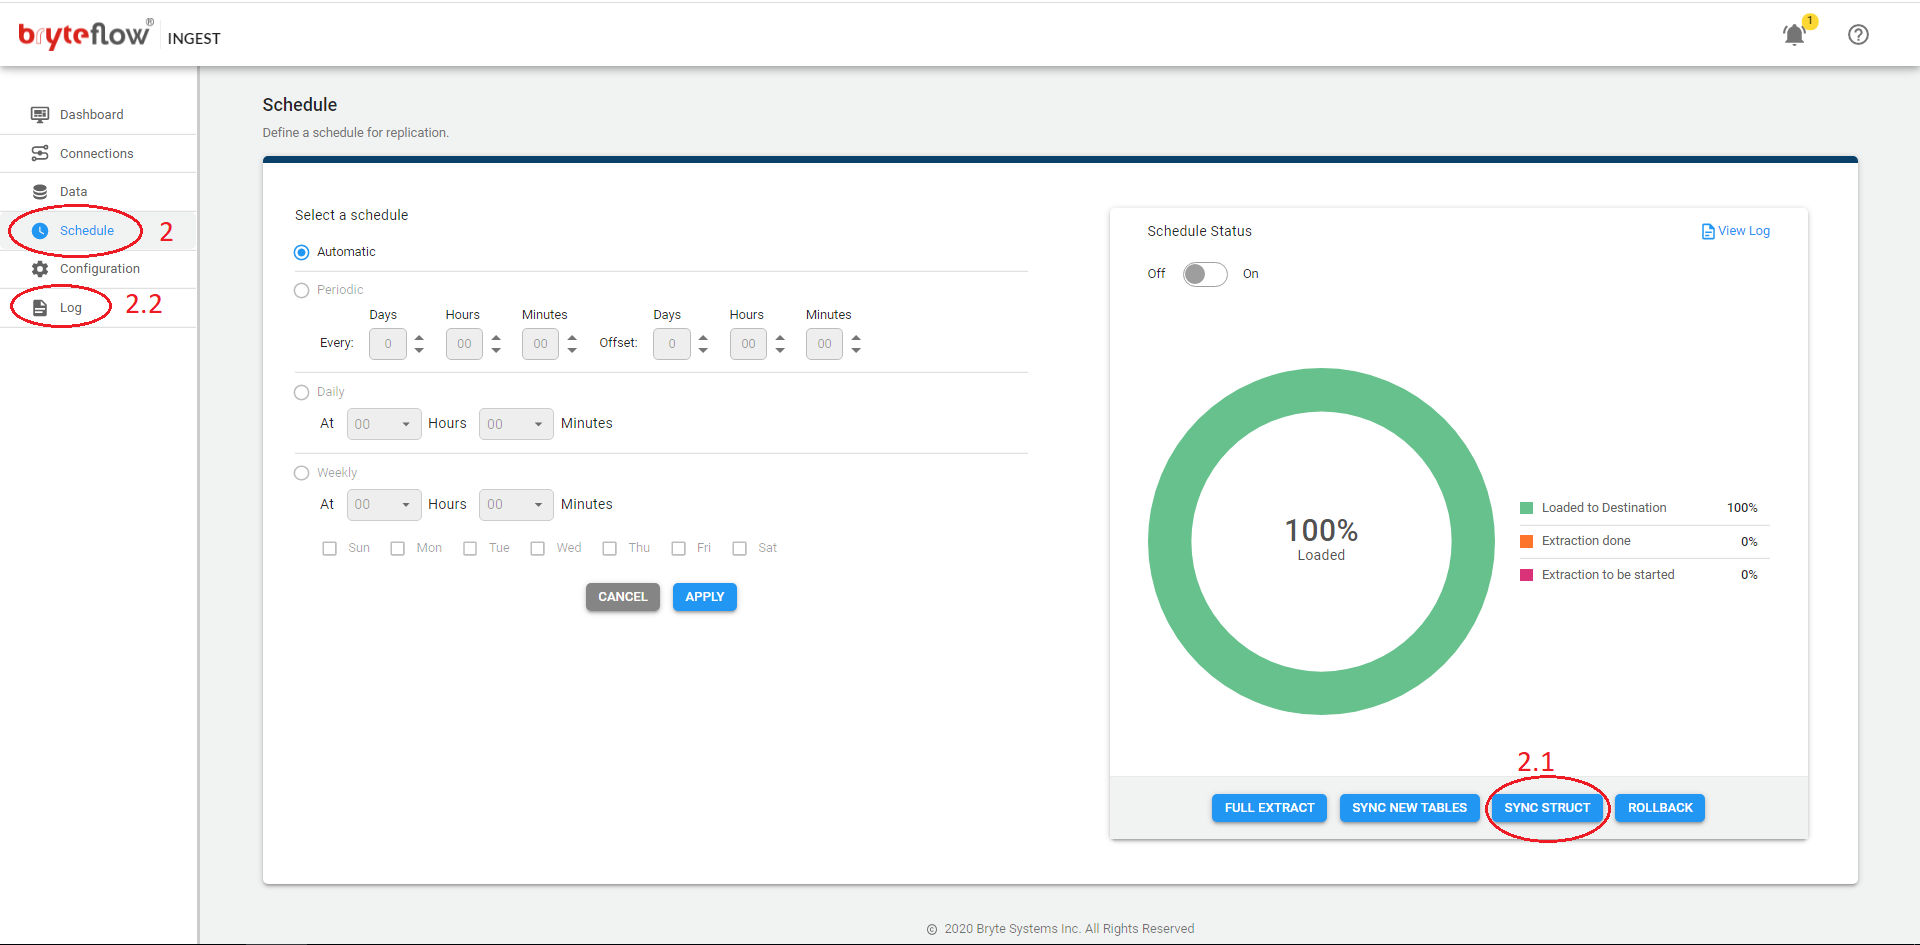
- Go to Schedule tab:
- Click Sync Struct.
- Check logs, Ingest will compare the structures and synchronize structures that are different.
How to stop BryteFlow Ingest
Steps to perform on how to stop Ingest.
- Turn off Ingest Schedule and wait for the load to complete.
- Open Window services and stop the BryteFlow Windows service.
- If BryteFlow Windows service have stopped successfully but the Ingest page is still loading then you might need to kill the non responding processes.
- To terminate the non responding Ingest process, perform below steps.
- Open command prompt as Administrator.
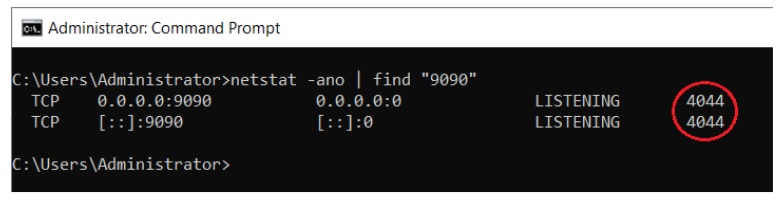
- Execute the command – netstat -ano | find “8081”
- Replace 8081 with the port number on which Ingest is running.
- In the example below, Ingest is running on port 9090. The process id of ingest is 4044 as highlighted in the snapshot.
- Open Windows Task Manager, under the Details tab, find the process with PID 4044.
- Right click on the process and click the End task.
- This will kill the runaway Ingest Java process.
Prerequisites for Oracle source
BryteFlow setup guide details on how to enable supplemental logging for source table(s) for Delta replication. Please refer to the setup guide.
https://docs.bryteflow.com/bryteflow-setup-guide#prerequisite-for-oracle-source
Important note:
- If Database supplemental logging is enabled then only inserts and deletes will come through and updates will be missed.
- If Table level supplemental logging is enabled only updates come through and inserts and deletes will be missed.
Hence, both Database and Table level supplemental loggings are required.
Create New Pipeline
Steps to create an additional Ingest pipeline.
- Unzip the provided zip file to a folder. Preferably something like c:\bryteflow\pipeline2\
- Edit the ingest.xml file in the c:\bryteflow\pipeline2\ folder.
- Change the <id>Bryteflow-Ingest</id> and <name>BryteFlow Ingest</name> xml tags with new pipeline reference names.
- Check if port 8081 is free and not used by any other processes.
- Open a command prompt as Administrator, and navigate to the new pipeline folder and execute Install-service.bat. Close the command prompt.
- Open the Windows services console and start the newly created service.
- Launch the pipeline on localhost:8081
- Its recommended to change the port from the ‘Configuration’->’Source Database’-> ‘Web Port’ to any other preferred web port, in order to use 8081 from creating new pipelines.
- Restrat the windows service and launch the BryteFlow appliccation on the new web port for eg: localhost:8082
- Make sure to avail a valid license key in order to get started.
Latency calculation
Latency is calculated based on time from the record is committed to source till the record is available on the destination.
S3 Delta File format
S3 Delta files contains the incremental data for a particular run from the source database.
The file has 2 types of fields:
- Constant fields : These are present in all files by default and are meant to provide additional details about the record in file.
- Variable fields : These varies for each file and aligns with the table structure. The columns on between ‘op_’ and ‘seq_no’ are the table columns as per the table definition at the source.
Different Constant fields and their description:
- op_ – This field determines the type of operation for each record in the file. There are different values for this field. Each operation code value is described below
-
- A – The record is extracted as part of FULL INITIAL Load.
- I – The record is an incremental record and the operation is INSERT.
- D – The record is an incremental record and the operation is DELETE.
- i – The record is an incremental record and the operation is UPDATE. The values for this record are the latest updated as of the source.
- d – The record is an incremental record and the operation is UPDATE. The values for this record are the previous value(prior to update).
-
2. seq_no – This field determines the order of each record. The value is a sequence NUMBER and is incremented by 1 for each record within a file. For incremental files, the value determines the order of DML operations performed on the source.
3. eff_dt – The column is present in the files for which the table Delta replication is set to ‘Primary Key with History‘ . This determines the commit time for the record on the source. Each record will have its commit time as ‘EFF_DT’ in the delta files.
Manifest file for S3 EMR Destination
BryteFlow Ingest delivers data to the S3 data lake from relational databases like SAP, Oracle, SQL Server, Postgres, and MySQL in real-time or changed data in batches (as per configuration) using log-based CDC.
The upsert on the S3 data lake is automated and requires no coding nor integration with any third-party applications.
It prepares a manifest file on AmazonS3 with the details of the files loaded onto the data bucket.
Location: [data directory path]/manifest/[table_name_{partitionname}].manifest
File Type: manifest
File format: JSON
File Details : File contains the list of S3 URL’s for all the data files created for each table respectively.
Sample entry for the manifest file:
{
“entries”: [
{“url”:”s3://samplebucket/data/SAMPLETABLE_A/20230615130423/part-r-00000.snappy.parquet”, “meta”: { “content_length”: 26267},”mandatory”:true}
]
}
Struct file for S3 EMR destination
BryteFlow Ingest delivers data to the S3 data lake from relational databases like SAP, Oracle, SQL Server, Postgres, and MySQL in real-time or changed data in batches (as per configuration) using log-based CDC.
The upsert on the S3 data lake is automated and requires no coding nor integration with any third-party application.
It prepares a .struct file on AmazonS3 with the details of the table structure of the loaded tables.
Location: [data directory path]/manifest/[table_name_{partitionname}].struct
File Type: .struct
File format: JSON
File Details : File contains the structure of the table with column list and its data types.
- manifest : Path and name of manifest file
- srcTable : Table name of the source database
- dstFile : Filename created at destination
- dstCleanFile : Filename created at destination
- outputFormat: Format of the data file created
- structure : List of columns and its datatypes in order of the file created.
Sample entry for the STRUCT file:
{
“manifest”: “s3://samplebucket/data/manifest/SAMPLETABLE_A.manifest”,
“srcTable”: “default:SAMPLETABLE_A”,
“dstFile”: “SAMPLETABLE_A”,
“dstCleanFile”: “SAMPLETABLE_A”,
“outputFormat”: “parquet.snappy”,
“structure”: [
{
“name”: “COLUMN1”,
“type”: “VARCHAR”
},
{
“name”: “COLUMN2”,
“type”: “INTEGER”
},
{
“name”: “COLUMN3”,
“type”: “VARCHAR”
},
{
“name”: “COLUMN4”,
“type”: “INTEGER”
}
]
}
Enable Windows Authentication for SQL Server DB
Steps for enabling Windows authentication in BryteFlow Ingest:
1. Stop the BryteFlow Ingest service.
2. Download and Copy the sqljdbc_auth.dll to the bin directory of your java. You can download the DLL from “https://bryteflow.com/
3. Start Ingest service and add the following to the JDBC option in the Source database connection settings :
integratedSecurity=true
How to setup BryteFlow pipeline for Rollover
BryteFlow Ingest can be setup to Rollover in a parallel pipeline.
Below are the steps to rollover, Please note this can be implemented using REST API calls of BryteFlow Ingest, details below: