Overview
BryteFlow uses a micro services architecture where each source and target data replication pipeline is independent and can be decoupled. The source and destination pair can run on premises or on the cloud or on another server as per the requirements. This prevents a single point of failure, and allows concurrency and independent scaling. One large source does not affect the performance of the other sources. Each Ingest instance comes along with the companion software modules – XL Ingest, TruData and Blend. These borrow the configuration from the Ingest instance. It is recommended that these are located with Ingest, but again, these could be decoupled for performance or security considerations. BryteFlow ControlRoom provides a consolidated interface across all the data pipelines.
Recommended Hardware configuration
The following describes the hardware configuration for a Windows server, assuming that there are a few sources and target combinations (3 medium ideally). It also depends on how intensively the data is being replicated from these sources, so this is a guide, but will need extra resources depending on the amount of data being replicated. The amount of disk space will also be dependent on the amount of data being replicated.
Processor: 4 core
Memory: 16GB
Disk requirements: Depend on the data being extracted, but a minimum of 300GB
Network performance: High
Prerequisites for software on the server
The following softwares are required to be installed on the server:
- The server should have 64-bit Open jdk 1.8
https://corretto.aws/downloads/latest/amazon-corretto-8-x64-windows-jre.msi
- Google Chrome
- For Oracle database as a destination ONLY:
- Please install Oracle client corresponding to the version of Oracle at destination database.
- For SQL Server sources and SQL Server destinations ONLY: Install bcp – Microsoft Utility and below drivers:
- VC++ 2017 64 bit
https://support.microsoft.com/en-in/help/2977003/the-latest- supported-visual-c-downloads - ODBC drivers 18 64 bit
https://www.microsoft.com/en-us/download/details.aspx?id= 56567 - SQL CMD version 15 64 bit
https://docs.microsoft.com/en-us/sql/tools/sqlcmd-utility? view=sql-server-ver15
Setup BryteFlow Suite
Setting up BryteFlow suite of products on an On premises windows server can be done in few easy steps. Please ensure there is connectivity to the sources and targets from this server.
- Download the software from the link provided on the server where the software needs to be installed.
- Unzip it to the installation directory of your choice .
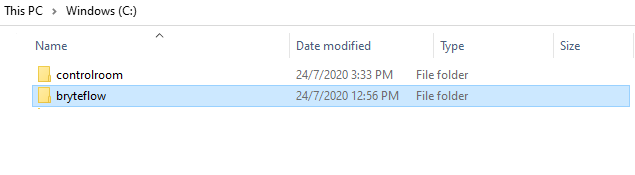
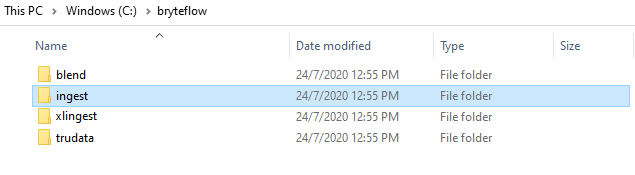
- This will have entire BryteFlow suite under the main directory named ‘bryteflow’.
- If you are planning to setup more than one BryteFlow instances, its good to rename the main install directory ‘bryteflow’ to ‘bryteflow-<source1>’ to avoid any conflict.
Setup BryteFlow Ingest
Setting up BryteFlow Ingest in few easy steps:
- Once the software is downloaded and unzipped.
- Go to ‘ingest’ directory under the main directory ‘bryteflow’.
- In order to install the service open windows command prompt with ‘Run as Administrator’
- Change the directory to ‘ingest’
- Execute “Install-BryteFlow Ingest Service.bat”
- ‘BryteFlow Ingest’ service is now installed on the server.
- Go to Windows ‘services’ and start the service for Ingest.
- Launch the user interface from google chrome browser with the URL: localhost:8081
- Proceed to complete Ingest setup by configuring the Source db and Destination db.
- Make sure you have a valid license before starting the replication. For more details on how to get the license key refer this section.
Installing BryteFlow Ingest on LINUX
Please follow below steps for installation on LINUX platform.
- Download Bryteflow Ingest from the provided download link and unzip it into directory.
- Install from Amazon Corretto Java 1.8 from https://docs.aws.amazon.com/corretto/latest/corretto-8-ug/downloads-list.html. Please follow the steps as per your Linux flavor.
- You will need to add the java path in system variable
- You can start Bryteflow Ingest by executing ingest.sh file or running command java -jar ingest.jar, alternatively you can create a system service to start and stop ingest.
- Launch BryteFlow Ingest application on browser using URL: localhost:8081
Creating new pipeline in BryteFlow Ingest
Creating new pipeline in BryteFlow Ingest:
- Once the software is downloaded and unzipped.
- Go to ‘ingest’ directory under the main directory ‘bryteflow’.
- In order to install the service open windows command prompt with ‘Run as Administrator’
- Change the directory to ‘ingest’
- Execute “Install-BryteFlow Ingest Service.bat”
- ‘BryteFlow Ingest’ service is now installed on the server.
- Go to Windows ‘services’ and start the service for Ingest.
- Launch the user interface from google chrome browser with the URL: localhost:8081
- It will prompt to use existing instance or create a new instance. Click on ‘New Instance’
- Go to the ‘Configuration’ tab
- Update the ‘Web Port’ value to the desired port no., apply and save the changes. For eg: 8082
- Stop the ‘BryteFlow Ingest’ service from windows service manager.
- Go to Ingest installation directory in file explorer. For eg. C:\ingest\
- Edit ingest.xml to update the ‘id, name and description’ to the name of the pipeline.
- Save the file. Start the new service from Windows service manager.
- Launch the application on Google Chrome browser on the new port. For eg. localhost:8082
- Proceed to setup the source and destination connection details for the new pipeline.
- Make sure you have a valid license before starting the replication. For more details on how to get the license key refer this section.
Prerequisites for Source Databases
In order to capture the database changes the software needs access to database logs. To make these available there are certain permissions required for each databases. Depending on the source database please perform the prerequisite steps. For change data capture via timestamps or if only full extracts are required, BryteFlow will support any database that can connect via a jdbc connection string, and these prerequisites are not required.
MS SQL Server source
SQL Server prerequisites depend on the replication option chosen, Change Tracking or Change Data Capture. Prerequisites for each option are described in detail below.
Prerequisites for SQL Server Change Tracking
This section applies to MS SQL Server, the version should be higher than 2008.
- To enable Change Tracking at the database level execute the following query:
ALTER DATABASE databasename
SET CHANGE_TRACKING = ON
(CHANGE_RETENTION = 7 DAYS, AUTO_CLEANUP = ON)
- Enable Change Tracking at the table level as below execute the following query:
ALTER TABLE tablename
ENABLE CHANGE_TRACKING
WITH (TRACK_COLUMNS_UPDATED = ON)
- Enable Change Tracking at the database and table level for all the databases and tables to be replicated.
- To enable view permission to event viewer logs execute the following query:
3. Grants and Permission
- GRANT VIEW SERVER STATE TO “AccountName”
- The BryteFlow Ingest database replication login user should have VIEW CHANGE TRACKING permission to view the Change Tracking information.
GRANT VIEW CHANGE TRACKING ON schema.tablename TO BryteFlow user;
*** Please Note: If you are configuring BryteFlow Ingest for a completely new SQL Server database, Please make sure to perform at least ‘One Transaction’ on the database to generate the log sequence number for BryteFlow to start with.
Prerequisites for SQL Server Change Data Capture
This section applies to MS SQL Server, the version should be higher than 2008.
- To enable Change Data Capture at the database level execute the following query:
Use <databasename>;
EXEC sys.sp_cdc_enable_db;
- Enable Change Data Capture at the table level as below execute the following query:
USE <databasename>
GO
EXEC sys.sp_cdc_enable_table
@source_schema = ‘<schema_name>’,
@source_name = ‘<table_name>’,
@role_name = null,
@supports_net_changes = 0;
- Enable Change Data Capture at the database and table level for all the databases and tables to be replicated.
-
Configure Retention of CDC data
-
By default, SQL Server CDC configure the data retention period of 3 days. In other words, CDC keeps all the data changes history for 3 days ONLY and the rest will be cleaned (deleted)
-
To modify the default retention run the below SQL
--Update minutes in the CDC jobUSE <databasename>GOEXECUTEsys.sp_cdc_change_job@job_type = N'cleanup',@retention = @New_retention_period_in_minutes;GO
-
3. Check if the SQL Server Agent has been started
Use Microsoft configuration Manager to turn on the SQL Server Agent.
The SQL Server Agent should be running.
Oracle as a source database connector
1. Prerequisites for an On-Premises Oracle Server
Supported Oracle versions – Oracle 9i and above.
Execute the following queries on Oracle Server to enable change tracking. For RDS Oracle refer to the user guide here.
- Oracle database should be in ARCHIVELOG mode.
- The supplemental logging has to be turned on at the database level. Supplemental logging is required so that additional details are logged in the archive logs.
To turn on supplemental logging at the database level, execute the following statements:ALTER DATABASE ADD SUPPLEMENTAL LOG DATA (ALL) COLUMNS;
- Alternatively to turn on minimal database supplemental logging execute the following statements:
ALTER DATABASE ADD SUPPLEMENTAL LOG DATA;
ALTER DATABASE FORCE LOGGING;
- In Oracle, ensure that supplemental logging is turned on at the table level. To turn on supplemental logging at the table level, execute the following statement:
ALTER TABLE <schema>.<tablename> ADD SUPPLEMENTAL LOG DATA (ALL) COLUMNS;
Prerequisites for a database on Amazon Oracle RDS
- In Oracle on Amazon RDS, the supplemental logging should be turned on at the database level.
- Supplemental logging is required so that additional details are logged in the archive logs.
To turn on supplemental logging at the database level, execute the following queries.exec rdsadmin.rdsadmin_util.alter_supplemental_logging('ADD','ALL');
- To retain archived redo logs on your DB instance, execute the following command (example 24 hours)
exec rdsadmin.rdsadmin_util.set_configuration('archivelog retention hours',24); - To turn on supplemental logging at the table level, execute the following statement
ALTER TABLE <schema>.<tablename> ADD SUPPLEMENTAL LOG DATA (ALL) COLUMNS;
Grants required for Oracle source connector
Grants and Permission required for Oracle database as a source connector
- SELECT access on all tables to be replicated
- SELECT access on V$ARCHIVED_LOG
- The following security permissions should be assigned to the user:
CREATE SESSION
SELECT access on V_$LOGMNR_CONTENTS
SELECT access on V_$LOGMNR_LOGS
SELECT access on ANY TRANSACTION
SELECT access on DBA_OBJECTS
EXECUTE access on DBMS_LOGMNR
- Run the following grant statements for <user> for the above requirements:
GRANT SELECT ON V_$ARCHIVED_LOG TO <user>; GRANT SELECT ON V_$LOGMNR_CONTENTS TO <user>; GRANT EXECUTE ON DBMS_LOGMNR TO <user>; GRANT SELECT ON V_$LOGMNR_LOGS TO <user>; GRANT SELECT ANY TRANSACTION TO <user>; GRANT SELECT ON DBA_OBJECTS TO <user>; GRANT
execute_catalog_roleTO <user>; GRANT LOGMINING to <user>; -- This is required for Oracle 12c and higher versions **For Oracle 10g only CREATE PUBLIC SYNONYM DBMS_LOGMNR FOR SYS.DBMS_LOGMNR;For Oracle 19c Continuous Logmining, Please provide additional grant as below:
GRANT SELECT ON V_$DATABASE TO <user>;
GRANT SELECT ON V_$Log TO <user>;
GRANT SELECT ON V_$Logfile TO <user>;
Verification of Oracle source
To verify if Oracle is setup correctly for change detection execute the following queries.
| Condition to be checked | SQL to be executed | Result expected |
|---|---|---|
| Is ArchiveLog mode enabled? |
SELECT log_mode FROM V$DATABASE; |
ARCHIVELOG |
| Is Supplemental logging turned on at database level? |
SELECT supplemental_log_data_min FROM V$DATABASE; |
YES |
| Is Supplemental Logging turned on at table level? |
SELECT log_group_name,
       table_name,
       always,
       log_group_type
  FROM dba_log_groups;
|
RESULT <log group name>, <table name>, ALWAYS, ALL COLUMN LOGGING |
Prerequisites for On-premises MySQL source
To prepare MySQL for change tracking perform the following steps.
- Enable Change Tracking
To enable binary logging, the following parameters need to be configured as below in my.ini file on MySQL on Windows or in my.cnf file on MySQL on UNIX:
| Parameter | Value |
|---|---|
| server_id | Any value from 1. E.g. server_id = 1 |
| log_bin=<path> | Path to the binary log file. E.g. log_bin = D:\MySQLLogs\BinLog |
| binlog_format | binlog_format=row |
| expire_logs_days | To avoid disk space issues it is strongly recommended not to use the default value (0). E.g. expire_log_days = 4 |
| binlog_checksum | This parameter can be set to binlog_checksum=none. BryteFlow does support CRC32 as well |
| binlog_row_image | binlog_row_image=full |
Prerequisites for MySQL on Amazon RDS as a source
Enabling Change tracking on MySQL on Amazon RDS
To enable change tracking MySQL on Amazon RDS perform the following steps.
- In the AWS management console, for MySQL on Amazon RDS create a new DB parameter group and the following parameters should be configured as shown.
- The MySQL RDS DB instance should use the newly created DB parameter group for binary logging to be enabled.
binlog_format: binlog_format=row
binlog_checksum : binlog_checksum=none OR CRC32.
Grants required for MySQL source
The Ingest user id must have the following privileges:
- Replication client, and Replication Slave.
- Select privileges on the source tables designated for replication.
- Execute the following queries to grant permissions to a MySQL user.
CREATE USER 'bflow_ingest_user' IDENTIFIED BY '*****';
GRANT SELECT, REPLICATION CLIENT, SHOW DATABASES ON *.* TO bflow_ingest_user;
GRANT SELECT, REPLICATION slave, SHOW DATABASES ON *.* TO bflow_ingest_user;

P.S. If the source DB type is Amazon RDS MySQL DB, please download 'mysqlbinlog.exe' and add its directory path in Windows 'Environment variable' 'PATH' on the Client machine(BryteFlow Server)
Prerequisites for Maria DB on Amazon RDS
To enable change tracking on MariaDB on Amazon RDS perform the following steps :
- In the AWS management console, for MariaDB on Amazon RDS create a new DB parameter group and the following parameters should be configured as shown.
- The MariaDB RDS DB instance should use the newly created DB parameter group for binary logging to be enabled.
binlog_format: binlog_format=row
binlog_checksum : binlog_checksum=none OR CRC32.
3. Please have an User account for BryteFlow that has the following privileges:
REPLICATION CLIENT
REPLICATION SLAVE
SUPER – (Required only in MySQL versions before 5.6.6)
The user must also have SELECT privileges for the source tables selected for replication.
Prerequisites for PostgreSQL source
- Use a PostgreSQL database that is version 9.4.x or later
- The IP address of the BryteFlow machine must be added to the pg_hba.conf
configuration file with the “replication” keyword in the database field.
Example:
host replication all 189.452.1.212/24 md5 - Set the following parameters and values in the postgresql.conf configuration file as below.
- Set wal_level = logical
- Set max_replication_slots to a value greater than 1.The max_replication_slots value should be set according to the number of tasks that you want to run. For example, to run four tasks you need to set a minimum of four slots. Slots open automatically as soon as a task starts and remain open even when the task is no longer running. You need to manually delete open slots.
- Set max_wal_senders to a value greater than 1.The max_wal_senders parameter sets the number of concurrent tasks that can run.
- Set wal_sender_timeout =0
- The wal_sender_timeout parameter terminates replication connections that are inactive longer than the specified number of milliseconds. Although the default is 60 seconds, we recommend that you set this parameter to zero, which disables the timeout mechanism.
Note:- After changing these parameters, a restart is needed for PostgreSQL
- Create a logical replication slot for the database you want to sync by running the following command:
-
SELECT pg_create_logical_replication_slot(‘bflow_replication_slot’, ‘test_decoding’);
2. Grant Replication role to BryteFlow User
3. Grant ‘Read-only’ access for all the replicating tables to BryteFlow user.
Preparing Salesforce account for BryteFlow Ingest
On Salesforce Change Data Capture is turned on by default, please do not turn it off.
You would need to generate a security token to be used with Bryteflow Ingest.
A security token is a case-sensitive alphanumeric key that appended to your Salesforce password.
eg. Your Salesforce password to be used with Ingest will be “<your Salesforce password ><security_token>”
A token can be generated by following these steps:
1. Log in to your salesforce account and go to My Setting > Personal > Reset my security token.
2. Click on Reset Security Token button. The token will be emailed to the email account associated with your salesforce account.
For getting all the required permissions for data replication please refer to the Salesforce Documentation.
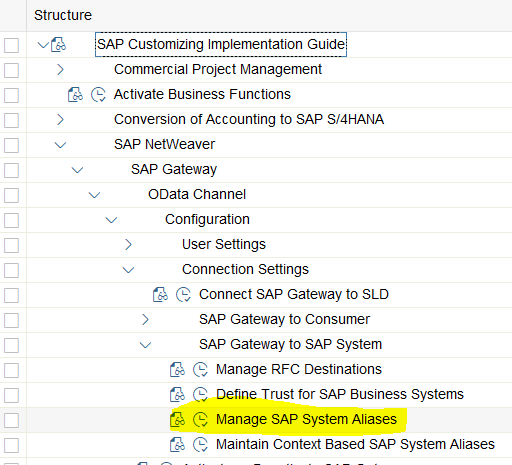
Prerequisites for SAP Odata based extraction for S/4HANA System
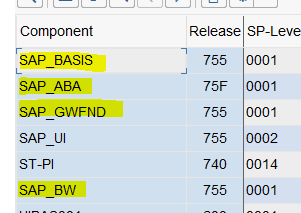
SAP S/4HANA System:
For ODP Based Extraction or CDS view Based Extraction below components are needed:
- SAP NetWeaver Version: 7.5 Support Pack Level 4 & Above
- SAP Gateway Component (SAP_GWFND) should be installed
- System Alias has to be defined, if this is not defined at a minimum LOCAL System alias is required
- SAP Gateway needs to be Activated
- Check for ODP Release check mark in transaction RSA6 for the required extractors
- OData Service / CDS views need to be built on an Extractor & registered for data extraction
- For extraction from the SAP HANA database layer, please refer to the prerequisites for SAP HANA database extraction below.
Prerequisites for SAP HANA database extraction
Pre-Requisites for SAP HANA (Change tracking) :
1.Create a user account for BryteFlow.
CREATE USER <USERNAME> PASSWORD <PASSWORD>;
2.BryteFlow replication user should have ‘select‘ access on the tables to be replicated.
BryteFlow replication user should have access to ‘create triggers’ to be replicated
Grant below privileges to BryteFlow user created above.
GRANT SELECT, TRIGGER ON SCHEMA <YOURSCHEMA> TO <USERNAME>;
3. BryteFlow replication user should have access to a schema where it can create a table on the source database.
This is used to store transactions for restart and recoverability
Grant below privileges to BryteFlow user created above.
GRANT CREATE ANY ON SCHEMA <YOURSCHEMA> TO <USERNAME>;
4. Provide ABAP_READ role to the BryteFlow replication user to provide access to the application layer objects
Prerequisites for SAP Odata based extraction for ECC 6.0 System
SAP ECC 6.0 System:
For ODP Based Extraction or CDS view Based Extraction below components are needed for ECC6.0:
- SAP NetWeaver Version: 7.5 Support Pack Level 4 & Above
- SAP Gateway Component (SAP_GWFND) should be installed
- System Alias has to be Defined, if not define it at least LOCAL System alias is needed.
- SAP Gateway needs to be Activated.
- Check for ODP Release check mark in transaction RSA6 for the required extractors
- OData Service / CDS views need to be built on an Extractor & registered for data extraction.
Prerequisites for SAP Odata based extraction for SAP BW System
For ODP Based Extraction on SAP BW System, below components are needed:
- SAP Netweaver Version: 7.5 Support Pack Level 4 & Above
- SAP Gateway Component (SAP_GWFND) should be installed
- SAP BW Version: 7.5 SP4 & Above
- System Alias has to be Defined, if not define atleast LOCAL System alias is needed.
- SAP Gateway needs to be Activated.
- BW extractor needs to be created for the info providers & release the extractor for ODP by using program “BS_ANLY_DS_RELEASE_OD“
- OData Service needed to build on Extractor & registered for data Extraction.
Verification steps for SAP Odata based extraction
- Check the SAP component versions in system status as mentioned below:
2. In transaction SPRO check System Alias. At a minimum, the LOCAL System alias is required.

3. Check that SAP Gateway is activated.
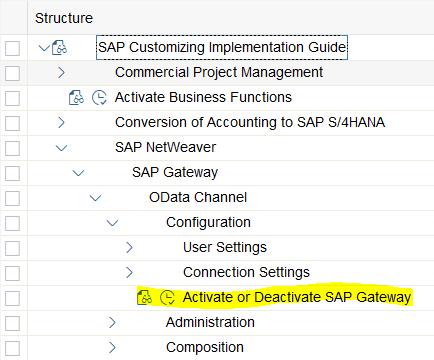
4. Check for ODP Release check mark for ODP extractors in transaction RSA6.

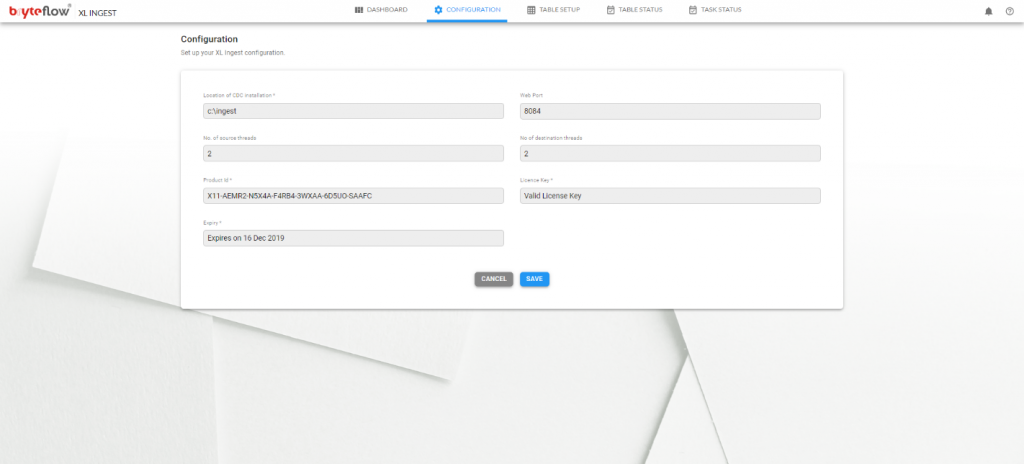
Setup BryteFlow XL Ingest
BryteFlow XL Ingest is a companion software to BryteFlow Ingest. It does the initial loads for huge volume tables.
The setup is easy as it reads through the Ingest config for source and destination databases.
Follow below steps to do the install:
- Once BryteFlow Ingest is setup and running.
- Go to the main directory ‘bryteflow’->’xlingest’
- In order to install the service open windows command prompt with ‘Run as Administrator’
- Change the path to ‘xlingest’ directory
- Execute “Install-BryteFlow XL Ingest Service.bat”
- ‘BryteFlow XL Ingest’ service is now installed on the server.
- Go to Windows ‘services’ and start the service for Ingest.
- Launch the user interface from google chrome browser with the URL: localhost:8084
- Make sure you have a valid license before starting the replication. For more details on how to get the license key refer this section.
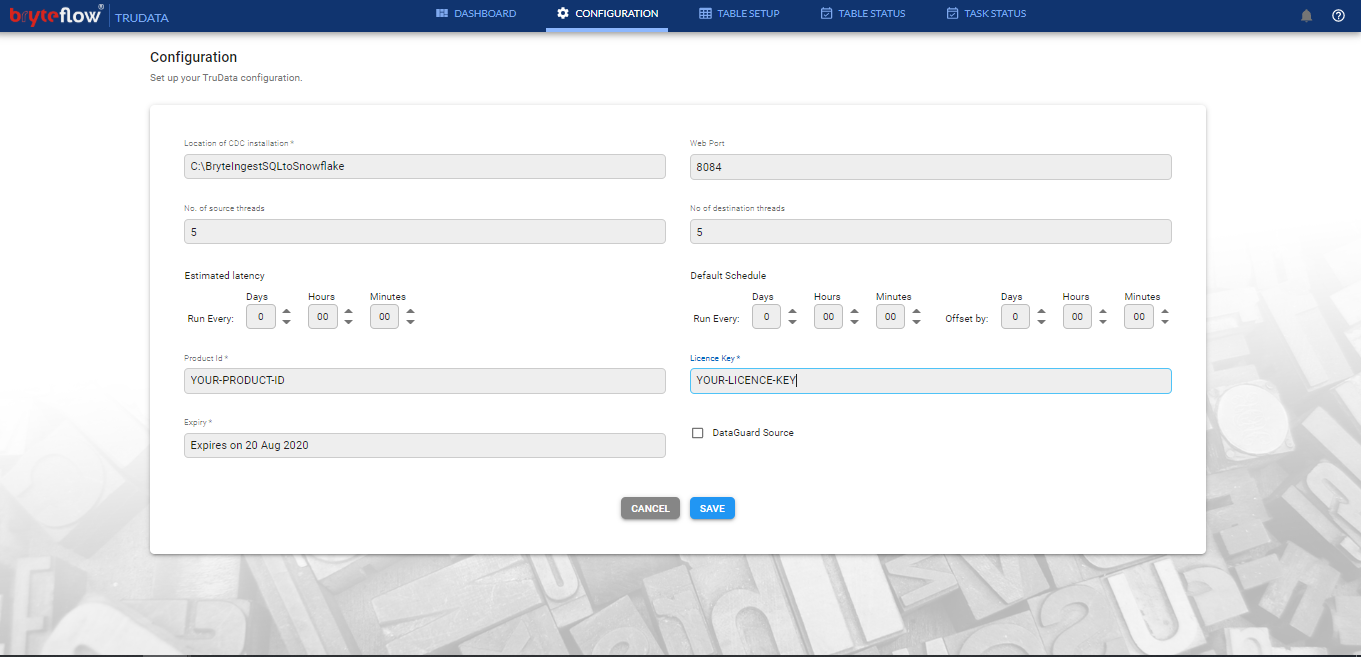
Setup BryteFlow Trudata
BryteFlow Trudata is a companion software to BryteFlow Ingest. It reconciles the source and destination tables in near real-time.
The setup is easy as it reads through the Ingest config for source and destination database details.
Follow below steps to do the install:
- Once BryteFlow Ingest is setup and running.
- Go to the main directory ‘bryteflow’->’trudata’
- In order to install the service open windows command prompt with ‘Run as Administrator’
- Change the path to ‘trudata’ path
- Execute “Install-BryteFlow Trudata Service.bat”
- ‘BryteFlow Trudata’ service is now installed on the server.
- Go to Windows ‘services’ and start the service for Ingest.
- Launch the user interface from google chrome browser with the URL: localhost:8085
- Make sure you have a valid license before starting the replication. For more details on how to get the license key refer this section.
Setup BryteFlow Blend
BryteFlow Blend is a companion software to BryteFlow Ingest. Its used to perform data transformations of AWS S3.
The setup is easy as it reads through the Ingest config for AWS details.
Follow below steps to do the install:
- Once BryteFlow Ingest is setup and running.
- Go to the main directory ‘bryteflow’->’blend’
- In order to install the service open windows command prompt with ‘Run as Administrator’
- Change the path to ‘blend’ path
- Execute “Install-BryteFlow Blend Service.bat”
- ‘BryteFlow Blend’ service is now installed on the server.
- Go to Windows ‘services’ and start the service for Ingest.
- Launch the user interface from google chrome browser with the URL: localhost:8082
- Make sure you have a valid license before starting the replication. For more details on how to get the license key refer this section.
Applying License Key
BryteFlow Suite of products when setup in Non-AMI environment comes with a validity which is specific to each customers agreement. Make sure you get the valid license keys in order to begin with software usages. Each software comes with its own product id when setup individually.
NOTE: Licensing is not applicable when sourced from the AWS Marketplace.
Here is how to apply license keys for each:
Apply License Key in BryteFlow Ingest
To get a valid license go to Configuration tab, then to the License tab and email the “Product ID” to the BryteFlow support team – support@bryteflow.com

Apply License Key in BryteFlow XL Ingest
To get a valid license go to Configuration tab and email the “Product ID” to the BryteFlow support team – support@bryteflow.com
Apply License Key in BryteFlow TruData
To get a valid license go to Configuration tab and email the “Product ID” to the BryteFlow support team – support@bryteflow.com
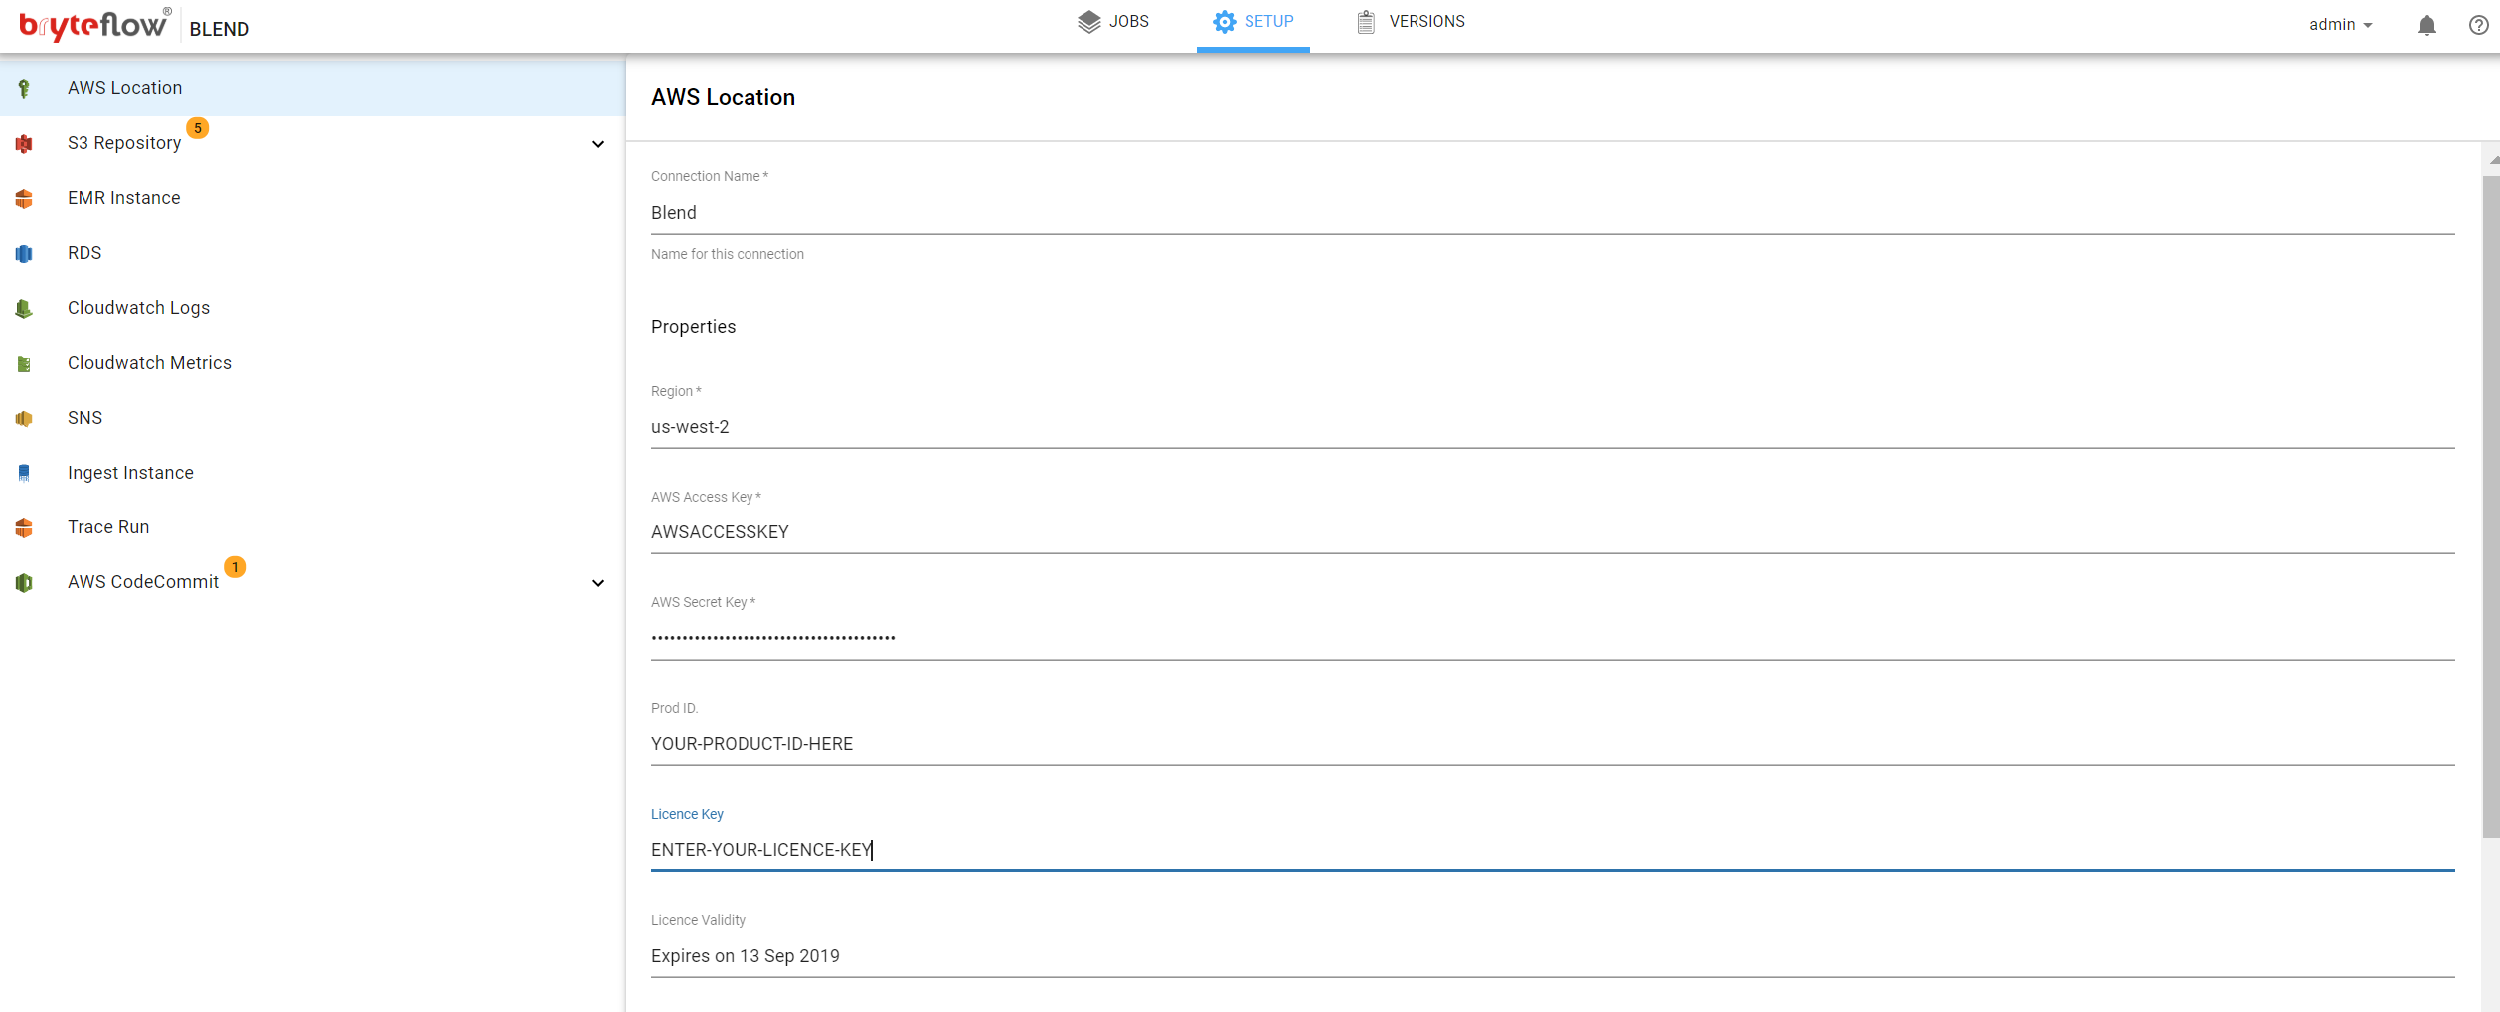
Apply License Key in BryteFlow Blend
To get a valid license go to ‘Setup‘ tab then select ‘AWS Location‘ in the left menu. Please email the “Product ID” to the BryteFlow support team – support@bryteflow.com
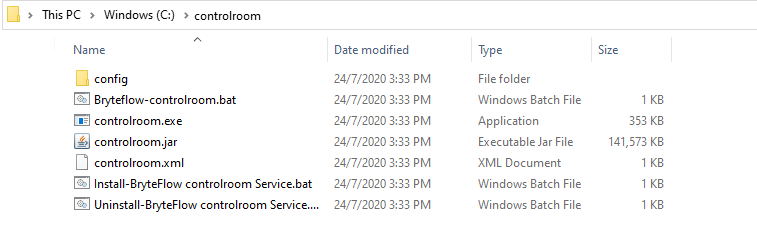
Setup BryteFlow Control Room
Setting up BryteFlow Control Room on an On premises windows server can be done in few easy steps.
- Download the software from the link provided on the server where the software needs to be installed.
- Unzip it to the installation directory, preferably at the same level of ‘bryteflow’
- In order to install the service open windows command prompt with ‘Run as Administrator’
- Change the directory to the path of ‘controlroom’
- Execute ‘Install-BryteFlow controlroom Service.bat’
- ‘BryteFlow Controlroom’ service is now installed on the server.
- Go to Windows ‘services’ and start the service for Ingest.
- Launch the user interface from google chrome browser with the URL: localhost:9091
- Make sure you have a valid license before starting the replication. For more details on how to get the license key refer to this section.