
About XL Ingest
BryteFlow XL Ingest is a companion software to BryteFlow Ingest. When large tables (>20GB) are included in Ingest, a conventional full extract may not be feasible. Due to the long period it requires, it is highly likely to encounter a problem. In case of a problem, the entire initial extract has to be rerun. In a way, Ingest XL becomes indispensable when large tables are involved.
Ingest XL helps transfer large tables across. It is constantly polling Ingest config and keeps itself updated on the Source and Destination. No additional setup is required for Ingest XL, apart from pointing it to the main Ingest instance.
Prerequisite
Although the setup is automatic, there are certain steps that need to be followed in order to get the large table across to the destination of choice.
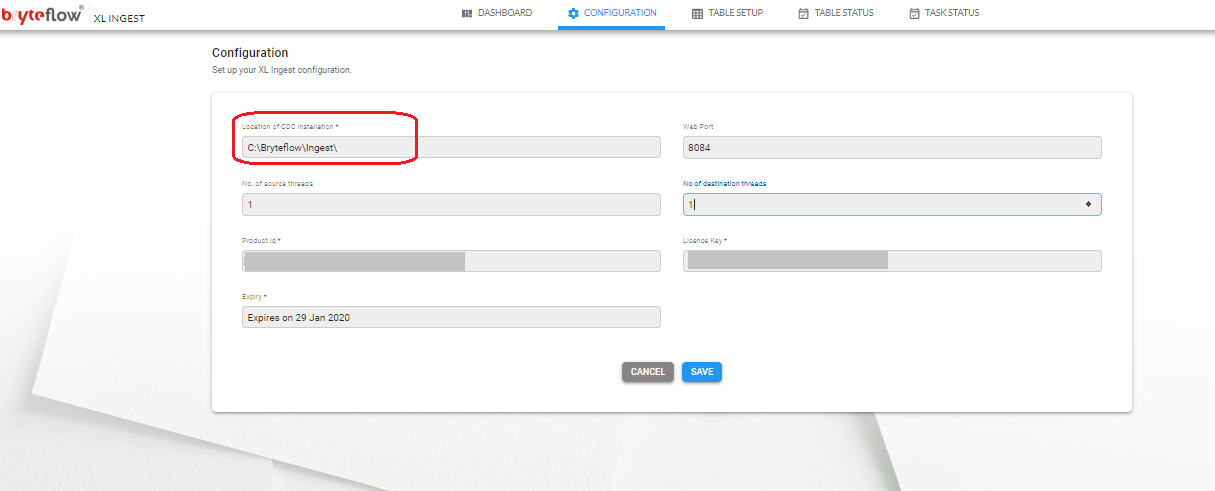
- Configure path for BryteFlow Ingest in Ingest XL
Steps to be performed in BryteFlow Ingest, prior to triggering a job in Ingest XL.
- A large table is included in BryteFlow Ingest. Select the table in ‘Data’ tab
- Define pkey and partitions, if any.
- Turn Ingest ‘Schedule’ to OFF. This is required so that all tables are as off same time in the destination.
- A ‘Skip Initial Extract’ is executed. This lets Ingest directly proceed to delta without waiting for an initial extract.
- Initiate ‘Sync Struct’ from the ‘Schedule’ tab. This creates empty tables in the destination.
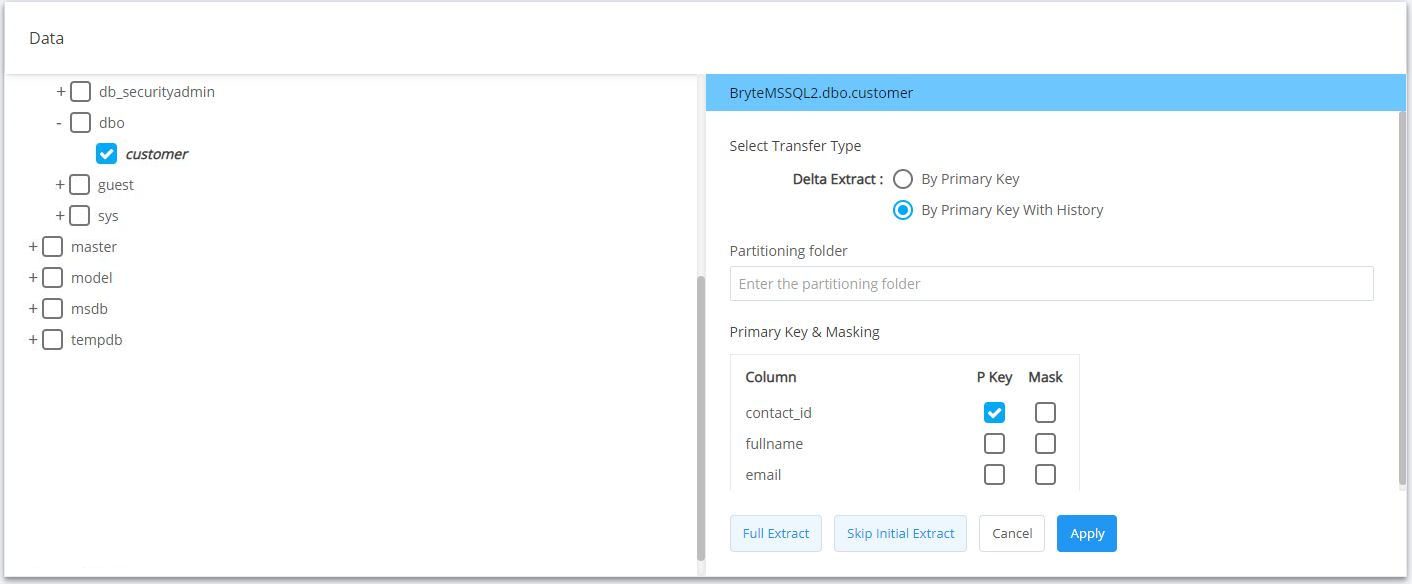
Fig: Showing ‘Skip Initial Extract’ in BryteFlow Ingest
The subsequent steps are executed on Ingest XL.
All tasks in Ingest XL are long running. Therefore, tasks are never directly executed but scheduled. Once run, the results are available.
Ingest XL allows the tasks to be monitored and, if needed, cancelled before they start running. The steps are as below:
- The table has to be split into a series of notional slices. These slices are based on the value of a single slice column
- For a large table, Ingest XL can automatically determine the slices based on a few parameters
- The first step is to schedule a count of the records in the table.
- Once a count is available, the auto-slice parameters are entered. The parameters specify the number of slices needed and the number of characters from the beginning of the values in the slice column. For example, for a slice column containing names, you can select the first 3 characters to demarcate the slices.
- For a large table, the user can directly enter the slice values without using the auto-slice function
- For a partitioned table, the table count is not required. The auto-slice action, determines the list of partitions that will be created. Each partition is treated as a slice.
- For a smaller table, no slicing may be used. In that case, the entire table is treated as if it was a single slice.
- Once sliced, a Quick Compare is scheduled to compare the number of records in the source and destination. Slices that differ by 10% or more may be highlighted.
- Once the Quick Compare is complete, a Sync can be scheduled. The Sync transfers the data across
- Once all slices are synced or show negligible differences, the transfer of that table is complete.
Scheduling Large tables in Ingest XL
All tasks in Ingest XL are long running. Therefore, tasks are never directly executed but scheduled. Once run, the results are available.
Ingest XL allows the tasks to be monitored and, if needed, cancelled before they start running. The steps are as below:
- The table has to be split into a series of notional slices. These slices are based on the value of a single slice column
- For a large table, Ingest XL can automatically determine the slices based on a few parameters
- The first step is to schedule a count of the records in the table.
- Once a count is available, the auto-slice parameters are entered. The parameters specify the number of slices needed and the number of characters from the beginning of the values in the slice column. For example, for a slice column containing names, you can select the first 3 characters to demarcate the slices.
- For a large table, the user can directly enter the slice values without using the auto-slice function
- For a partitioned table, the table count is not required. The auto-slice action, determines the list of partitions that will be created. Each partition is treated as a slice.
- For a smaller table, no slicing may be used. In that case, the entire table is treated as if it was a single slice.
- Once sliced, a Quick Compare is scheduled to compare the number of records in the source and destination. Slices that differ by 10% or more may be highlighted.
- Once the Quick Compare is complete, a Sync can be scheduled. The Sync transfers the data across
- Once all slices are synced or show negligible differences, the transfer of that table is complete.
Config Options
This section refers to the config location of Ingest along with the licensing information.
When using AMI, both fields are not required.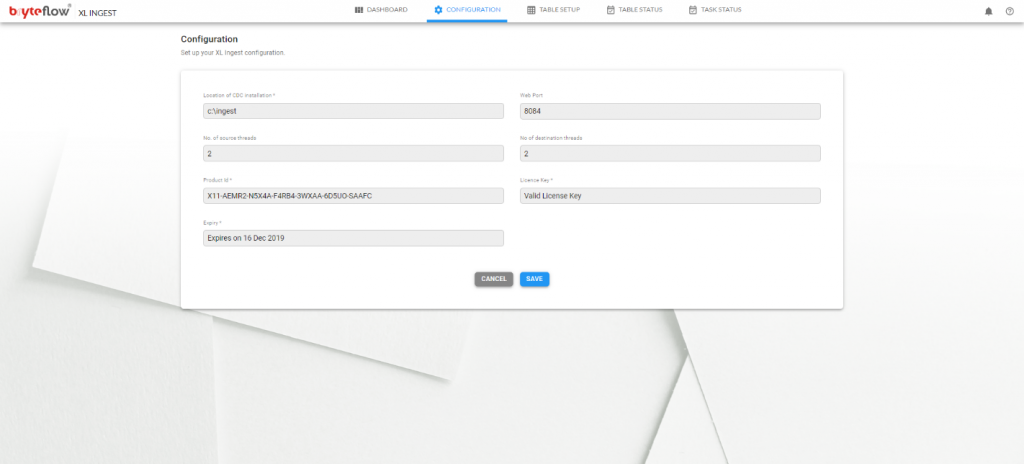
Table Settings
Configure the tables in this section, usually the list of tables on the left is directly populated from Ingest.
Additionally, a user may select one or more tables to be processed by Ingest XL by clicking on the checkbox.
For a selected table, selecting a slicing column is mandatory. Generally, the Primary key is used as a slicing column.
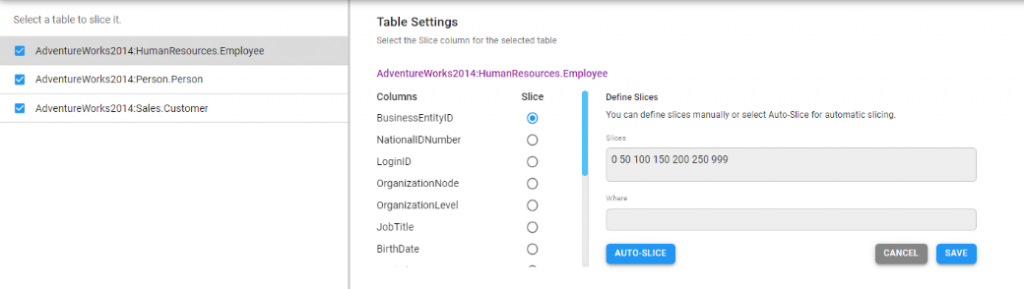
The Where field is rarely used except in SAP environments. The slices, if manually entered are likely to be one line. Any more than that and it is likely that users will use the Auto-slice function.
On clicking the Auto-slice button a dialog box is presented.
The user starts by selecting Schedule Count so that the number of records gets populated. This takes a while and the user may have to monitor the progress on the Task Status page. After entering the prefix size and slice count, Schedule Slice is selected. This also is a long process after which, the slices field will be populated in the background page in the slices field. This is likely to run into several lines.
The Schedule Slice button is disabled until the number of records is known. For partitioned tables, a Schedule Count is not required and the Schedule Slice button is enabled at all times.
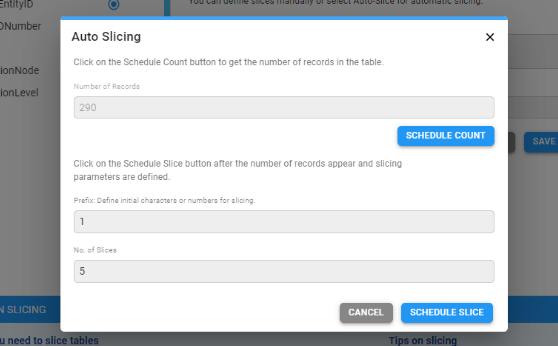
Table Status
Once tables have been selected, they appear on the Table Status page. A few other details about each table are also displayed. The bar graph on the right indicates the status of each table i.e. how much of the data has been transferred across.

Click on the table to show the Table Slicing Status
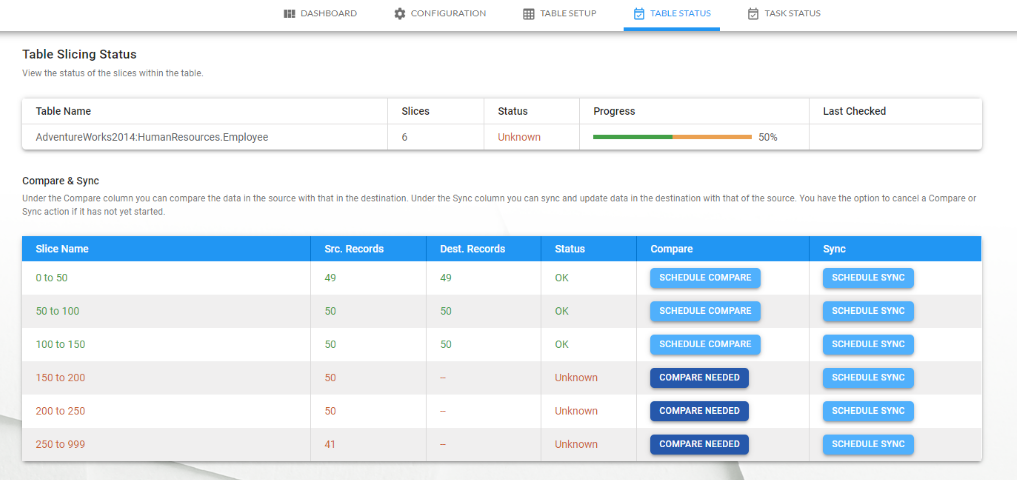
Table Slicing Status
The Table Slicing Status page lists all slices in a table. This could be a single slice if the table is not sliced or a list of partitions in case of a partitioned table. There are two buttons for each slice. One is to schedule a quick compare of the slice between the source and destination and another is to schedule transfer the data across. Both buttons have the following states and colour in the current design:
- Dark Blue indicating that the compare/transfer can be scheduled and is recommended. For compare, this is when the comparison details are not yet known and for sync, it is when the variation is more than 10%.
- Light Blue indicating that the compare/transfer can be scheduled but there is no compelling reason to.
- Once clicked, the tasks are scheduled. The button is red and the text indicates that the scheduled task can be canceled, if needed before they run.
- Grey indicating that the task is in progress and no action can be undertaken. Once the task is completed, it will switch to light blue.
Future versions may allow these actions to be done at the table level. The actions may be scheduled only for slices that need it.
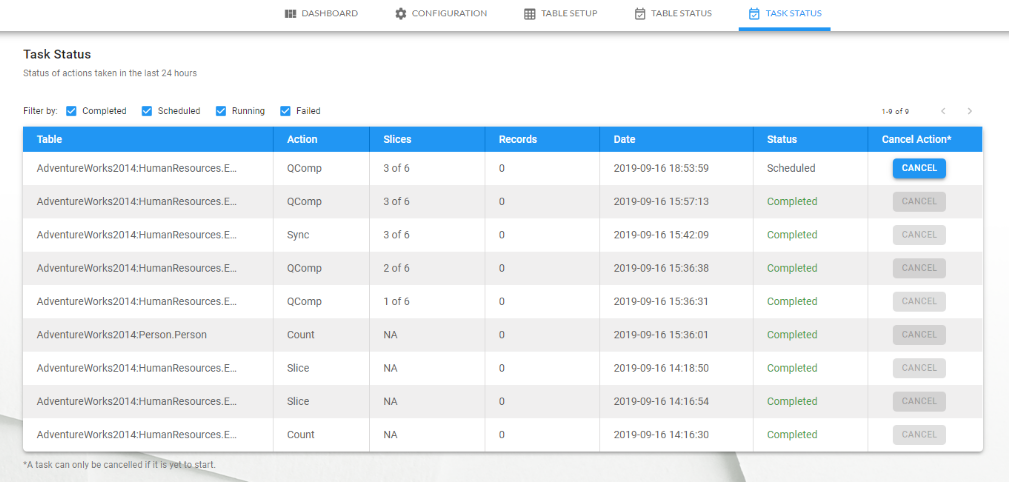
Task Status
This is where User gets to see the list of tasks in the last 24 hours.
Tasks have three statuses – Scheduled, Running, Completed and Failed.
There are checkboxes to filter based on the task status. There is pagination support, allowing users to navigate between pagefuls. The natural sort order is Scheduled, Running, Completed and Failed. Scheduled tasks will have a cancel button.
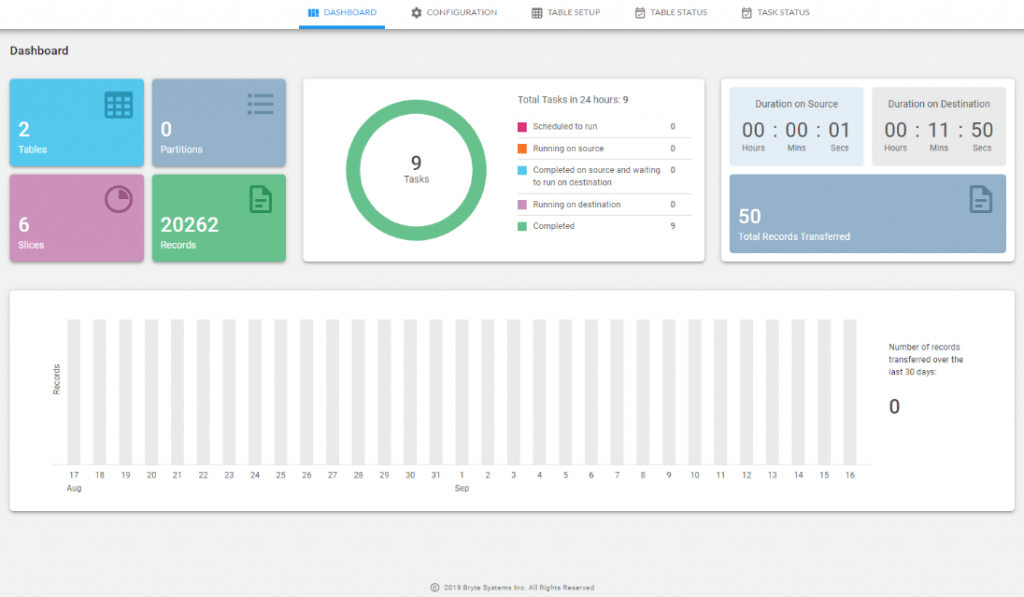
Dashboard
The dashboard gives an overview of the application.
The first panel provides information of the amount of data being looked after.
The second panel shows any work done over the last 24 hours. This includes the amount of time the application spent connected to the source and destination (Source and Dest. Duration).
A pie chart in the middle shows tasks in various states in the last 24 hours. The states are as follows:
- Scheduled to run
- Running on source
- Completed on the source and waiting to run on destination. A delay allowing data to flow from source to destination via Ingest may be added. This is in the order of several minutes and is configurable in the Options page.
- Running on destination
- Completed
A bar chart below shows the amount of data transferred over the last 30 days.
Appendix: Release Notes
Release details (by date descending, latest version first)
BryteFlow XL Ingest – v2.2
Release Notes BryteFlow XL Ingest – v2.2 Build 777
Released January 2020
New Features
- New UI of COMPARE ALL, SYNC ALL on Table Status Page
- Fix for destination counts of the table after Sync
- Oracle/MsSQL – Slicing can be done on TIMESTAMP, DATE, BIGINT columns.
- Support for Destination S3/EMR + Athena. Data is loaded on S3 only.
Bug Fixes
- Oracle tables with slash (/) in name is now handled.
BryteFlow XL Ingest 2.1
Release Notes BryteFlow XL Ingest – v2.1 Build 519
Released November 2019
New Features
- New UI
- Support for Snowflake
- Support for S3/EMR + Redshift Ingest instances
- Support for partitions
- Optimization for access to on-premise Oracle from Bryteflow server on AWS
Bug Fixes
- Number of source and destination threads is now correctly handled
- Support for UTF-8 characters in data
Known Issues
- None