
About TruData
BryteFlow TruData is the data reconciliation application for the data replicated to the Cloud Data Lake or Cloud Data Warehouse. It does near real time data reconciliation for the configured objects, replicated on any Cloud destinations i.e. AWS Redshift, S3 or Snowflake via BryteFlow’s Ingest application.
Though the BryteFlow Ingest application is reliable, operational issues can sometimes affect data completeness on the target or destination. Data reconciliation using TruData is typically used to verify target data against the original source data, to ensure that the replication application BryteFlow Ingest has transferred the data and no change has been missed. TruData can also be used in situations where the database transaction logs are corrupted or not available, to identify the missing data. BryteFlow XL-Ingest can be then used to bring back the missing data.
BryteFlow TruData uses process information and mathematical methods to do a complete count and checksum validation of source and target data, at a particular point in time.
Being a companion software to BryteFlow Ingest the setup is automatic. It performs a thorough and accurate verification on the correctness of the migrated data. It provides near real-time stats for the reconciled data and the ongoing reconciliation process. It has flexibility to break down really huge tables to a very granular level and provide the comparison.
Table size doesn’t matter anymore. Every bit can be reconciled.
Overview of User Interface
The User Interface of TruData is very informative and user friendly. Its graphical representation of the completeness results is very informative for the user, summarizes everything in one place.
New tables setup is just a few clicks away. Monitor progress and results instantly.
Dashboard
The BryteFlow TruData dashboard provides complete summary of the reconciliations that are currently setup within the BryteFlow TruData application.
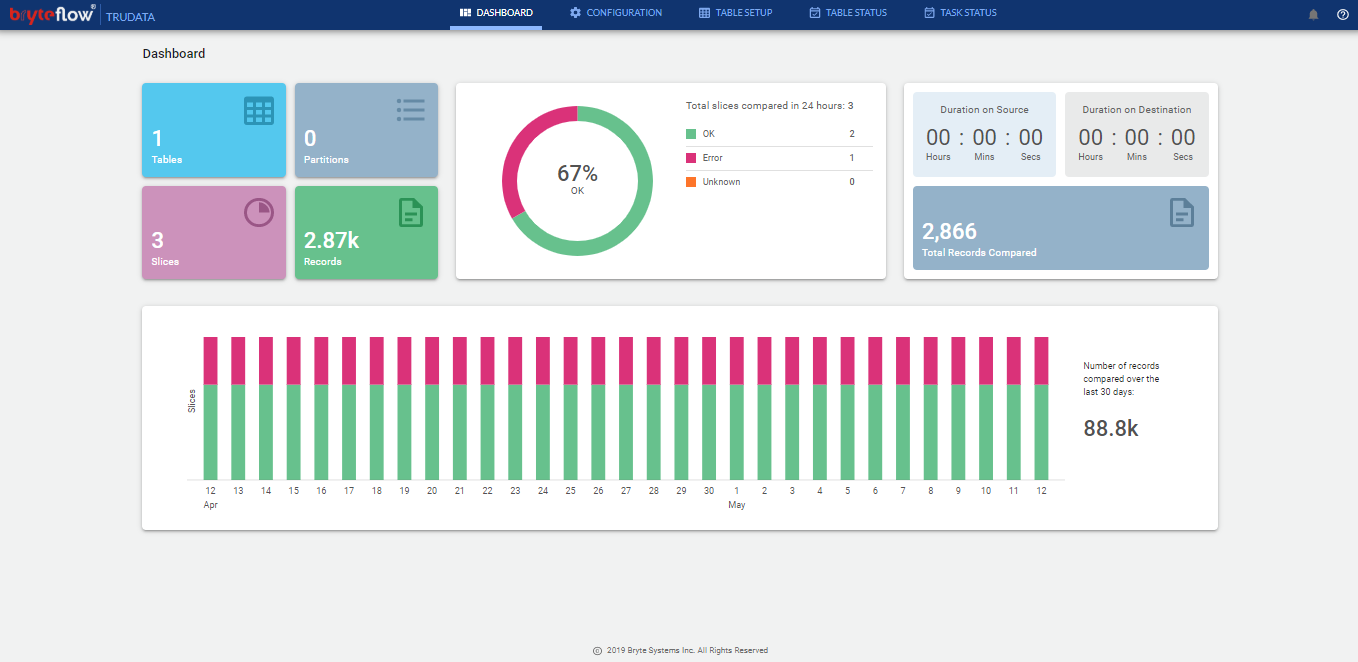
It shows summary for :
- Tables, the number of tables configured for reconciliation
- Records, the total number of records across all the tables configured for reconciliation
- Partition, Total no. of partitions compared. This shows information only when the table configuration has partition information.
- Slices, Total no. of table slices configured for reconciliation.
- Total Records Compared, Total no. of records from all selected tables for comparison
- Duration on Source, total time taken at source database to perform reconciliation of configured tables
- Duration on Destination, total time taken at destination database to perform reconciliation of configured tables
- Current Run Status, shows percent complete status of the ongoing reconciliation in a graphical representation using colour legends
- Daily run summary, a bar chart showing the overall reconciliation of all configured tables for each day using colour legends
Table Status
In this page you will see the brief summary of all the tables configured for reconciliation. It lists the tables selected for reconciliation along with
- Table Name, Name of the table marked for reconciliation
- Slices, No. of slices in each table
- Status, Last checked status for each table. Statuses are ‘OK’ or ‘Error’.
- Progress, Progress bar to show progress as percent complete using color legends.
- Last checked, Last Checked datetime for each table
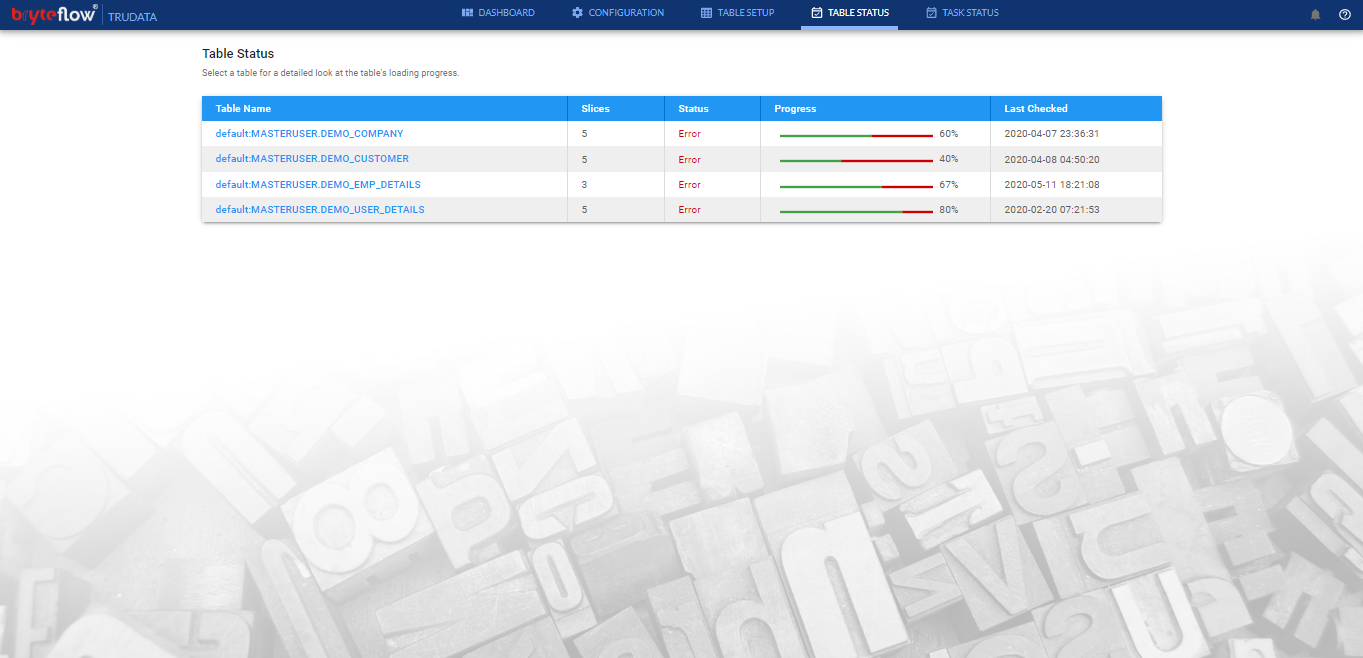
Clicking further on each table name results in a detail summary being displayed as shown below :

Table Slicing Status, shows detailed statistics for the most recent reconciliation for each slice of the table that has been processed
Slice Name, Value range(min to max) for each slice of the selected table.
Src. Records, number of records in source database for the slice
Dest. Records, number of records in destination database for the slice
Status, Reconciliation status for each slice for the table selected
Src. Checksum, checksum value for the slice at Source
Dest. Checksum, checksum value for the slice at Destination
Last Checked, date and time of the last reconciliation run that happened for the Slice
Configuration
This section can be used to do simple configuration of the TruData application which covers :
Location of CDC installation : The path of BryteFlow Ingest software
Web port : Port no. for the TruData web application to be hosted
No. of Source threads: Configured parallelism at source. No. of threads performing the reconciliation checks at source database.
No. of Destination threads: Configured parallelism at destination. No. of threads performing the reconciliation checks at destination database
Estimated Latency: Estimated latency of Ingest application. The schedule at which Ingest instance is scheduled to perform the load.
Default Schedule : This is the default schedule of the reconciliation process for all the tables selected. When no schedule is configured, default schedule is set to 24hrs.
Product ID : Product ID of the TruData installation
Licence Key : Licence key for the product id of the installation
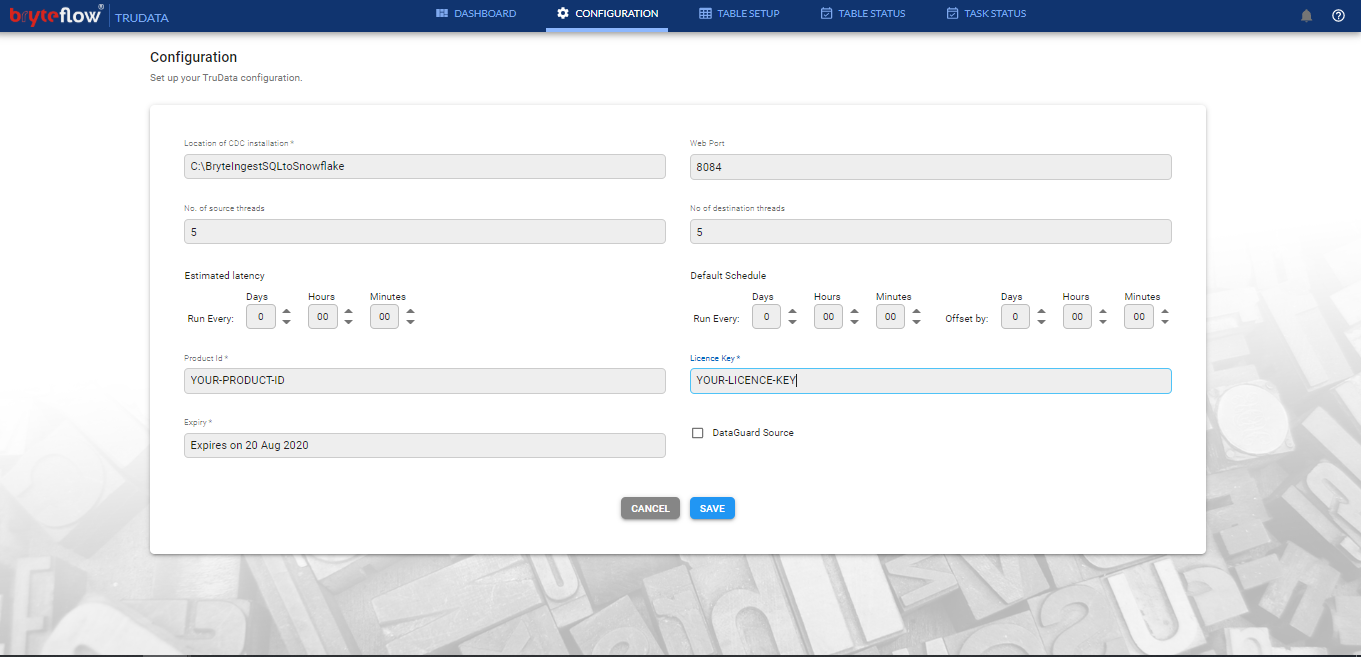
Table Setup
Trudata being the companion software to Ingest pulls up the table list from the Ingest setup and lists all tables in this section for them to be configured for reconciliation.
In this section, the Users get to configure the table settings individually.
They get to,
- choose the columns to be reconciled
- to define the Slice columns for each table
- to specify the schedule for each table, this is in case when the tables need to be validated at different times
- to apply filter criteria for each table, if needed.
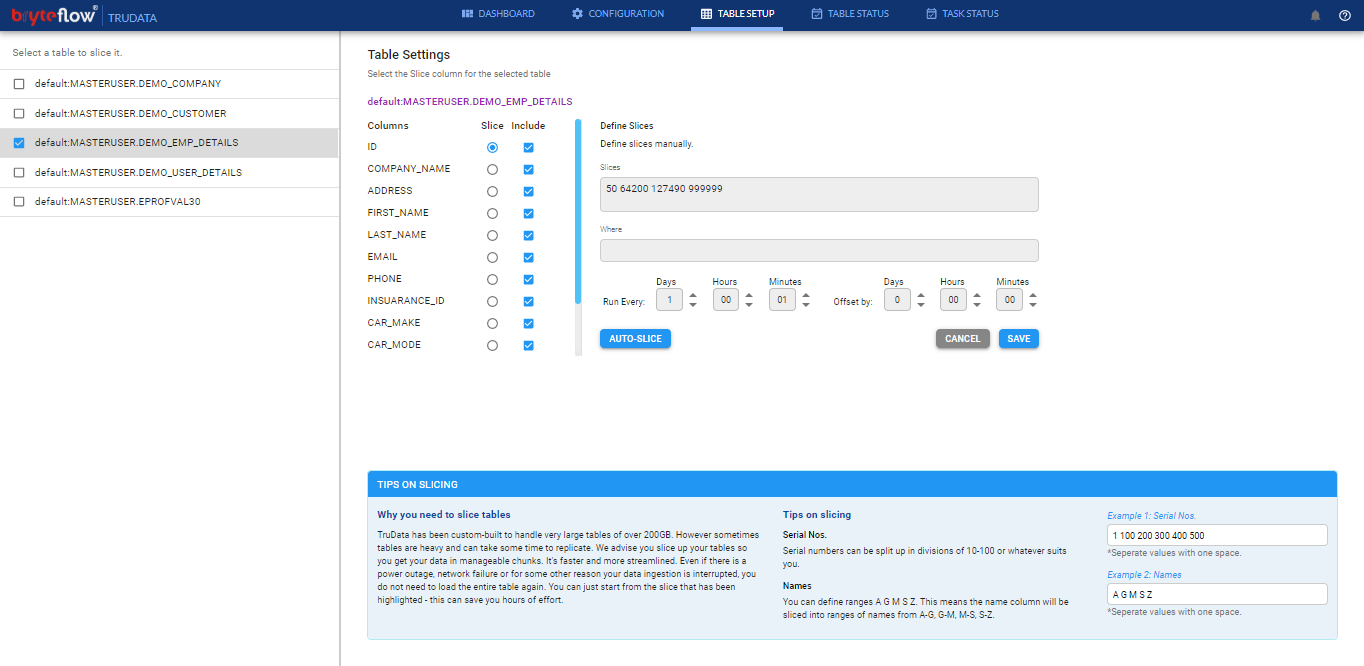
Steps for Table Setup:
- Click on the checkbox against table name in order to select the table for reconciliation.
- Click on the table name to configure table details.
- Select the Slice column for the table. This has to be a unique key column which can be a column from the primary key or unique index.
- The checkbox ‘Include‘ can be used to mark the columns of the tables which has to be reconciled. This can be one, many or all.
- Slice values needs to be entered in the ‘Slice‘ field. This can be manual or automatic.
- Enter the values manually by entering the range of values for Slicing column
- Enter the values automatically using ‘Auto Slice’
- ‘Where’ field is optional, this allows Users to apply filter condition on the selected table in order to perform a conditional check.
- Run time for each table can be set by setting the schedule in the ‘Run Every’ section.
Slice and Auto Slice
BryteFlow TruData has been custom built to handle tables of all sizes. Large tables (over 20GB) are heavy and can take some time to replicate. In such scenario, we advise to slice the tables to form comparatively smaller chunks which makes it faster, more streamlined and highly manageable. This can be in turn beneficial in case of network failures or any interruption caused in between checks by redoing the specific slices.
Users are given an option to either enter the slice values for the table manually or by using the software’s ‘Auto Slice‘ functionality. Below are some recommendation for manual slicing:
Tips on manual slicing
- Serial Nos. Serial numbers can be split up in divisions of 10-100 or whatever suits.
Example 1: Serial Nos.
Slice: 1 100 200 300 400 500*Separate values with one space.
- Character values Users can define ranges A G M S Z. This means the character column will be sliced into range of values from A-G, G-M, M-S, S-Z
Example 2: Character values
Slice: A G M S Z
*Separate values with one space.
‘Auto Slice’ is an important feature added in ‘Table Setup‘. Users can choose to use this functionality to slice the tables automatically by the software by following some easy steps as below.
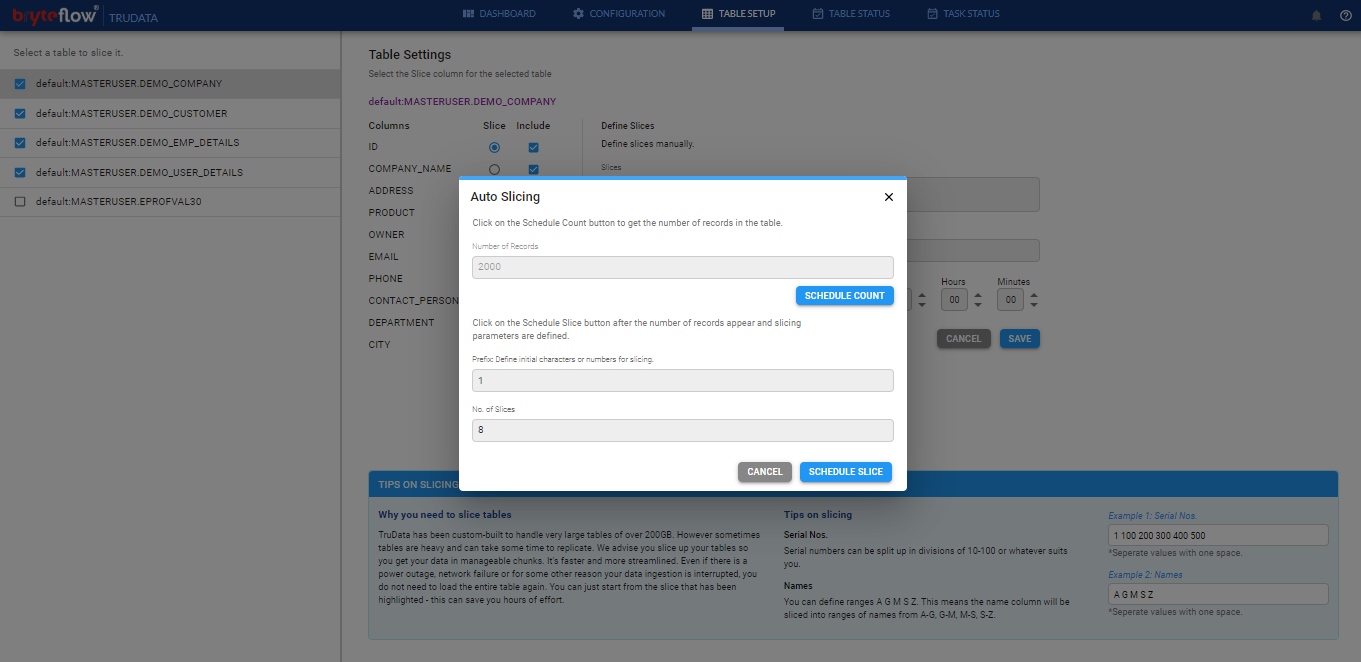
Steps to Auto-Slice tables
- Click ‘Auto Slice‘ button under Table Setup
- Click on the ‘Schedule Count‘ button to get the number of records in the table.
- Once the record count is fetched in the ‘Number of Records‘ field, provide values for ‘Prefix’ and ‘No. of Slices’.
- Click on the ‘Schedule Slice’ button after the number of records appear and slicing parameters are defined.
- Monitor the status of Slicing job in ‘Task Status’ tab.
- Once Slicing job is complete the slice values will appear in the ‘Slices‘ column.
- Same slices will now appear in ‘Table Status’ against the table with relevant statuses once the check has completed.
**Please note : Partitioned Tables replicated on AWS S3 as a destination cannot be Sliced.
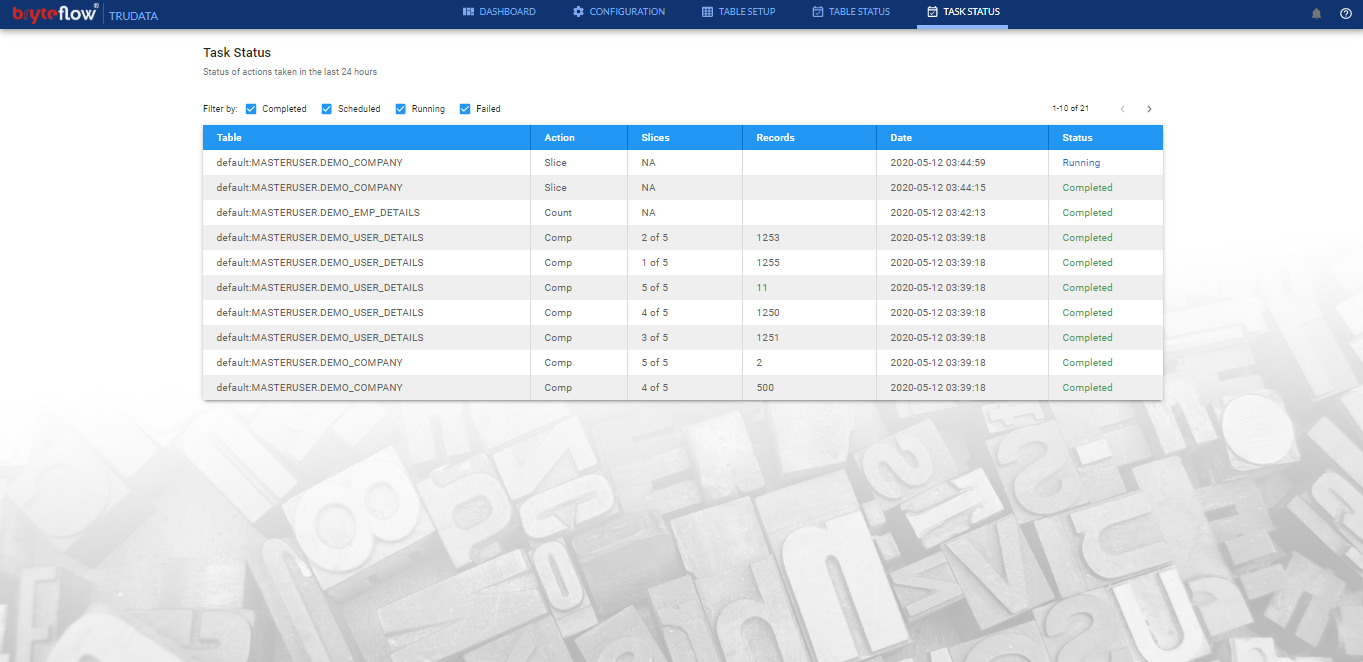
Task Status
This section shows the list of actions/jobs performed in last 24 hours. It list all the actions such as ‘Slice’, ‘Count’ and ‘Compare’ with respective statuses, run datetime, no. of records, slice information etc.
The list of actions/jobs can be filtered based on the different status options selected against ‘Filter by’. All statuses are selected by default to show all actions.
Appendix: Release Notes
Release details (by date descending, latest version first)
BryteFlow Trudata 2.2
Release Notes BryteFlow Trudata – v2.2
Released May 2020
New Features
- Revamped and New graphical User interface
- Comparison of Ingest setup (EMR+Redshift) happens on Redshift instead of EMR.
- Meaningful and relevant error messages
BryteFlow Trudata 2.1.1
Release Notes BryteFlow Trudata – v2.1.1
Released November 2019
New Features
- Initial public release
Known Issues
- Overriding the destination schema in Ingest configuration can cause comparison failures
- Floating point numbers can result in comparison errors