
About BryteFlow Blend
- Performing ANSI SQL2 operations on existing AWS S3 assets
- Joining with other AWS S3 assets as if the were ‘tables’ (again using ANSI SQL2)
- Performing ANSI SQL2 operations on the results of previous operations
- Export/create new assets to
- AWS S3
- AWS Redshift
- AWS Aurora
Prerequisites
The following are minimum requirements for BryteFlow Blend
- Real or virtual machine running Windows 10
- Java version 7 or higher is required to be installed on machine
- Connectivity and permissions to access AWS S3
- Connectivity and permissions to access AWS EMR
-
Applications
-
Spark 2.3.0,
-
Ganglia 3.7.2,
-
Zeppelin 0.7.3
-
-
- Port 8080 needs to be available on system for the application to bind to
- Open access to Port 8080 through any firewalls for interface access
- Google Chrome
Installation
The application can be placed in any folder, however Bryte recommends installing to the following location:
c:\BryteFlow\Blend\
Edit
BryteFlow Blend is a companion software to BryteFlow Ingest. Its used to perform data transformations of AWS S3.
Step 1 – Application Files
Unzip the application archive to your desired folder, for example
c:\BryteFlow\Blend\
Step 2 – Run the Application
Follow below steps to do the install:
- Go to the main directory ‘bryteflow’->’blend’
- In order to install the service open windows command prompt with ‘Run as Administrator’
- Change the path to ‘blend’ path
- Execute “Install-BryteFlow Blend Service.bat”
- ‘BryteFlow Blend’ service is now installed on the server.
- Go to Windows ‘services’ and start the service for Ingest.
- Launch the user interface from google chrome browser with the URL: localhost:8082
- Make sure you have a valid license before starting the replication. For more details on how to get the license key refer this section.
Step 3 – Access the User Interface
BryteFlow Blend utilises a browser based user interface. You can access this, once the application is running, on:
If you are accessing remotely then use the appropriate domain and port 8082.
Configuration
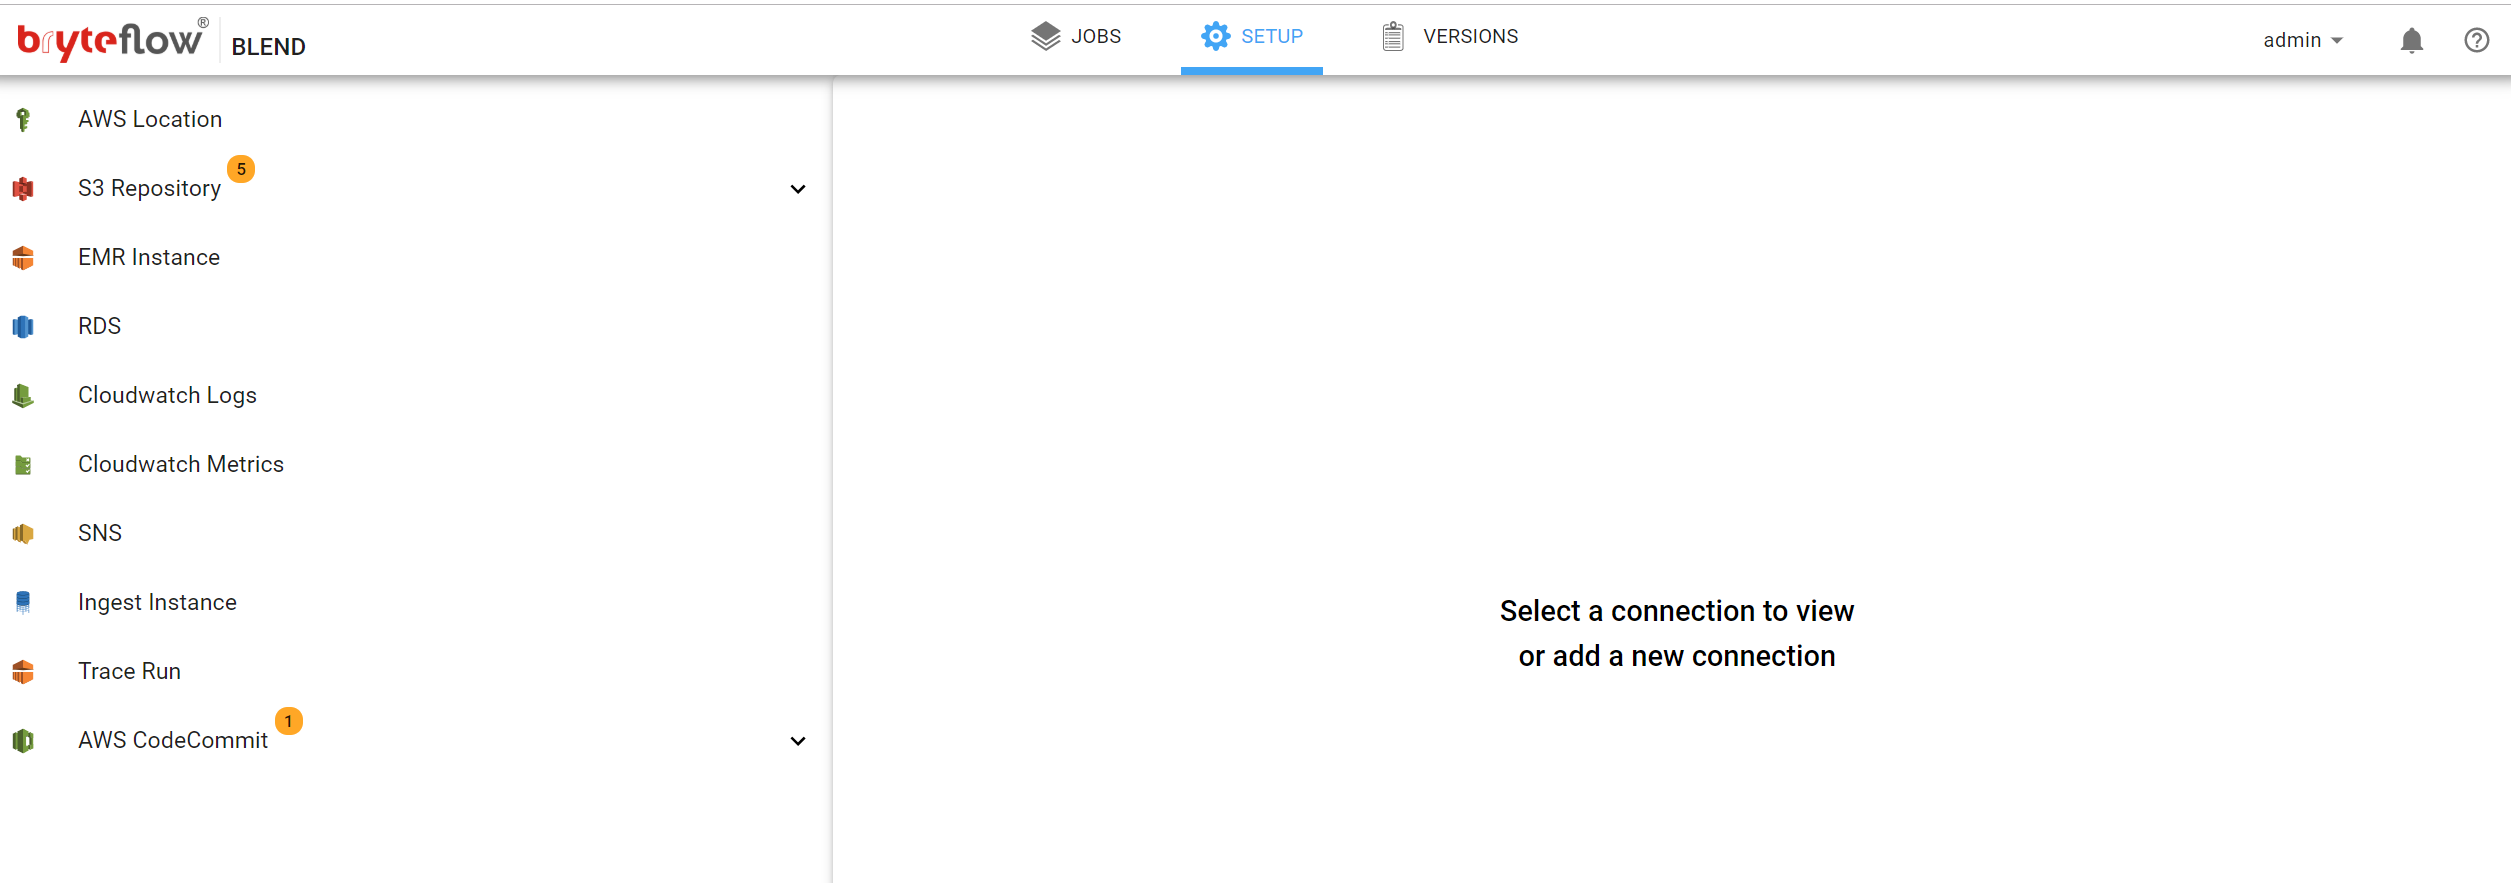
Configuration of BryteFlow Blend is accessed from the ‘SETUP’ tab on the top of the header breadcrumb.

The Setup view is divided into two sections. The left panel lists the available external systems that can be configured. Clicking on a tab in the list will display the available properties in the right hand panel.
Connections, Required
The BryteFlow Blend system utilises external systems to provide data and SQL operations. Core to BryteFlow Blend are the following services:
Blend for S3:
- AWS Location
- S3 Repository
- EMR Instance
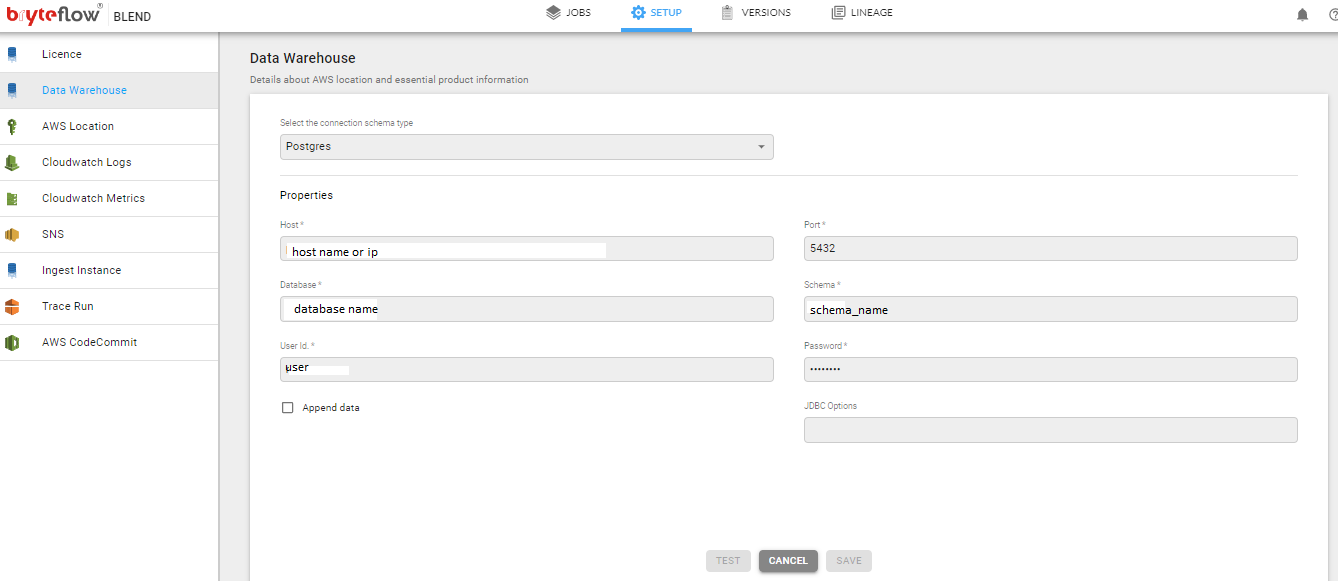
Blend for Data Warehouse:
- Data Warehouse connection
AWS Configuration
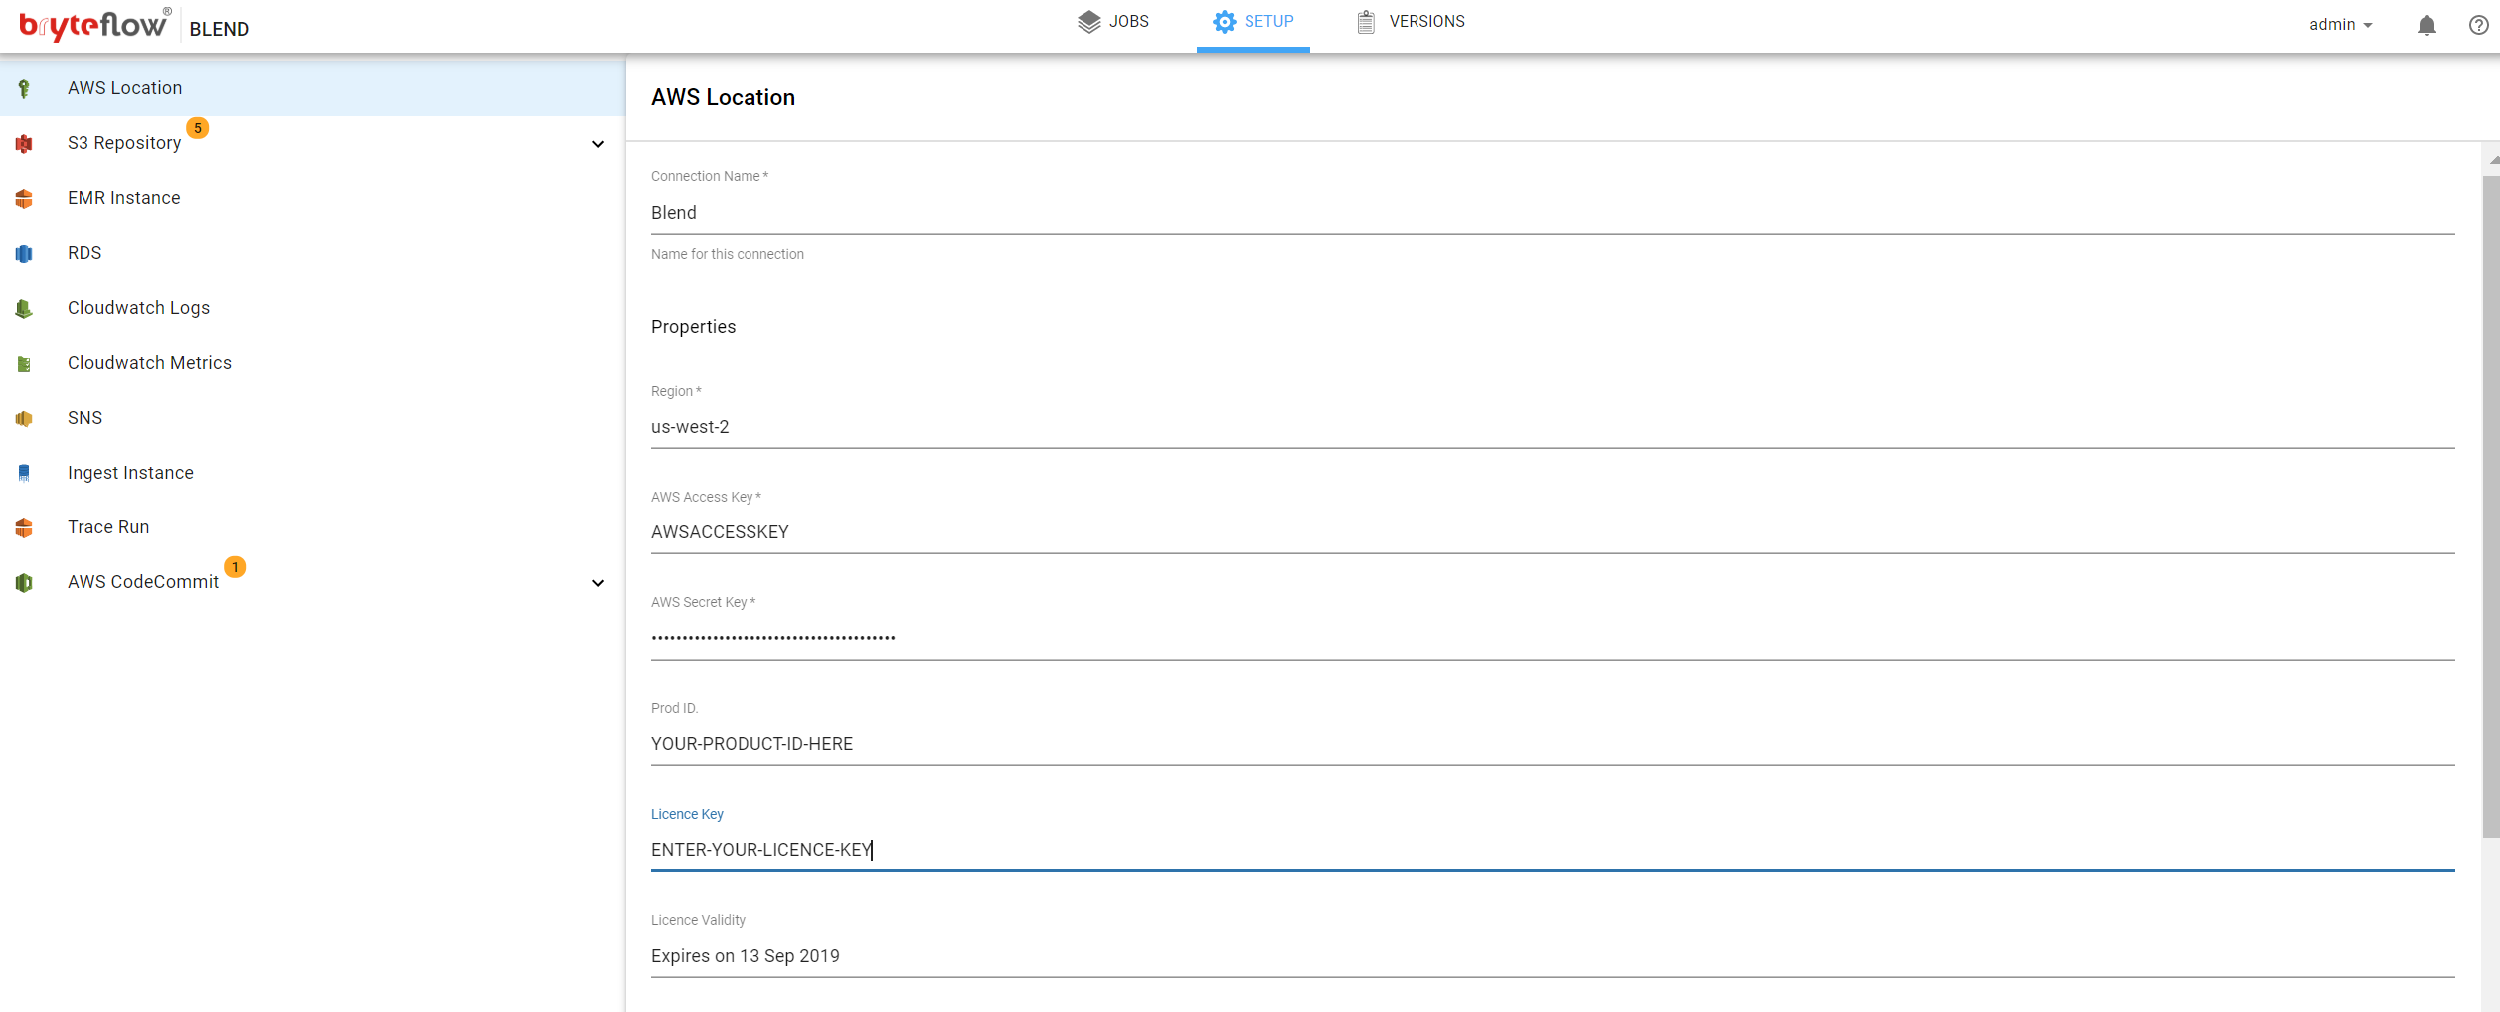
Clicking on AWS Location provides access to the required configuration. Please enter the following:
- Connection Name, a business friendly name you can provide to your connection
- Region, for example us-west-2
- AWS Access Key, enter the required key
- AWS Secret Access Key, enter the required key
- Product ID, the ID of the current install of BryteFlow Blend
- License Key, enter the required license key
- To obtain a valid license key email the BryteFlow support team support@bryteflow.com along with your Product ID
- AWS Proxy Host, if your organisation uses proxies please enter the appropriate host
- AWS Proxy Port, if your organisation uses proxies please enter the appropriate port
- AWS Proxy User Id, if your organisation uses proxies please enter the appropriate User Id
- AWS Proxy Password, if your organisation uses proxies please enter the appropriate password
In case your licence is expired, you can email the ‘Product ID’ to the Bryte support team, support@bryteflow.com. In response, you will receive the valid licence key to be applied back to the product. The key can be entered in the following location, this will reactivate the software.
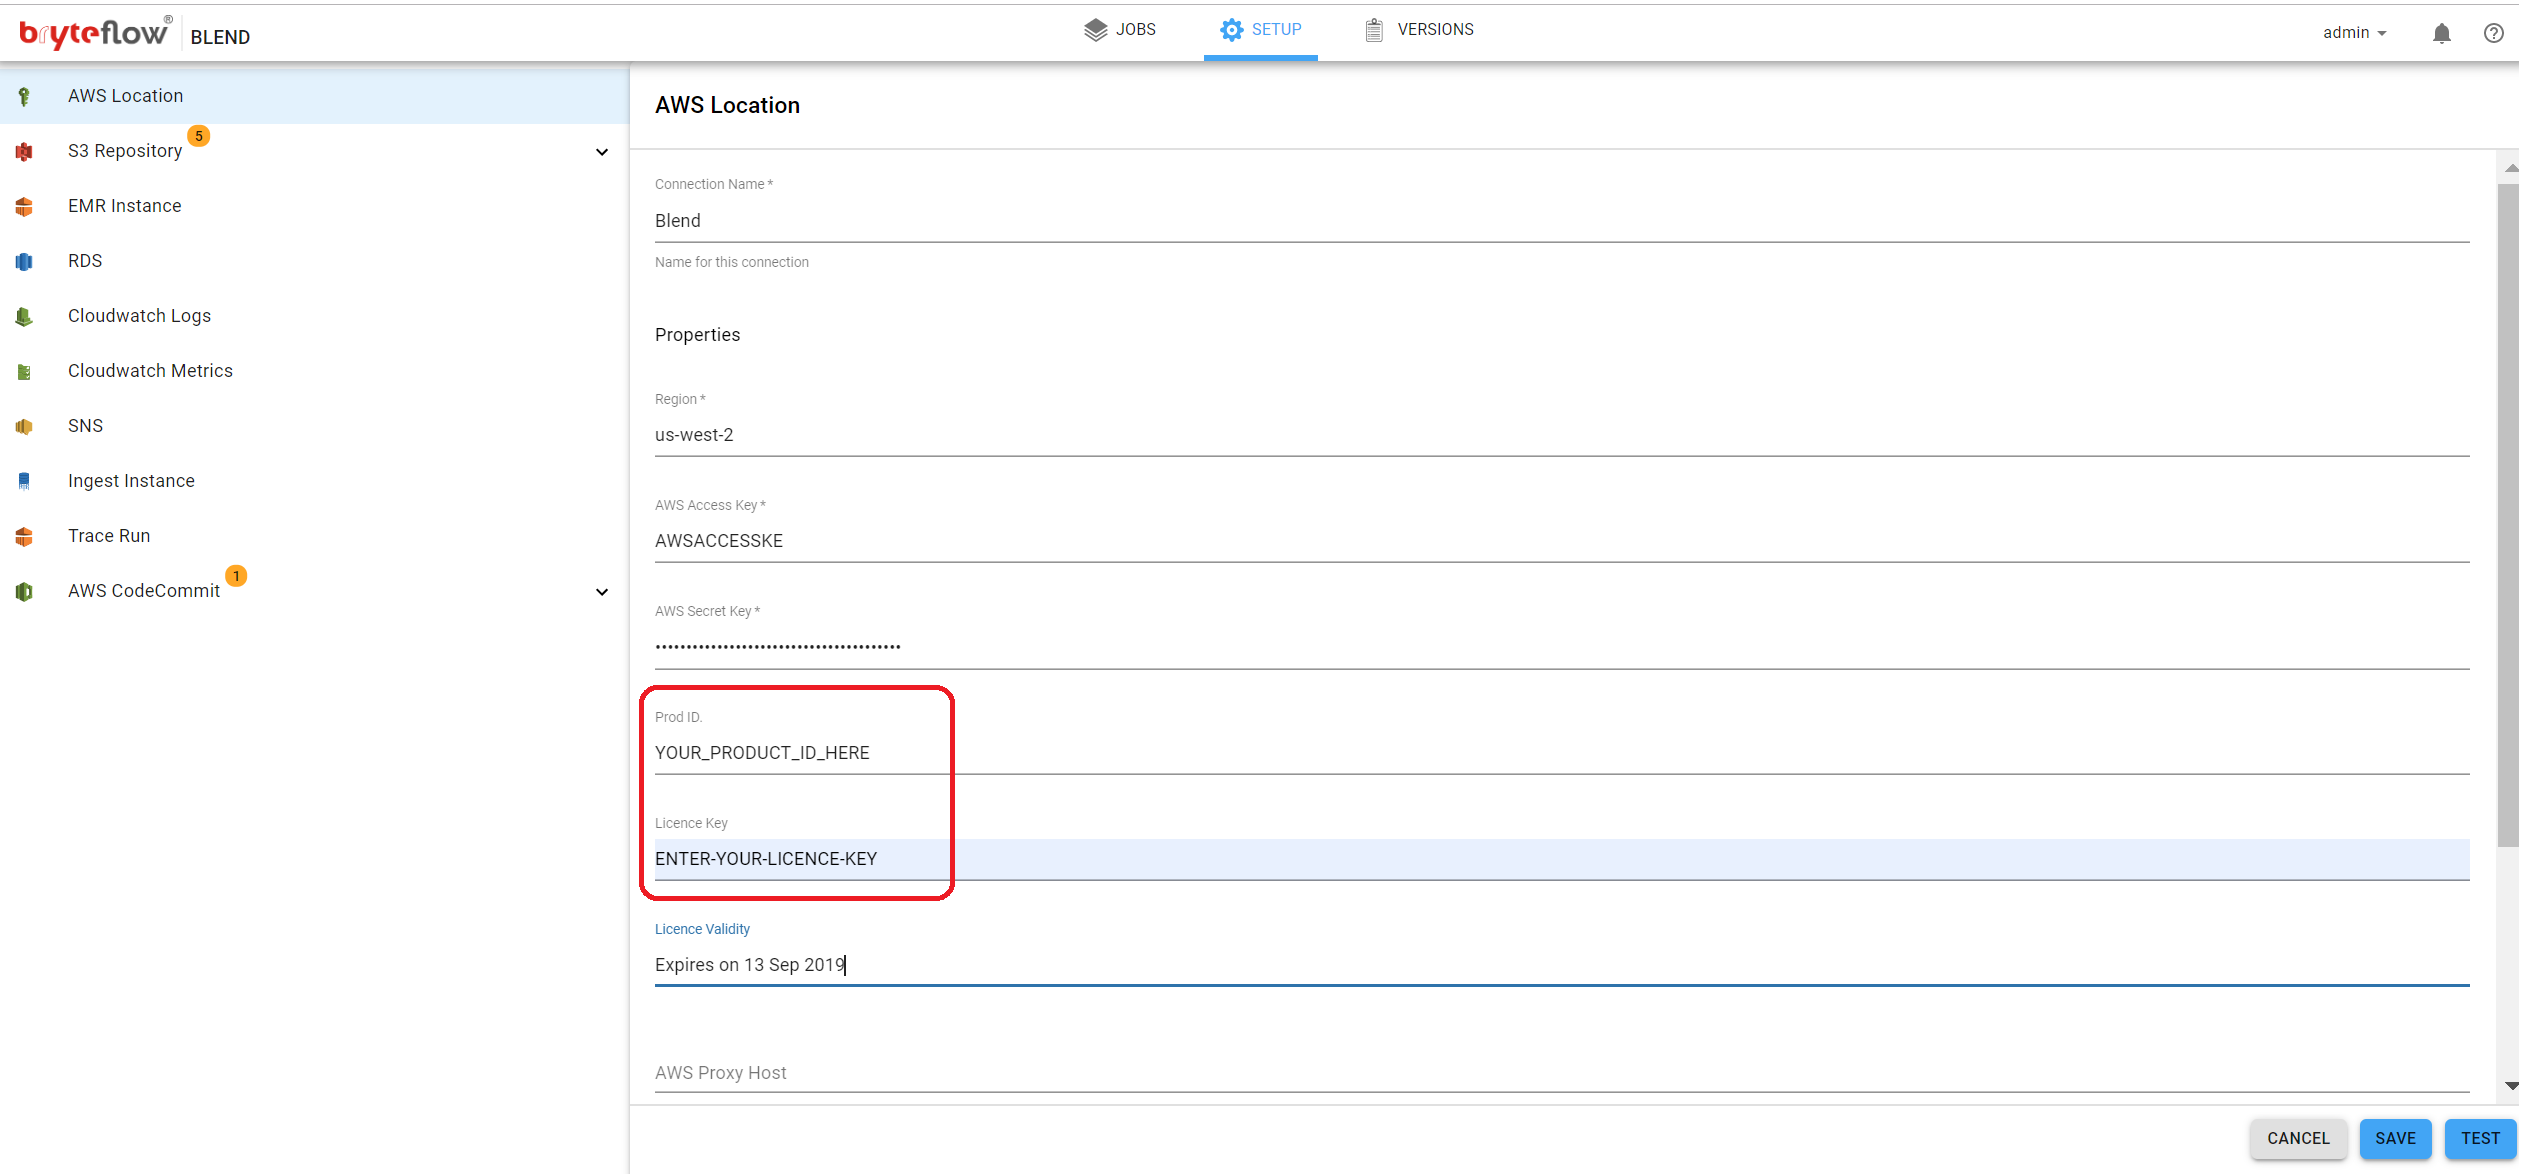
Once all of the AWS Location details are complete use the TEST and SAVE buttons at the bottom right of the screen to confirm accordingly.
S3 Repository
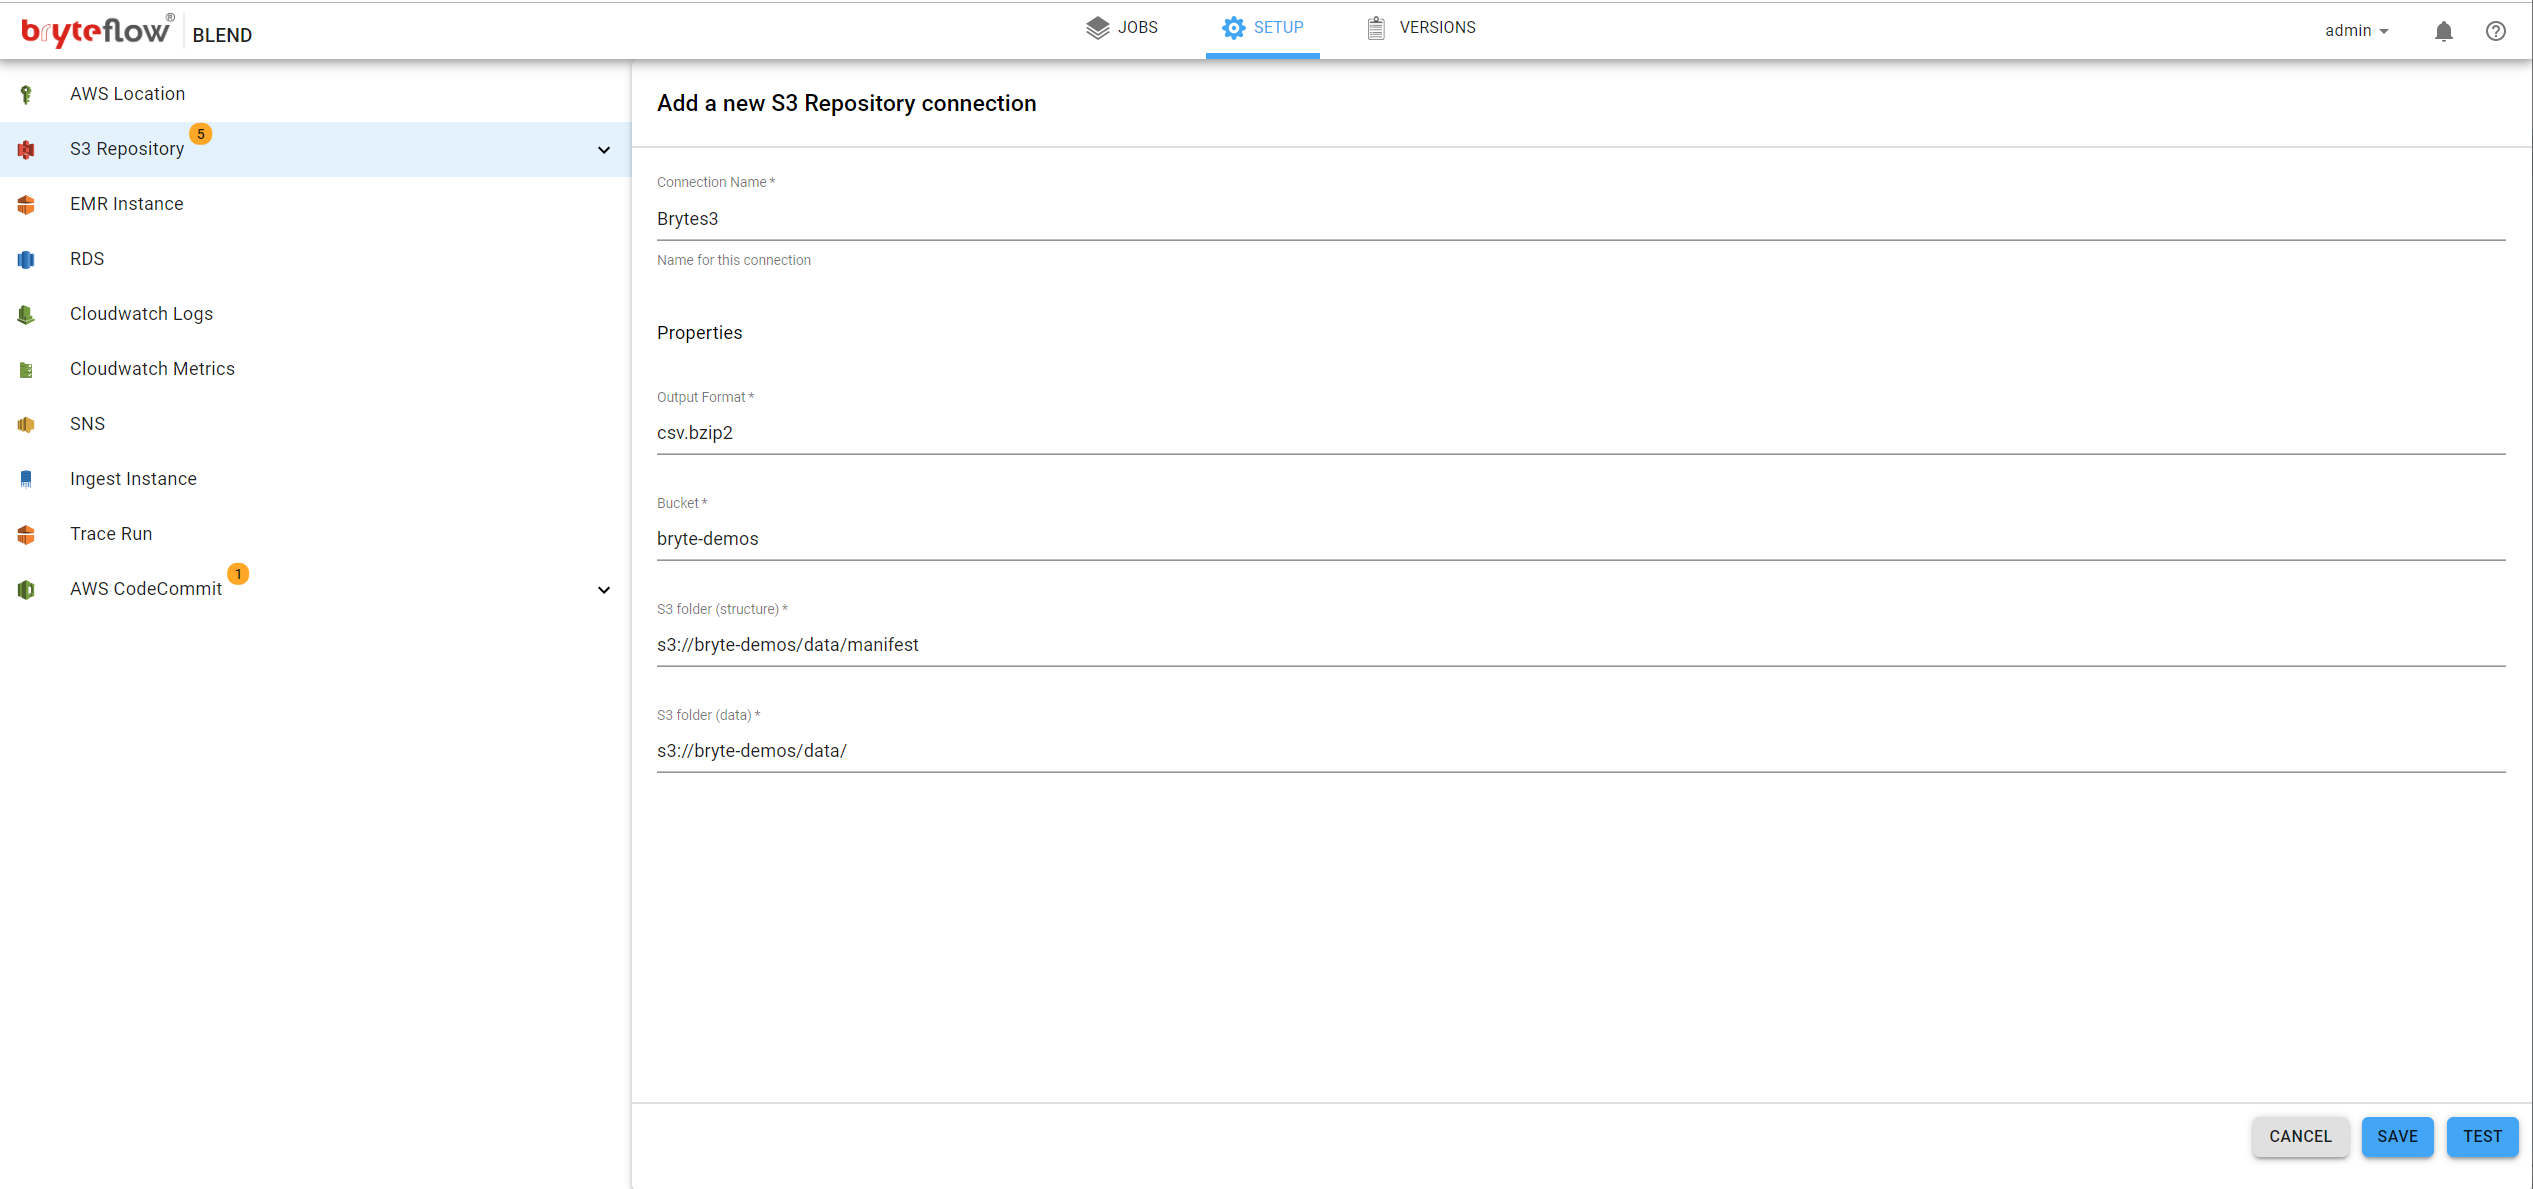
Click on ‘S3 Repository’ on the left panel, this will allow the connection to AWS S3 to be configured. The following fields need to be completed:
- Connection Name, the name for this connection. This is for you use and identification within the system, for example a business name
- Output Format, data structure type for this connection. This could be of the following types :
- Struct metadata file
- Parquet format
- ORC format
- Bucket, the S3 bucket where the data will reside
- S3 Folder (structure), the folder location for the structure information, this is required only for ‘Struct metadata file’ schema type (see above)
- S3 Folder (data), the folder location for the data in S3
For additional information on AWS S3 please refer to the following link
EMR Instance
Clicking ‘EMR Instance’ on the left panel will allow the EMR Instance to be configured. The following fields need to be completed:
- Name, the name for this instance, for example this could be a business name, it has no effect on the operation of the instance
- Instance, the unique AWS EMR instance ID, this can be obtained from your AWS Console
- S3 Work Area, is the full S3 location that will be used by the EMR cluster as a work area to process data.
For further details on AWS EMR, please refer to the following link

Connections, Optional
Optionally BryteFlow Blend can integrate with additional AWS Services, this makes additional features such as exporting of data or advanced monitoring available.
- AWS Redshift
- AWS Aurora
- AWS Cloudwatch Logs
- AWS Cloudwatch Metrics
- AWS SNS (Simple Notification Service)
- AWS CodeCommit
RDS
BryteFlow Blend allows users to export the final data as output to the Datawarehouse. It allows users to run the transformations on S3 while only taking the curated/transformed data set to Data Warehouse, saving on cost. Both AWS Redshift and Snowflake is supported as an export destination.
BryteFlow Blend can export data to the following Destinations:
- AWS Redshift
- AWS Aurora
- Snowflake
The AWS RDS (Relational Database Service) makes it easy to set up, operate, and scale a relational databases in the cloud. It provides cost-efficient and resizable capacity while automating time-consuming administration tasks such as hardware provisioning, database setup, patching and backups. It provides fast performance, high availability, security and compatibility.
For further details on AWS RDS please refer to the following link
Redshift
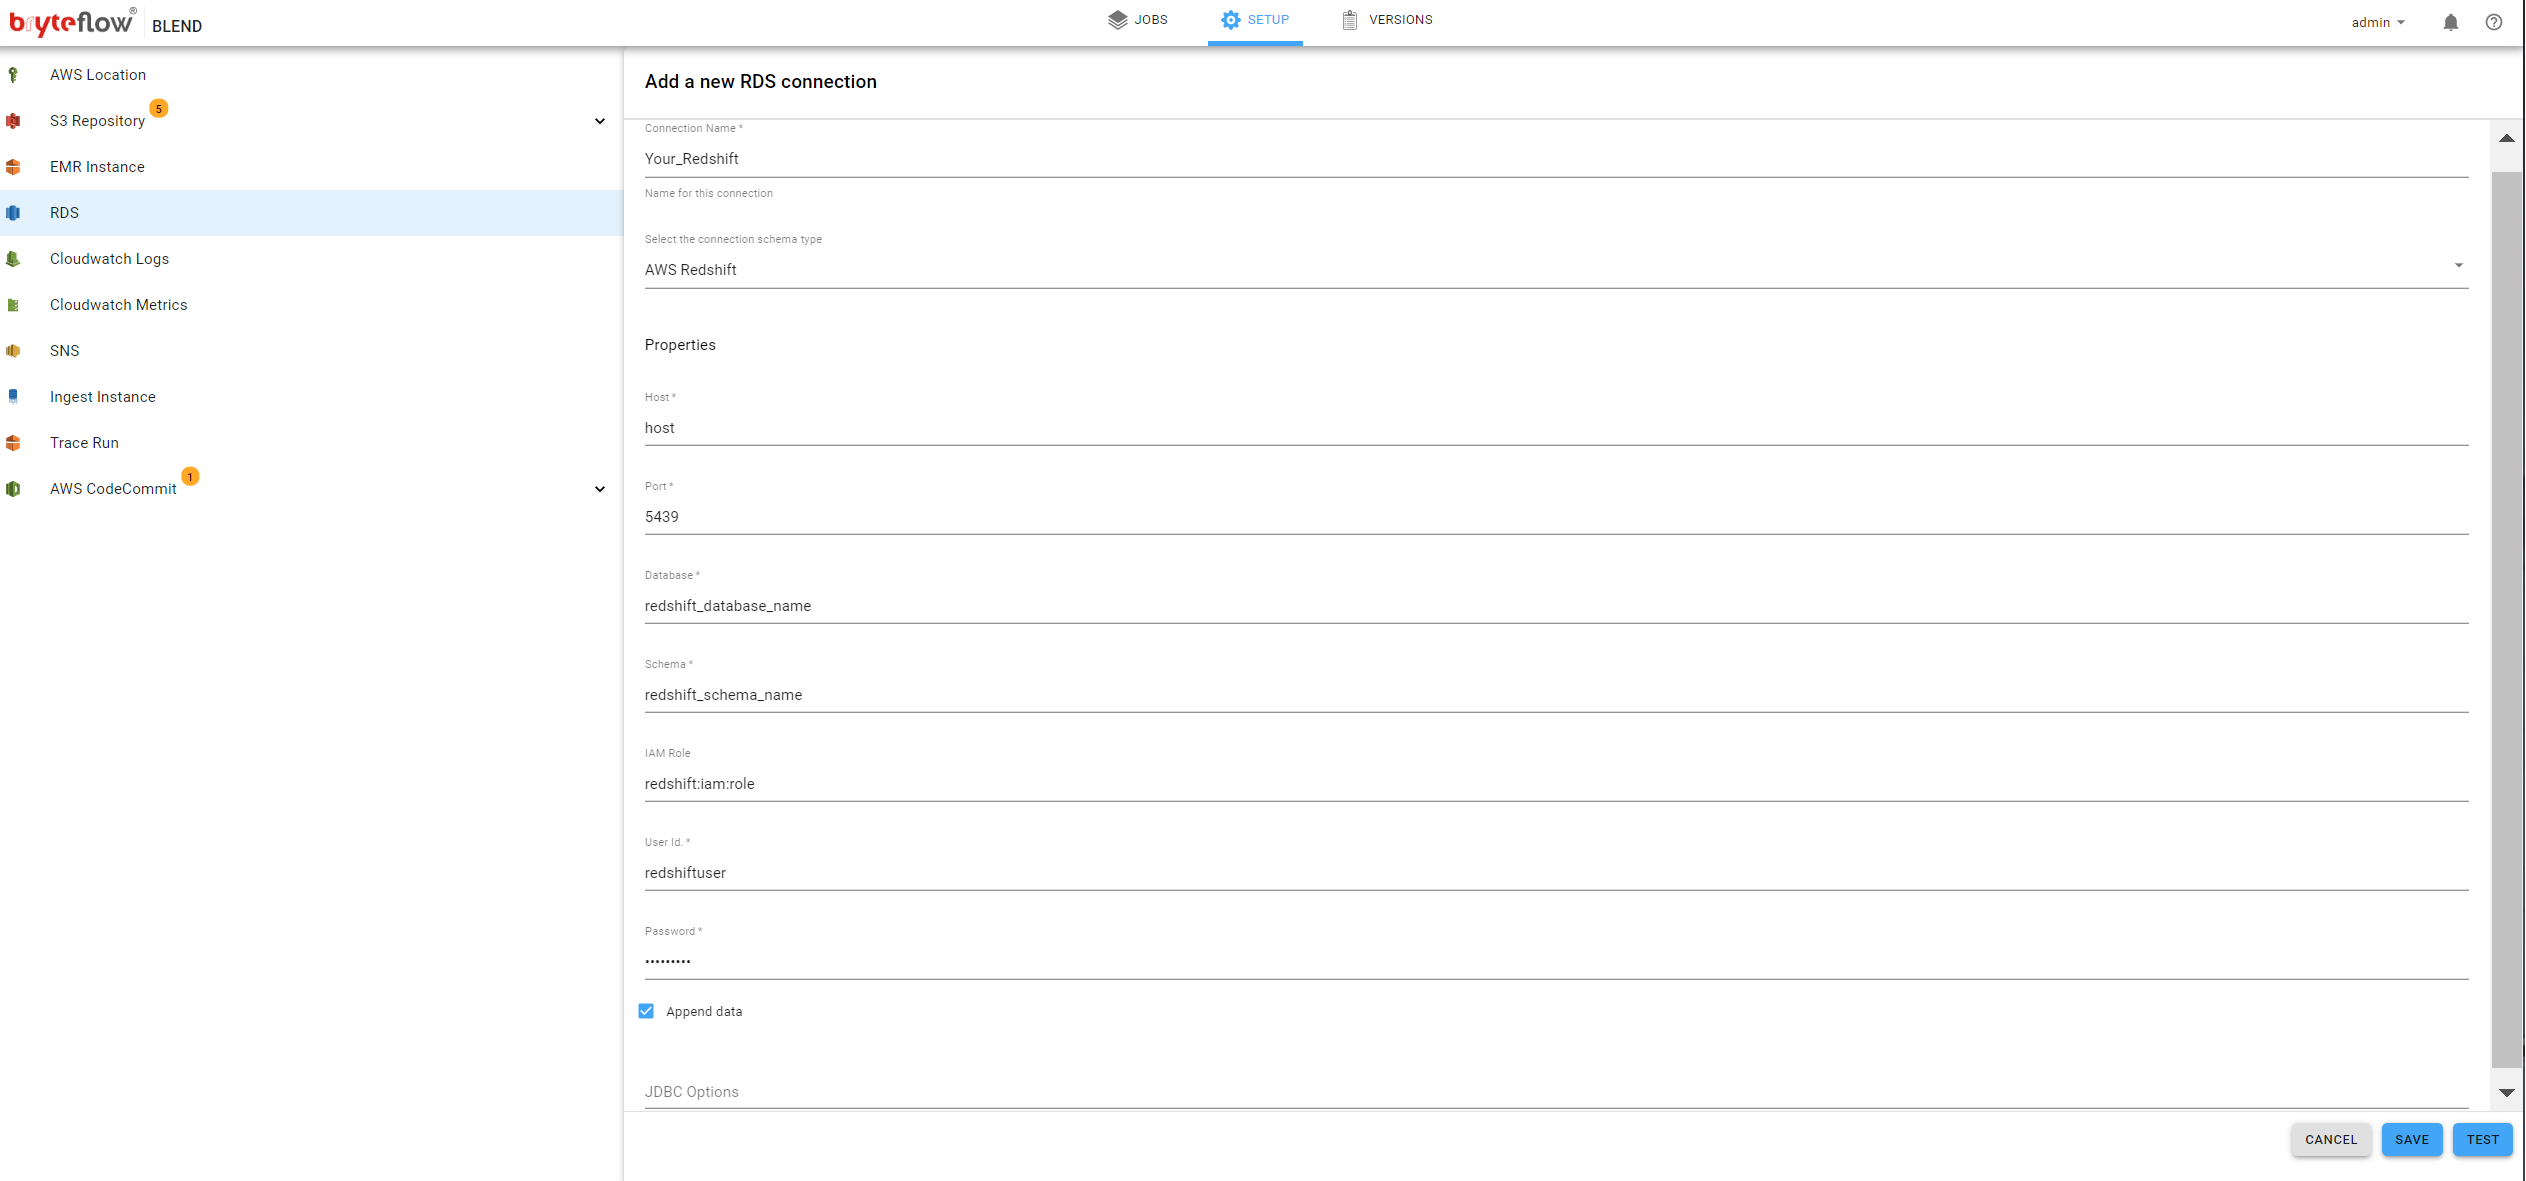
AWS Redshift is a fast, scalable data warehouse that makes it simple and cost-effective to analyze all your data across your data warehouse and data lake. Redshift delivers ten times faster performance than other data warehouses by using machine learning, massively parallel query execution, and columnar storage on high-performance disk. To select Redshift as a destination select AWS Redshift in the left panel and then configure as shown below
- Name, the name for this destination. This is for identification within the system, perhaps business friendly name
- Host, the domain host for your Redshift instance
- Port, the TCP port for access to your Redshift instance
- Database, the database name to use for data operations
- Schema, the database schema to use for data operations
- IAM Role, the AWS IAM Role to used to access Redshift
- User Id, the AWS User Id to used to access Redshift
- Password, the corresponding password for the AWS User Id used to access Redshift
- Append Data, indicates how the data is loaded to the destination tables
- If checked, data will be appended to destination table(s)
- If unchecked, data will be cleared from the destination table(s) and subsequently reloaded
For further details regarding AWS Redshift Database service please refer to the following link
Aurora
BryteFlow Blend is supported for Aurora PostgreSQL. It can orchestrate jobs and run transformations on Aurora database. This can be used to setup ELT pipelines using Ingest and Blend in orchestration. While Ingest does the E-Extract and L- Load, Blend does the T- Transform and together help achieve the ELT model in modern data analytics.
AWS Aurora is a relational database engine that combines the speed and reliability of high-end commercial databases with the simplicity and cost-effectiveness of open source databases. For further details regarding the AWS Aurora service please refer to the following link : https://aws.amazon.com/rds/aurora/
Cloudwatch Logs
BryteFlow Blend can be integrated with the AWS CloudWatch Log Service, this enables a unified view of AWS resources…with regard to BryteFlow Blend it can capture job execution events such as
- Job completion
- Job failure
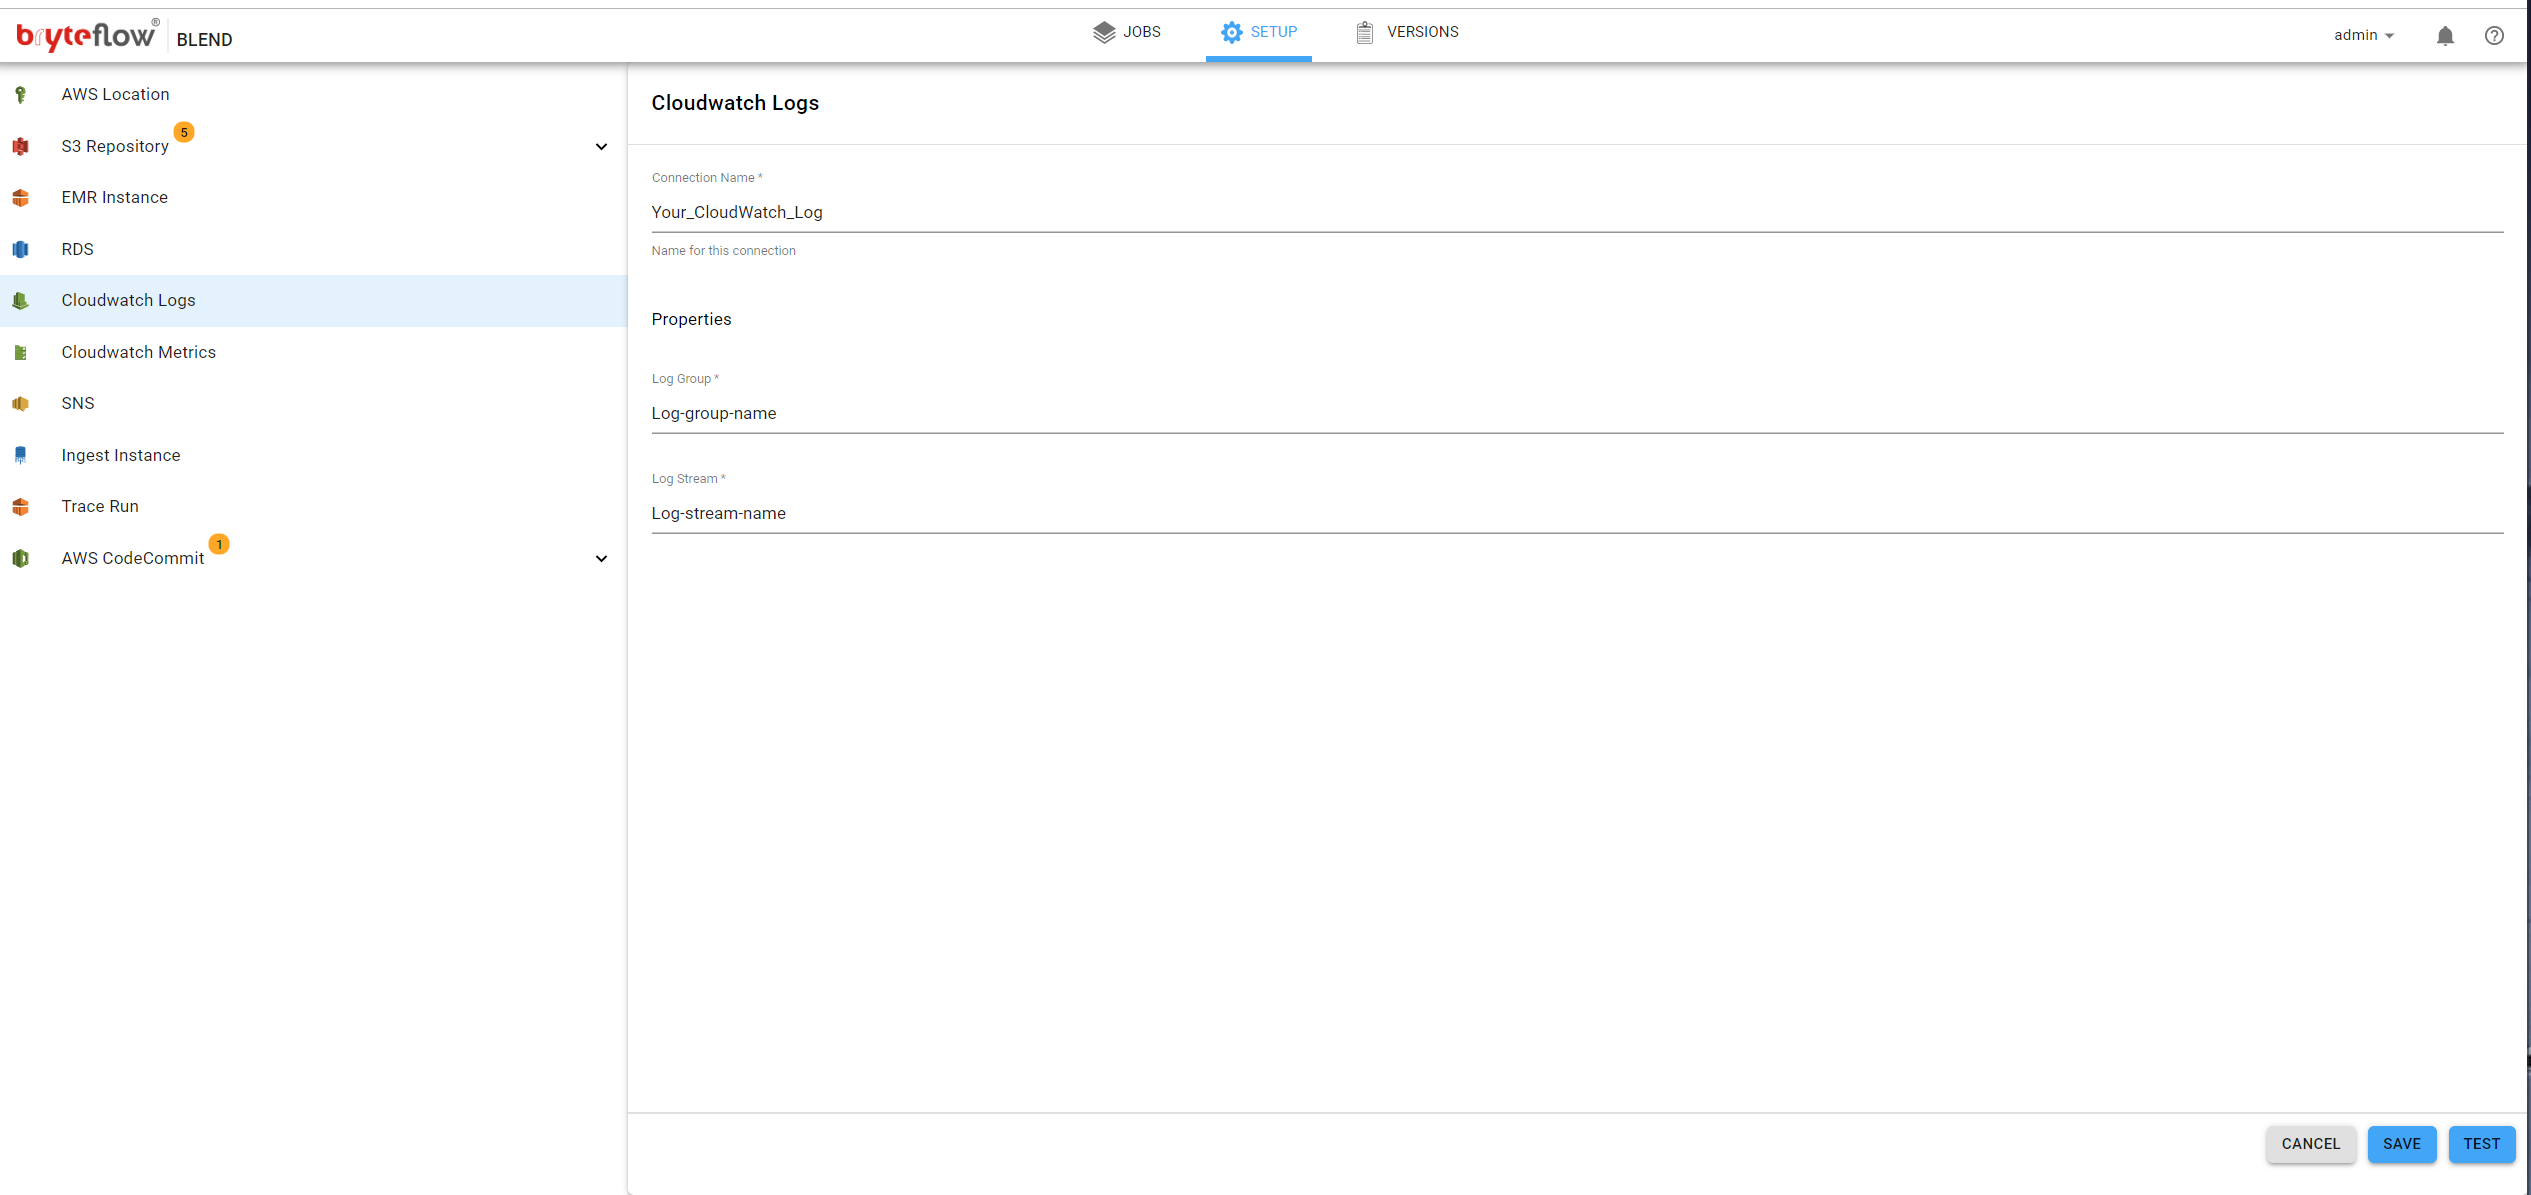
Monitoring using AWS CloudWatch Logs is optional, it is configured by selecting CloudWatch Logs on the left panel and completing the options as shown below
- Connection Name, the name for this connection. This is to identify this connection within the system (perhaps a business name)
- Log Group, name of the Log Group. This Log Group has to already exist in AWS CloudWatch.
- The Log Group is configured using the AWS console
- Log Stream, name of the Log Stream. This Log Stream has to already exist in AWS CloudWatch.
- The Log Stream is configured using the AWS console
For further information regarding AWS CloudWatch Log Groups and Log Streams please refer to the following link
Cloudwatch Metrics
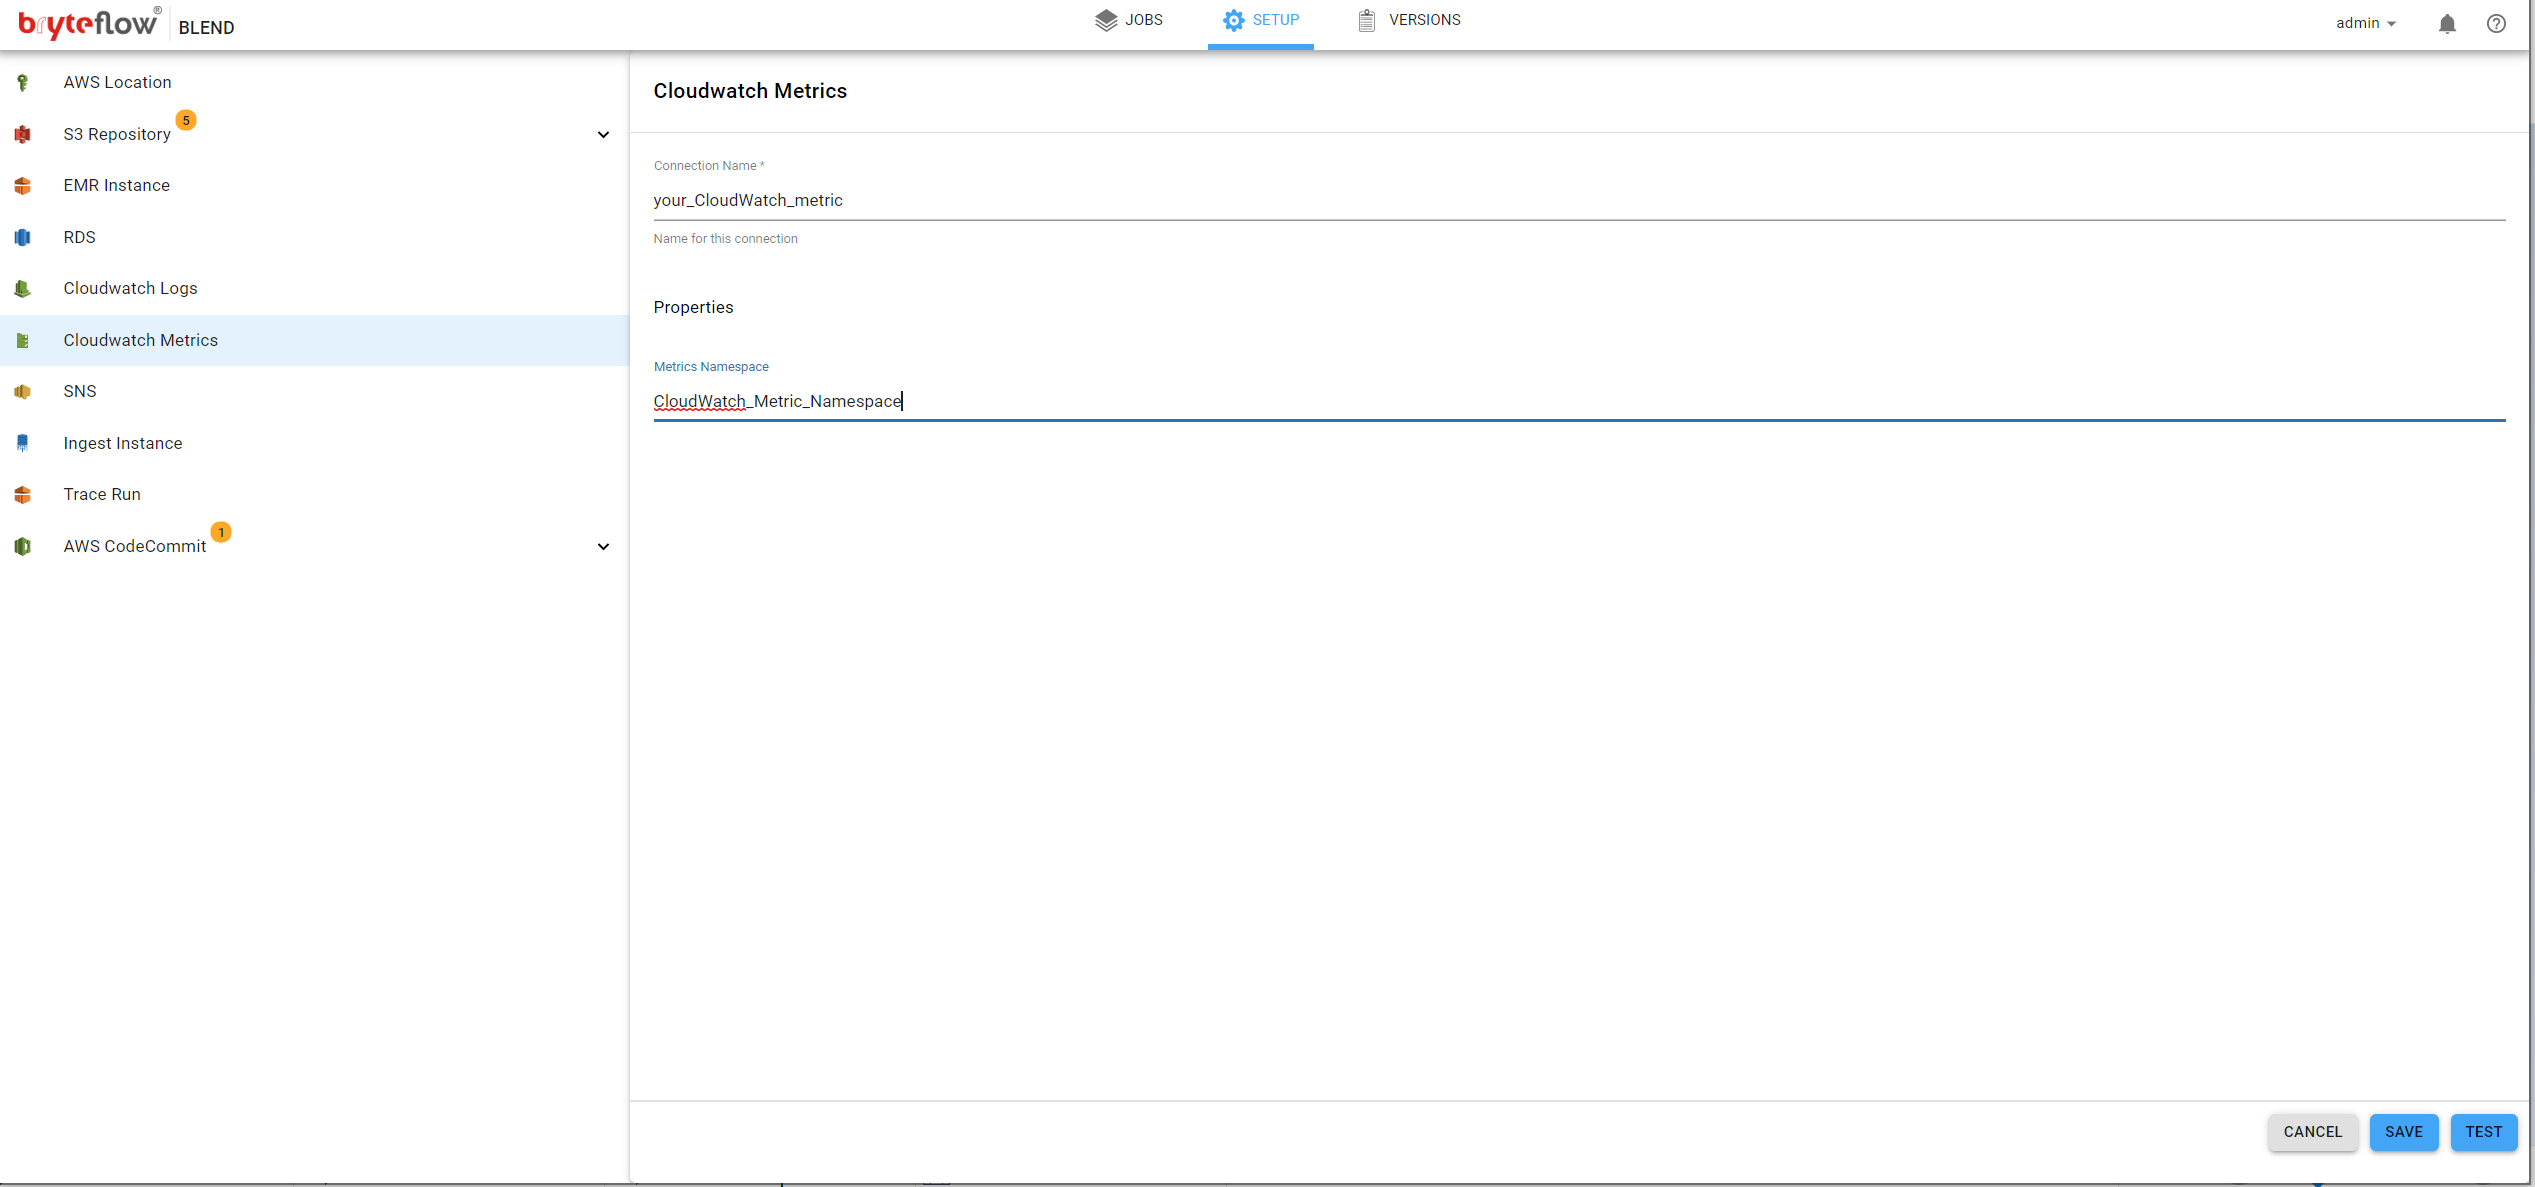
BryteFlow Blend can be monitored though the use of AWS CloudWatch Metrics. Metrics such as the time taken to execute a job, the time a job waits for the EMR to become available can be monitored on the AWS metrics dashboard. Metrics also enable alarms to be raised should the metric cross a predefined threshold. This functionality is optional in BryteFlow Blend. To configure select CloudWatch Metrics from the menu and complete as shown below.
- Connection Name, The name for this connection. This is to identify this connection within the system.
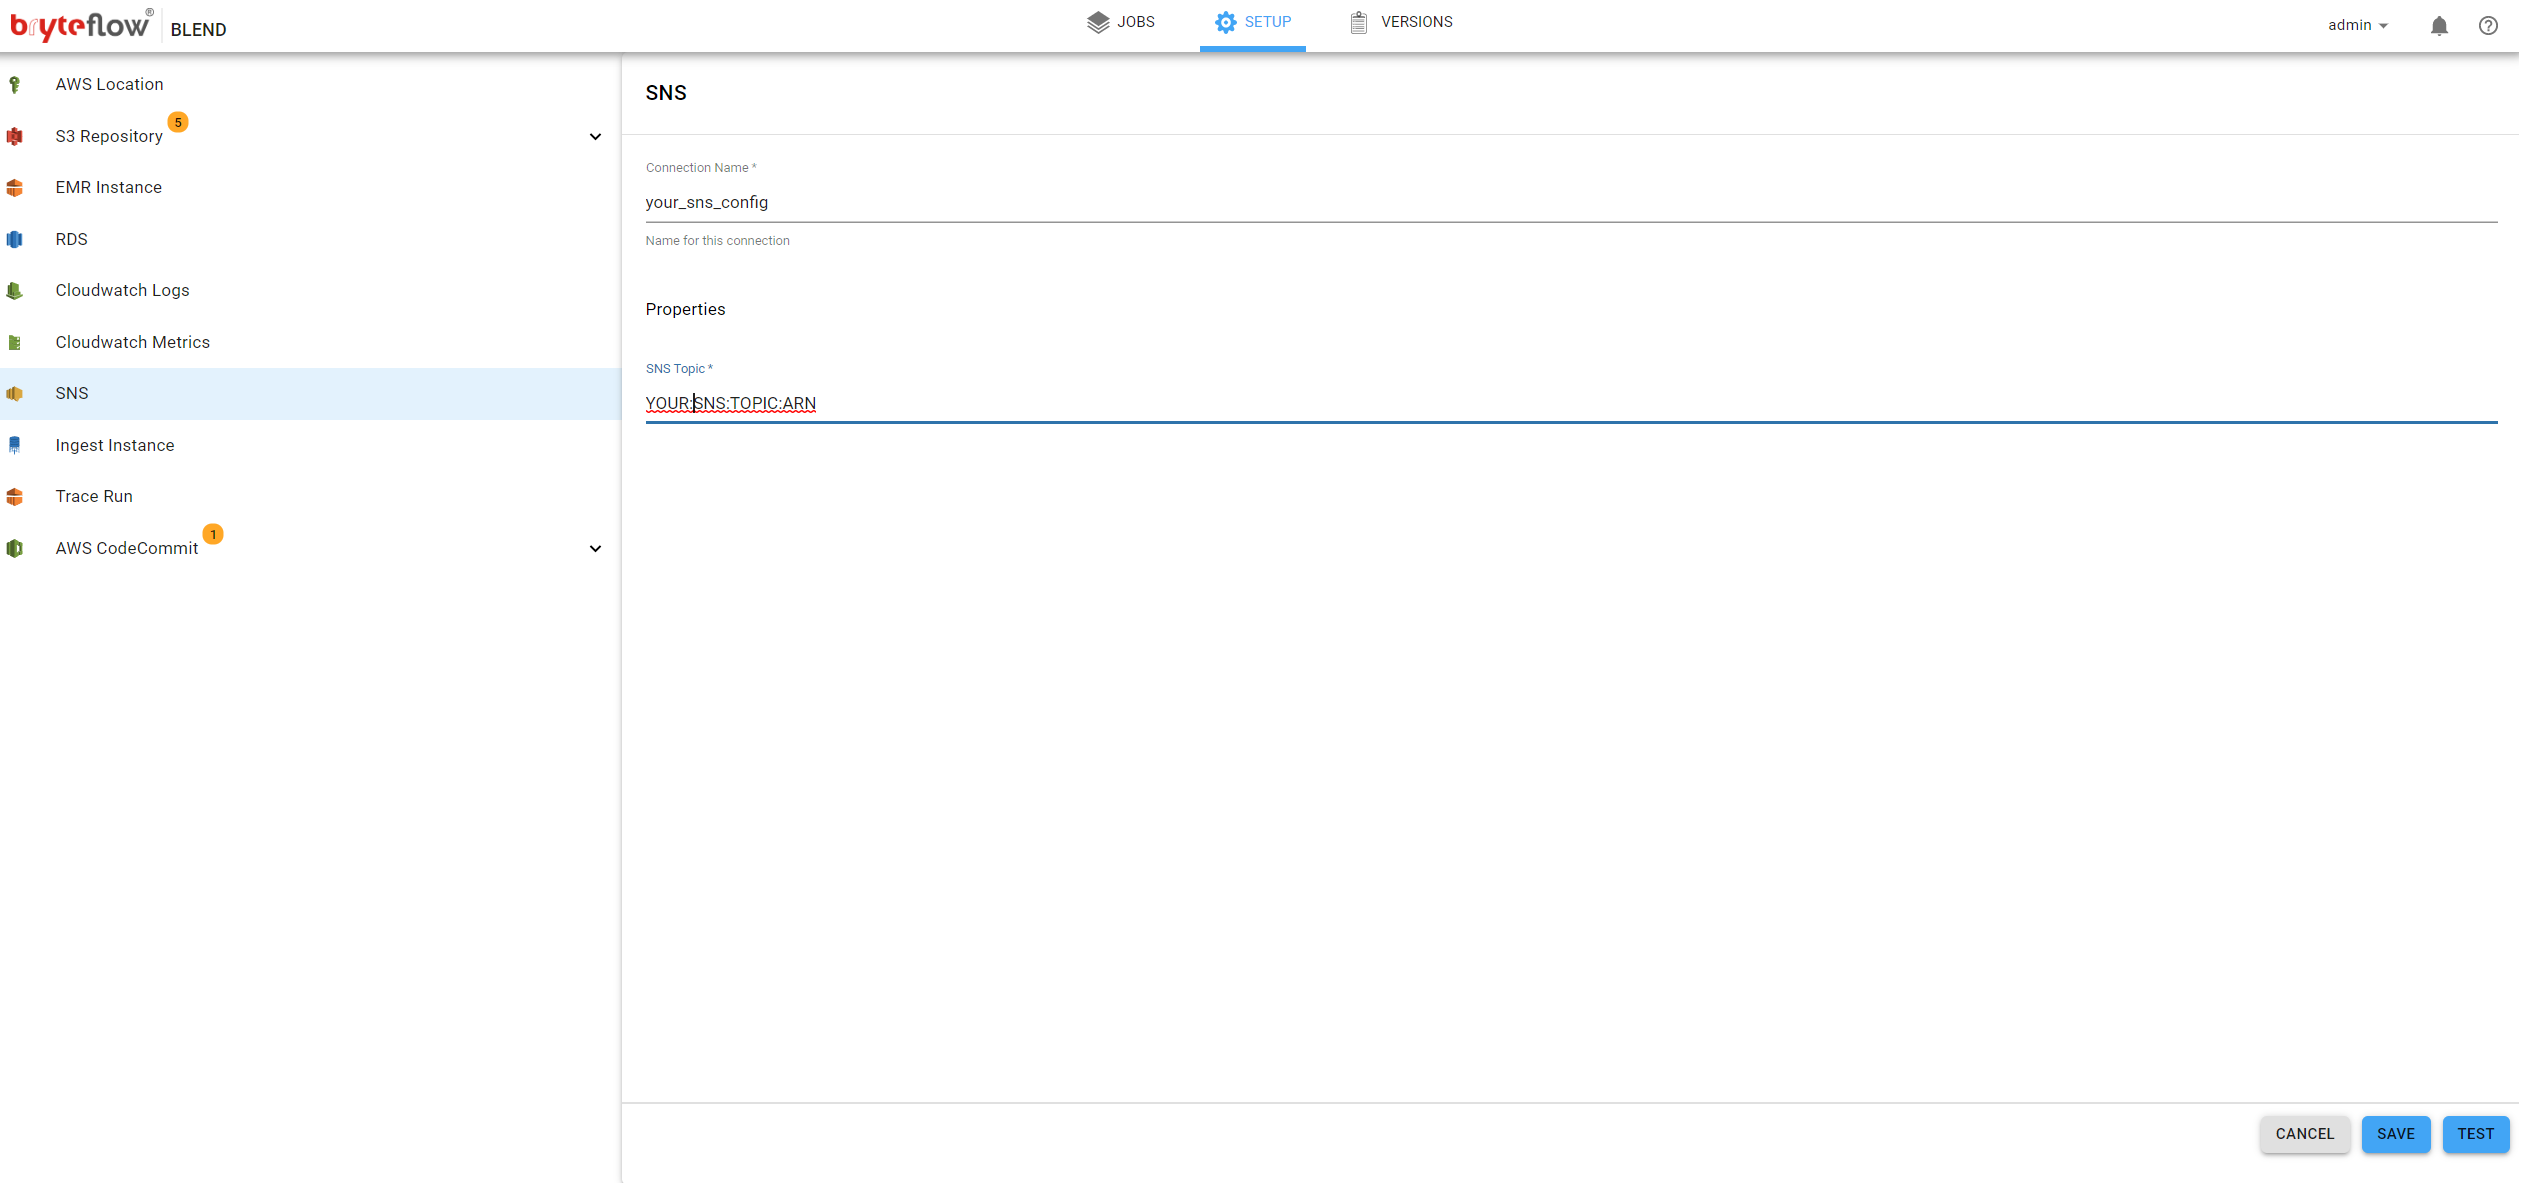
SNS
BryteFlow Blend supports AWS Simple Notification Service (SNS). This service can be used to send SNS messages on significant events like job completion or failure. SNS is a publish/subscribe notification service that can be used to reliably route notifications to multiple endpoints. This can be used to trigger event-driven computing (for example AWS Lambda) and workflows.
Selection of the SNS on the left panel will allow access to SNS to be configured for BryteFlow Blend. The following fields need to be completed:
- Connection Name, The name for this connection. This is to identify this connection within the system
- SNS Topic, Name of the SNS Topic. This has to already exist and can be configured using the AWS console
For further information on AWS SNS and AWS Lambada and please refer to the following links
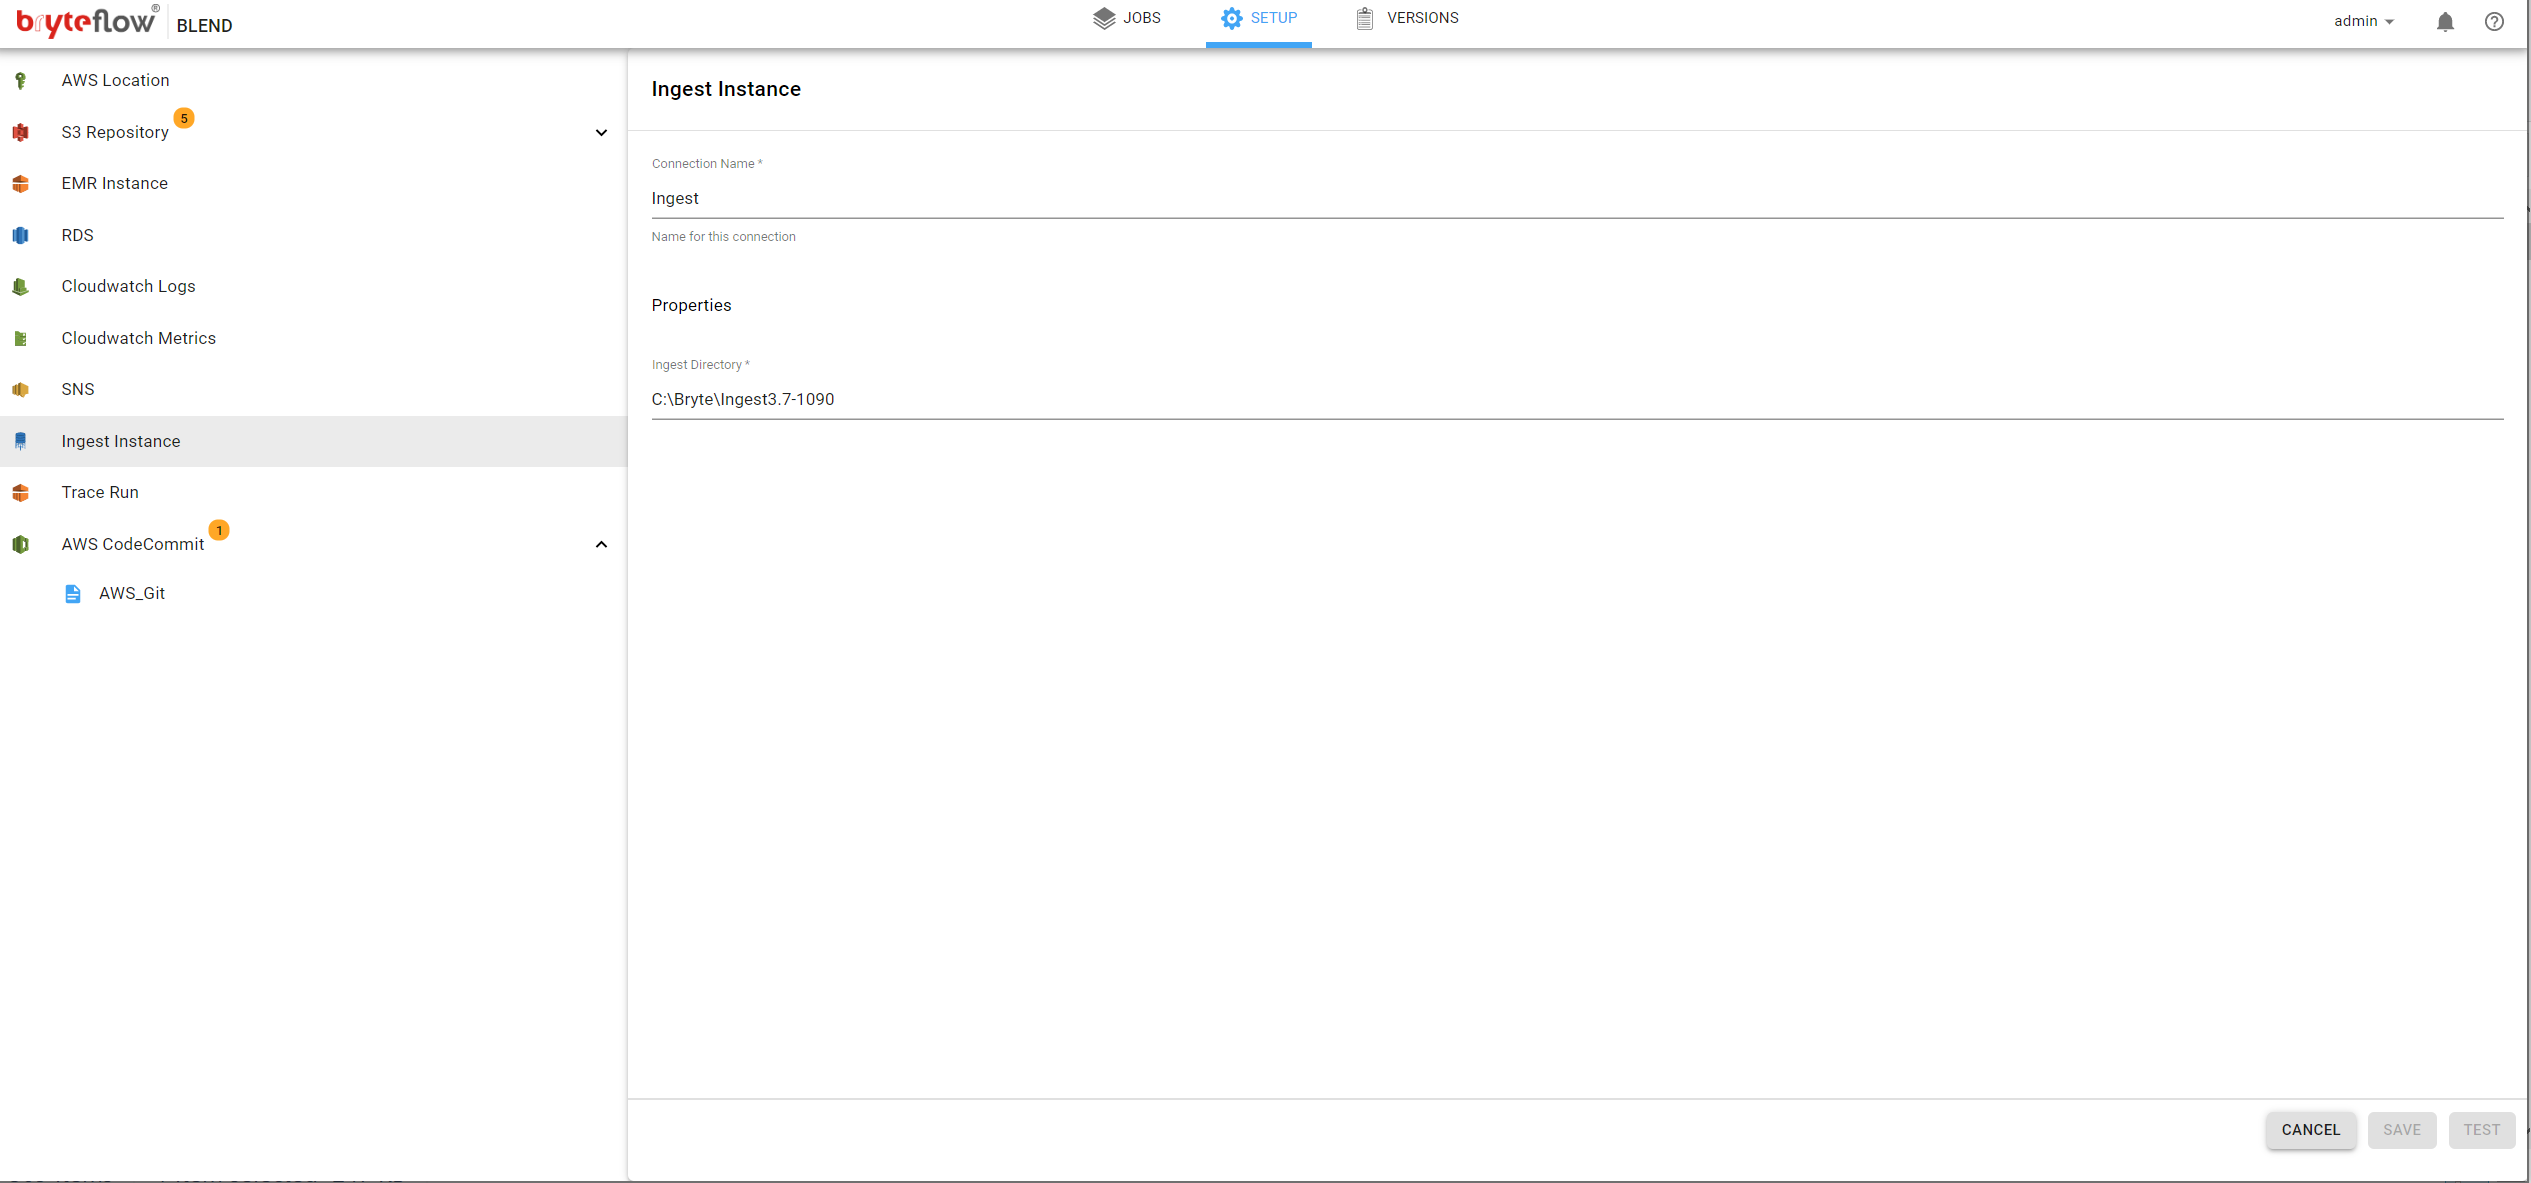
Ingest Instance
BryteFlow Blend works hand-in-hand with BryteFlow Ingest, where the on-premise data is continuously getting synced to S3.
To auto trigger your Blend job based on Ingest table load, you need to configure the Ingest Instance in Blend.
All it needs is the Ingest install directory path.
**Assumption here is Ingest and Blend resides on the same server.
Trace Run
BryteFlow Blend allows a job to be run for debugging purposes. A small subset of the records in input files is used to reduce the run time of the trace process and unlike a normal run, all intermediate outputs are available. Enter the required details to allow this optional feature to be activated.

AWS Code Commit
BryteFlow Blend supports connection to a Git repository to provide version control for jobs created o the system. The Git repository supported is AWS CodeCommit service.
AWS CodeCommit is a version control service hosted by AWS that you can use to privately store and manage assets (such as documents, source code, and binary files) in the cloud.
This connection is optional and is used only if you decide to store all jobs in a version control system.
Selecting the ‘CodeCommitRepository’ item in the left panel will allow Git access to be configured. The following fields need to be completed:
- Connection Name, The name for this connection. This is to identify this connection within the system.
- Remote repository path, Enter the path for the remote repository
- Git User Name, This is the user id used to connect to AWS CodeCommit
- Git Password, This is the password used to connect to AWS CodeCommit
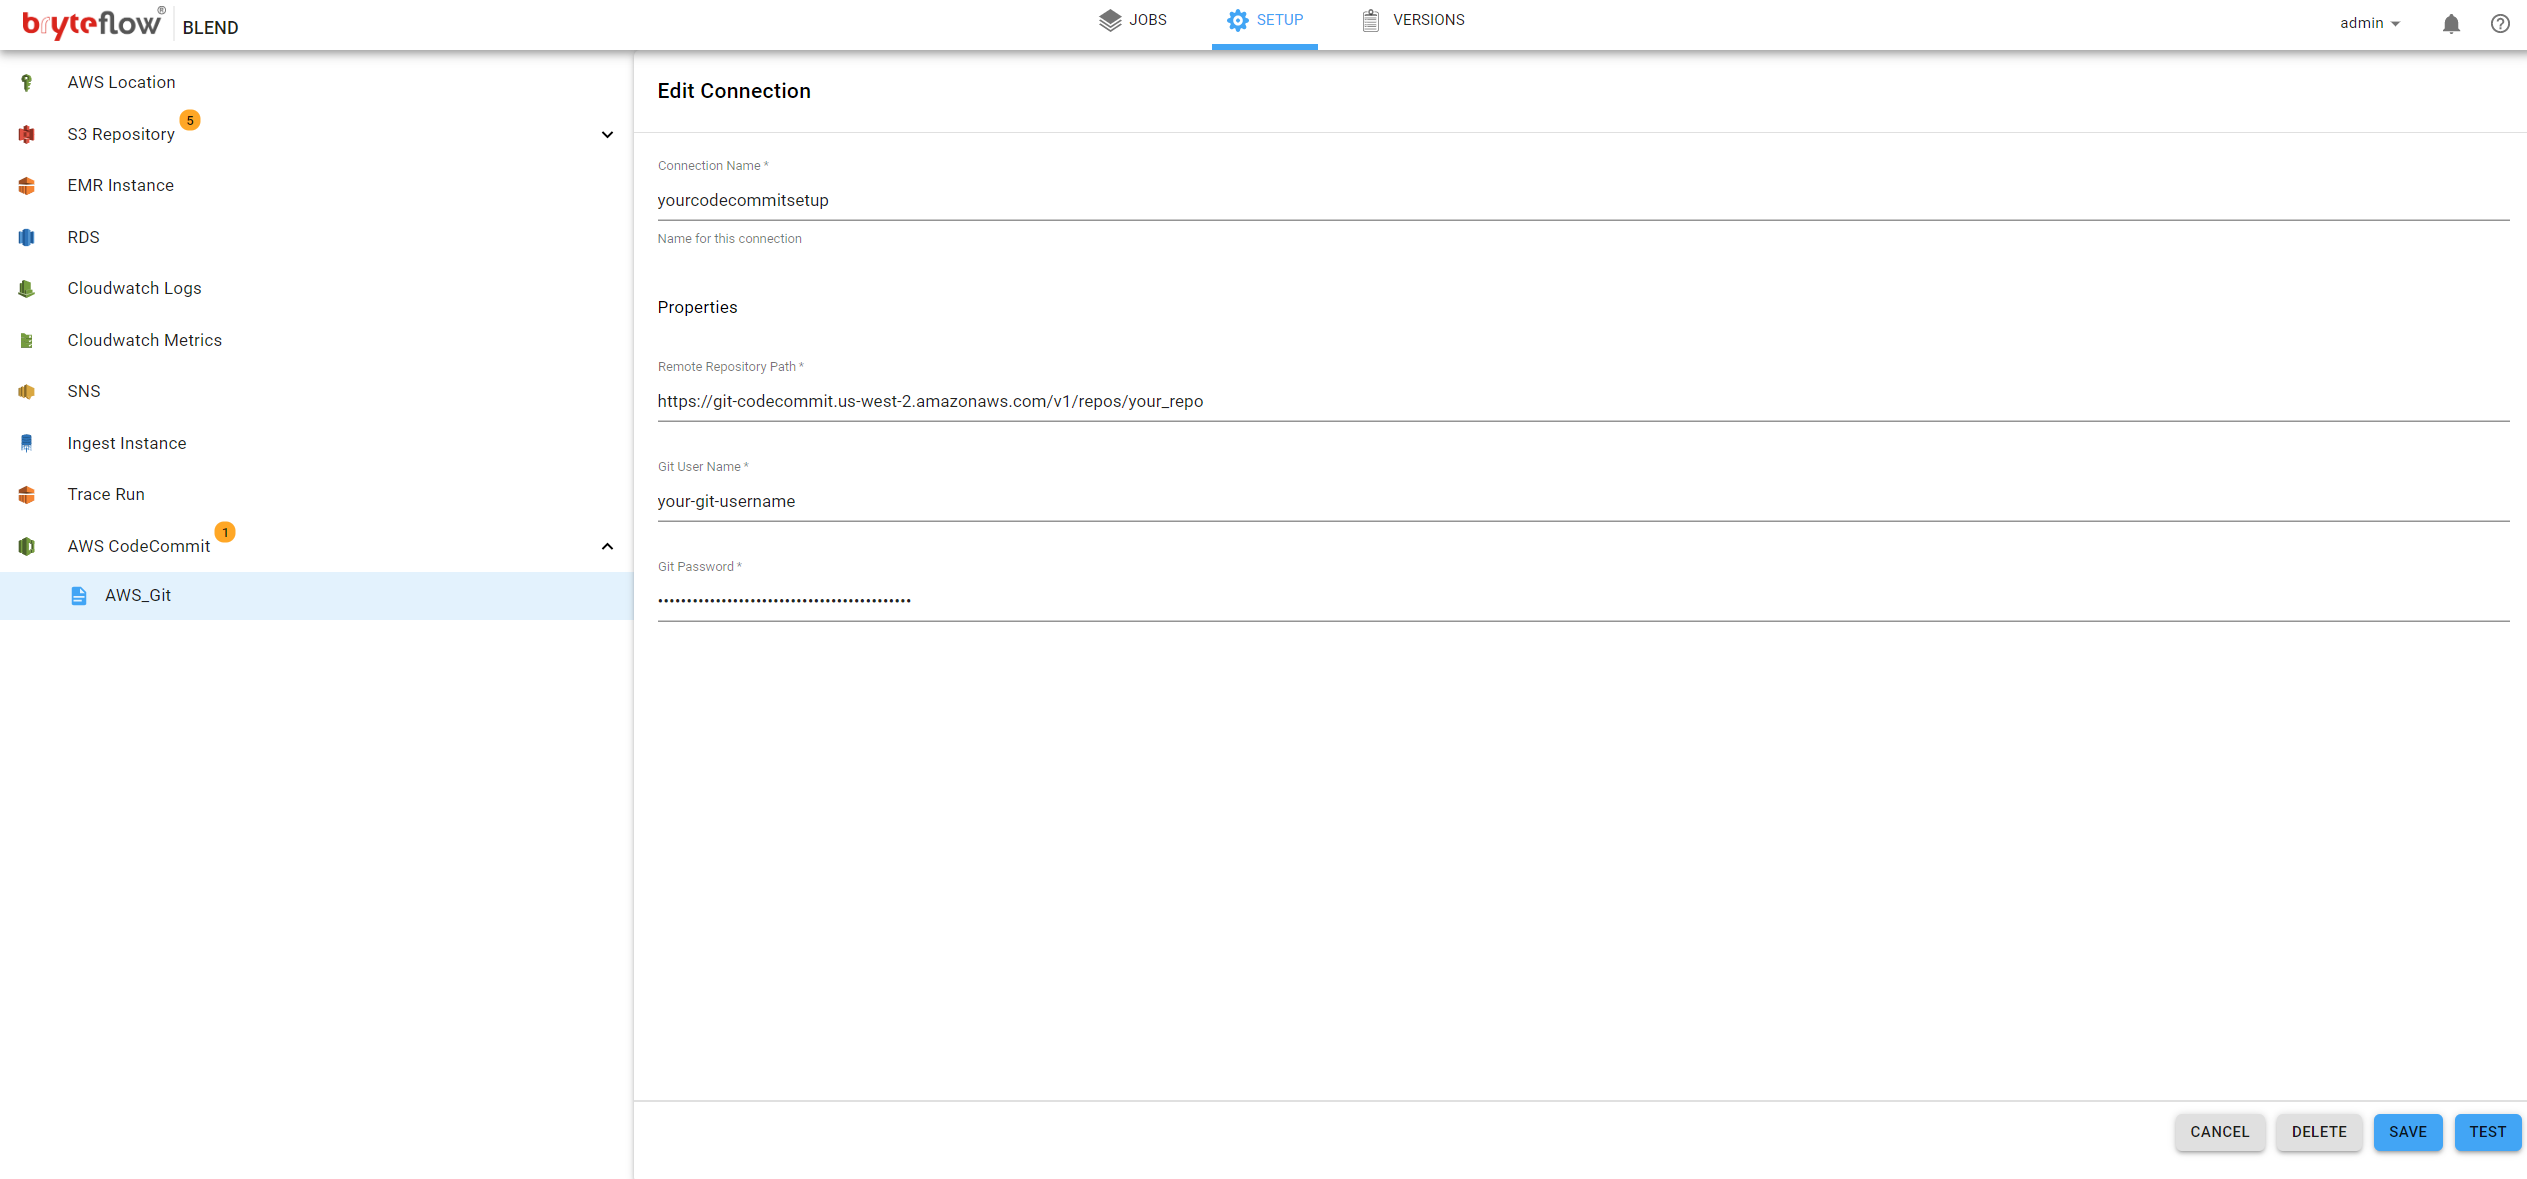
For more information about AWS CodeCommit please refer to the following link
BryteFlow Blend Concepts
BryteFlow Blend has the following concepts, each will be discussed in turn
- Task
- Pipeline
- Job
- S3 View
A task is an individual step or operation (for example load from S3, save to S3, query or export), these tasks are chained together to form a pipeline, one or more pipeline(s) reside inside a single Job

Job
As mentioned earlier a job contains a pipeline of tasks, so the first step is to create a job that houses the pipeline and it’s underlying tasks
Job, Add
A new Job can be added to BryteFlow Blend by clicking the ‘Add New Job’ button located in the top left corner of the Job List
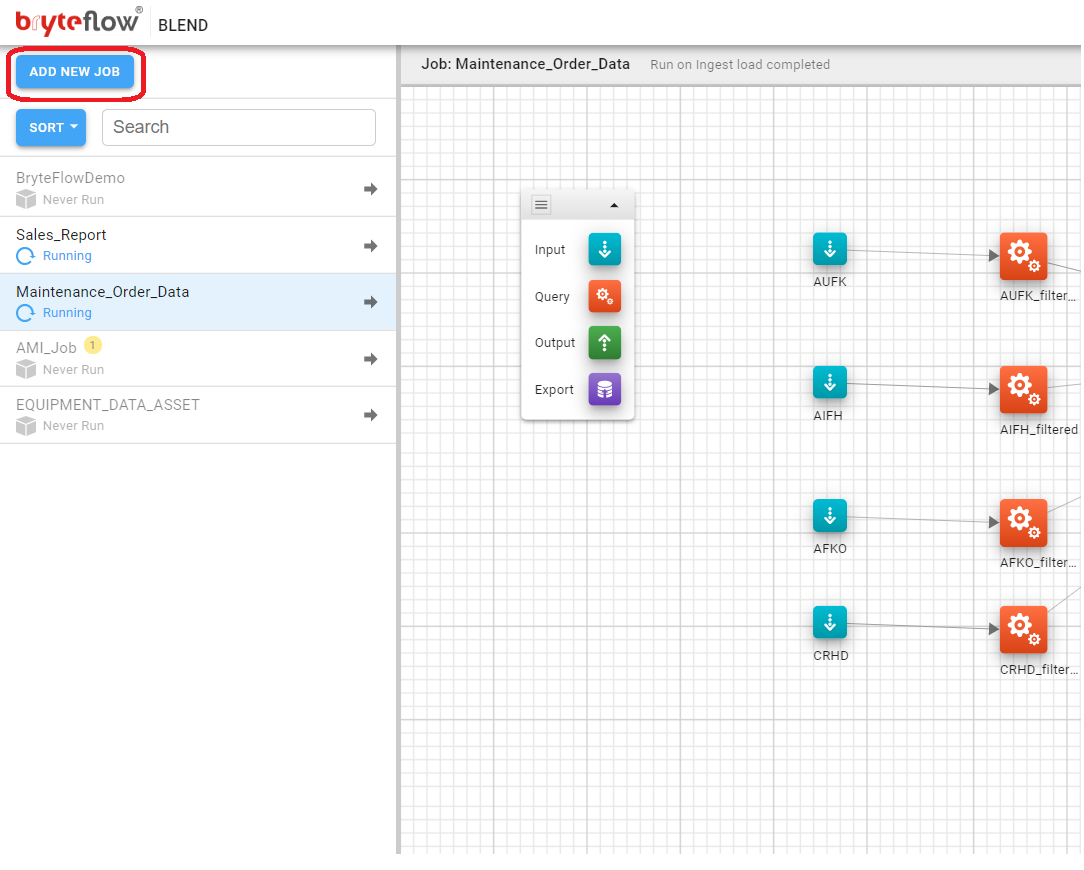
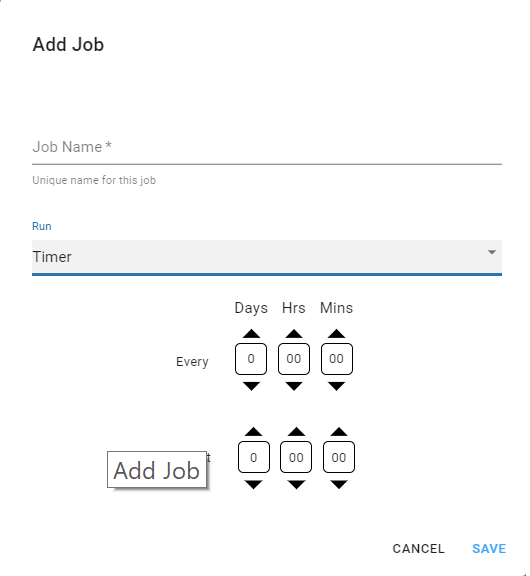
This will open the Add Job Dialog where the name for the Job can be entered, and the schedule for when the Job will be executed can be set
The new Job will be added to the Job List and is disabled by default
Job, Edit
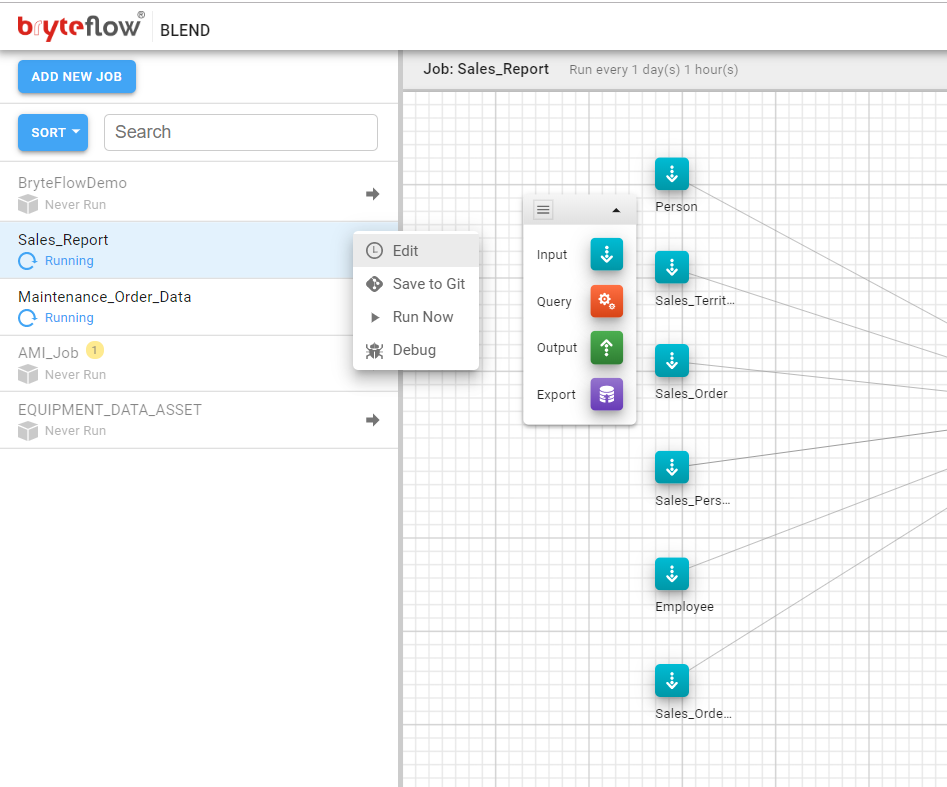
A Job can be edited by clicking the menu icon to the right of the Job in the Job List and selecting the Edit option.
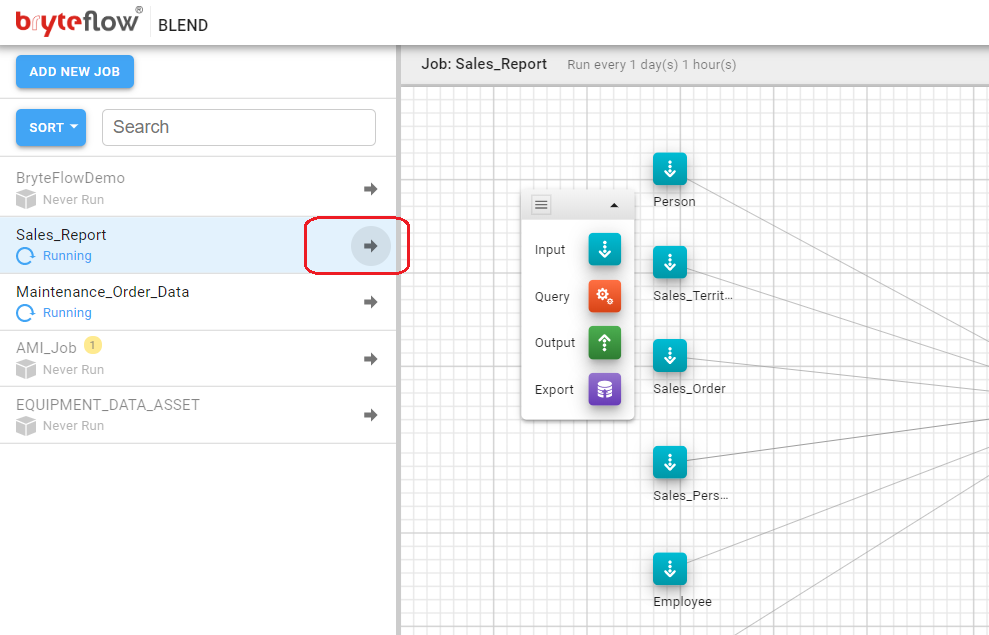
This will prompt the User for various actions that can be performed specifically for the Job.
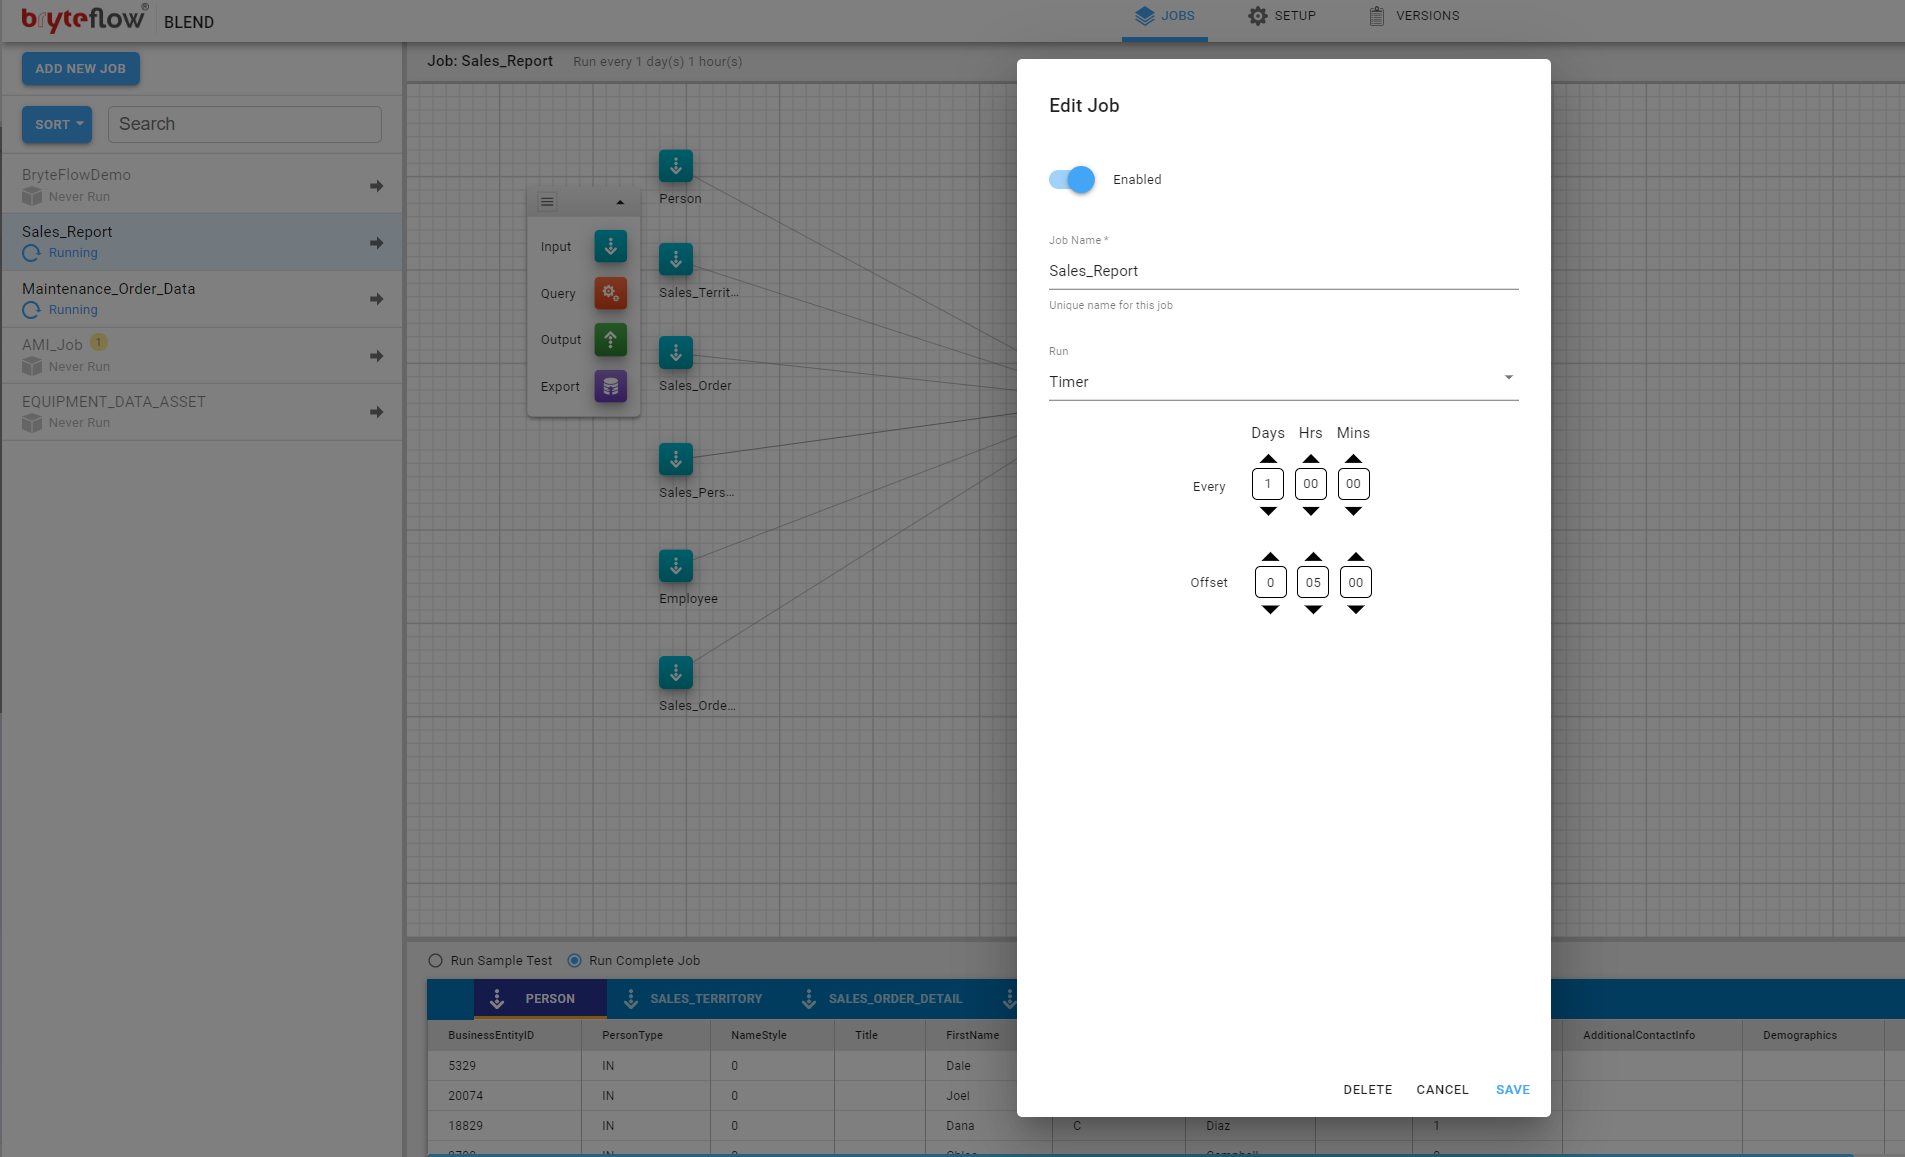
On clicking ‘Edit’, opens up the ‘Edit Job’ dialog where the job can be ‘enabled’ or ‘disabled’ or the name of the Job, and the schedule for the Job, can be modified.
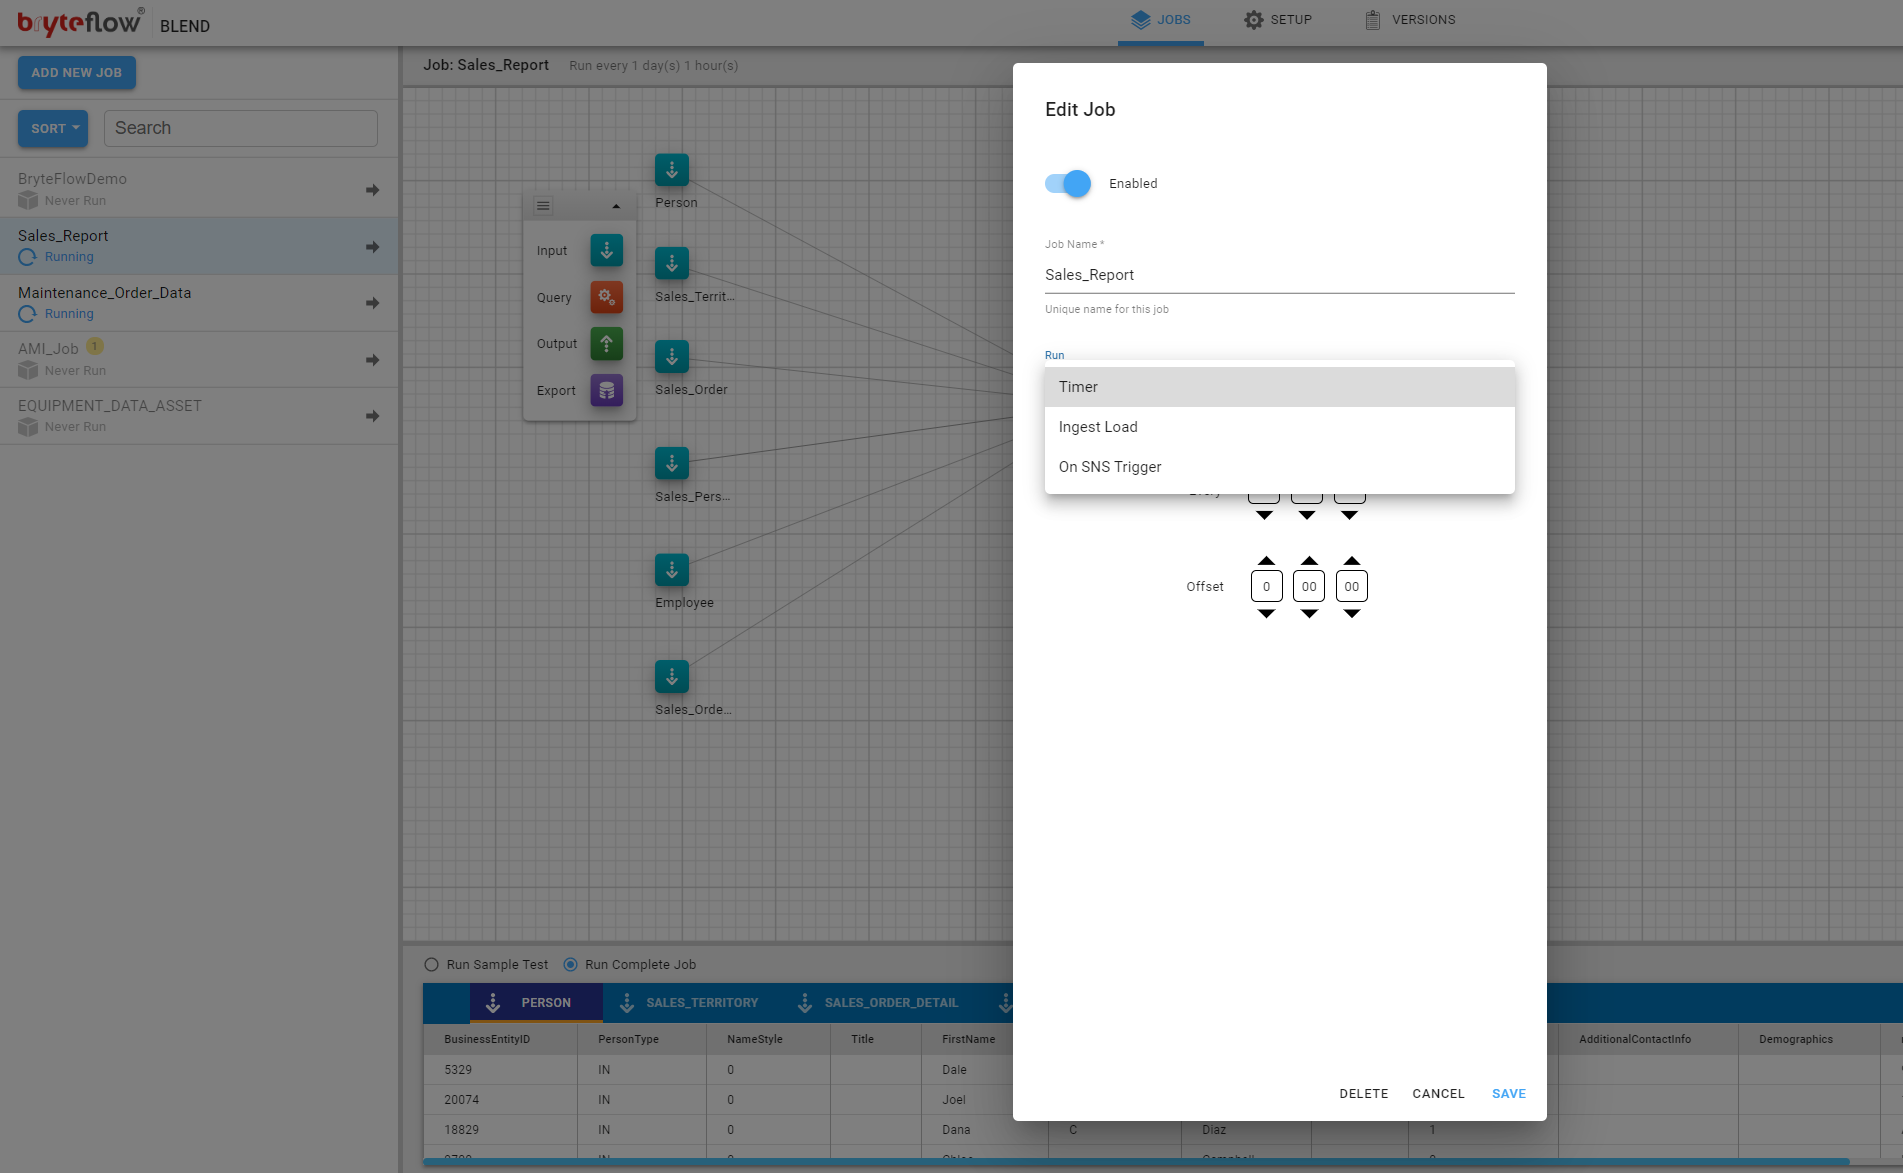
The schedule determines when a Job will be initiated and at what frequency.
There are three options:
- Timer, allows you to specify repeating duration in Days, Hours and Minutes on which the Job will be initiated with a flexibility to have an ‘Offset’. For Example, in the below image the ‘Timer’ is set to Run daily at ’00:00′ hours with an offset of 5 minutes, meaning this job will run daily at ’12:05 am’.
- Ingest Load, allows to configure the schedule of the job on the load event of tables configured in ‘BryteFlow Ingest’. This can be set on an individual table load or ‘All tables’ load.
- On SNS Trigger, allows you to trigger the execution of the Job based on an SNS topic
- Please refer to the following section on SNS Triggers
Please refer to later sections in this document for the following other job edit options
- Monitor
- Save to Git
- Run Now
- Debug
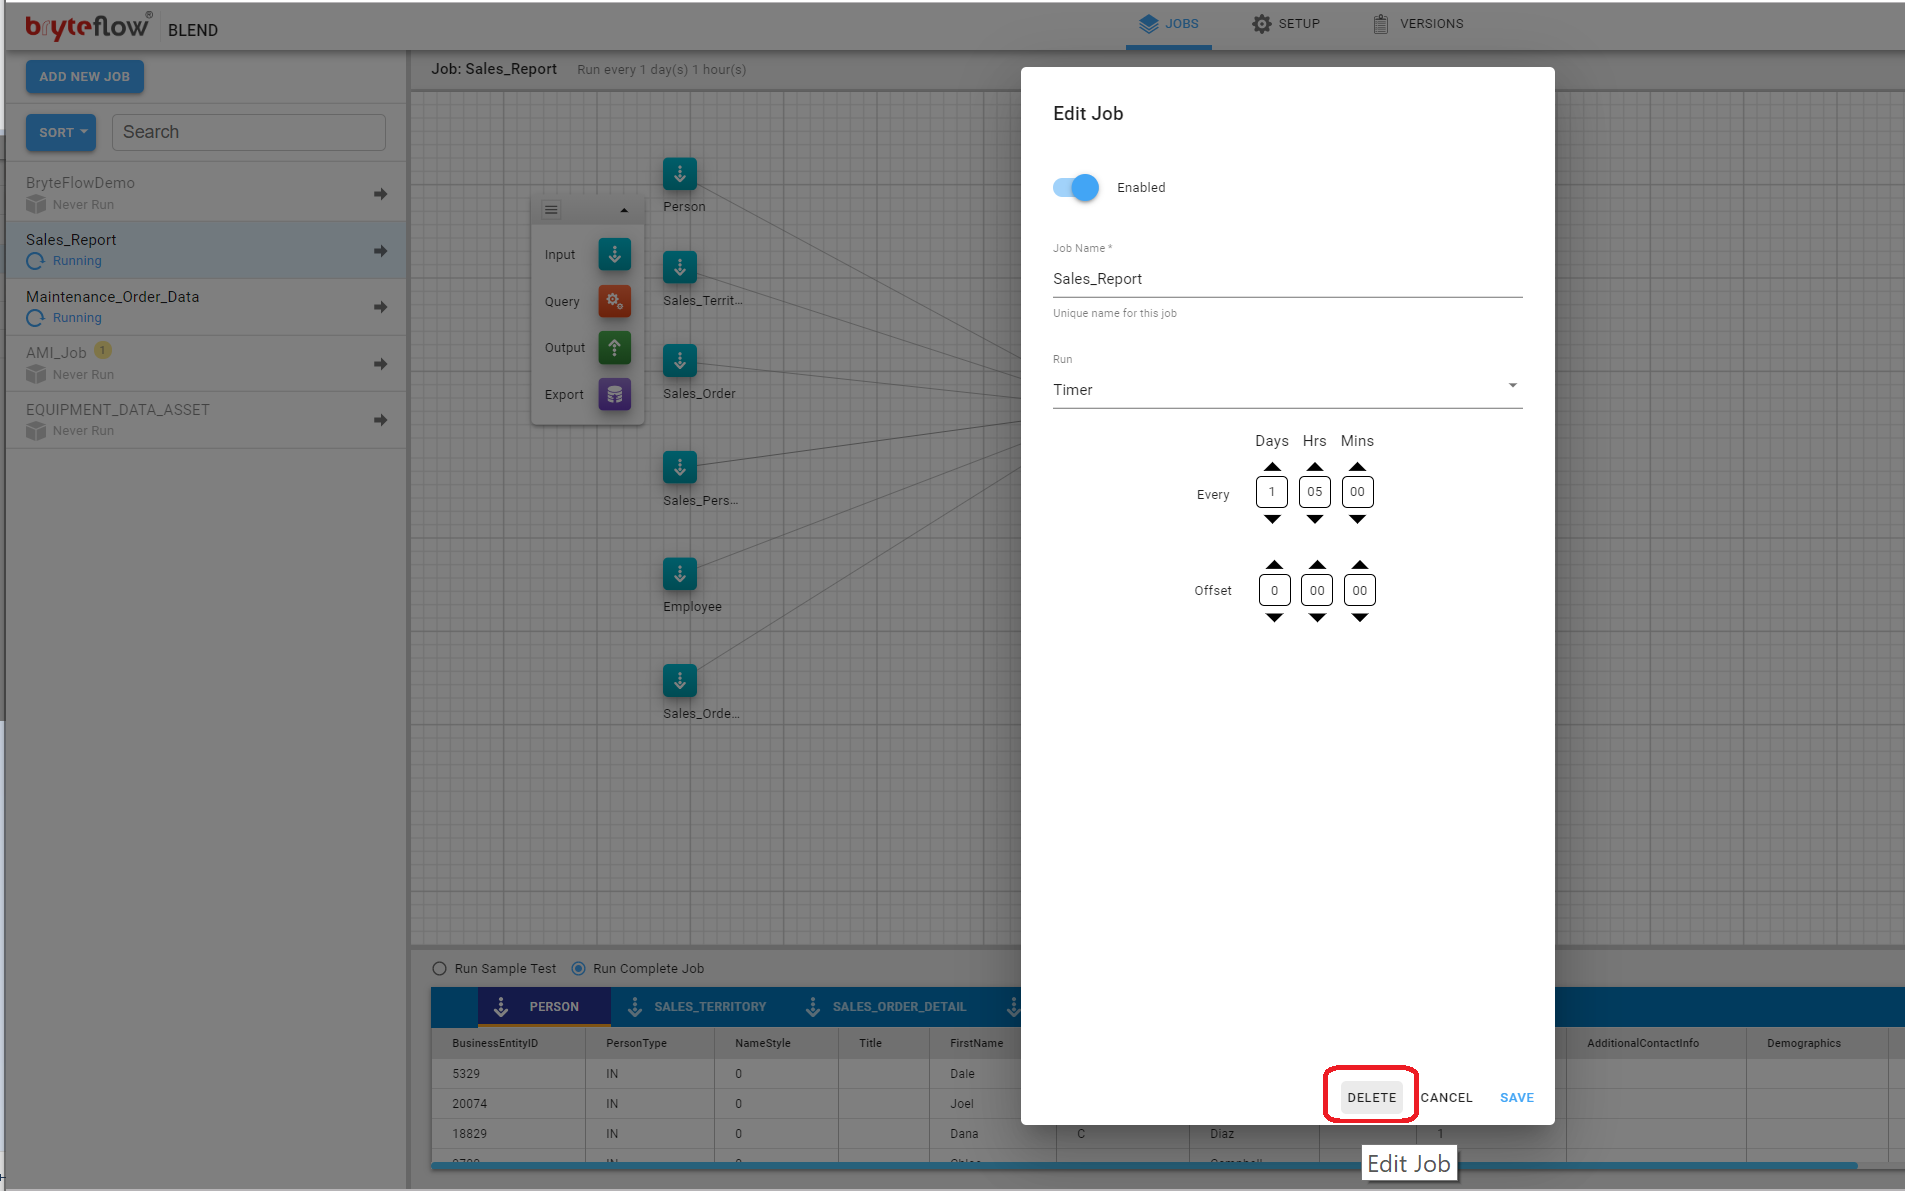
Job, Delete
This Edit Job Dialog also includes a Delete Job button that will, after confirmation, delete the Job and all associated Tasks.
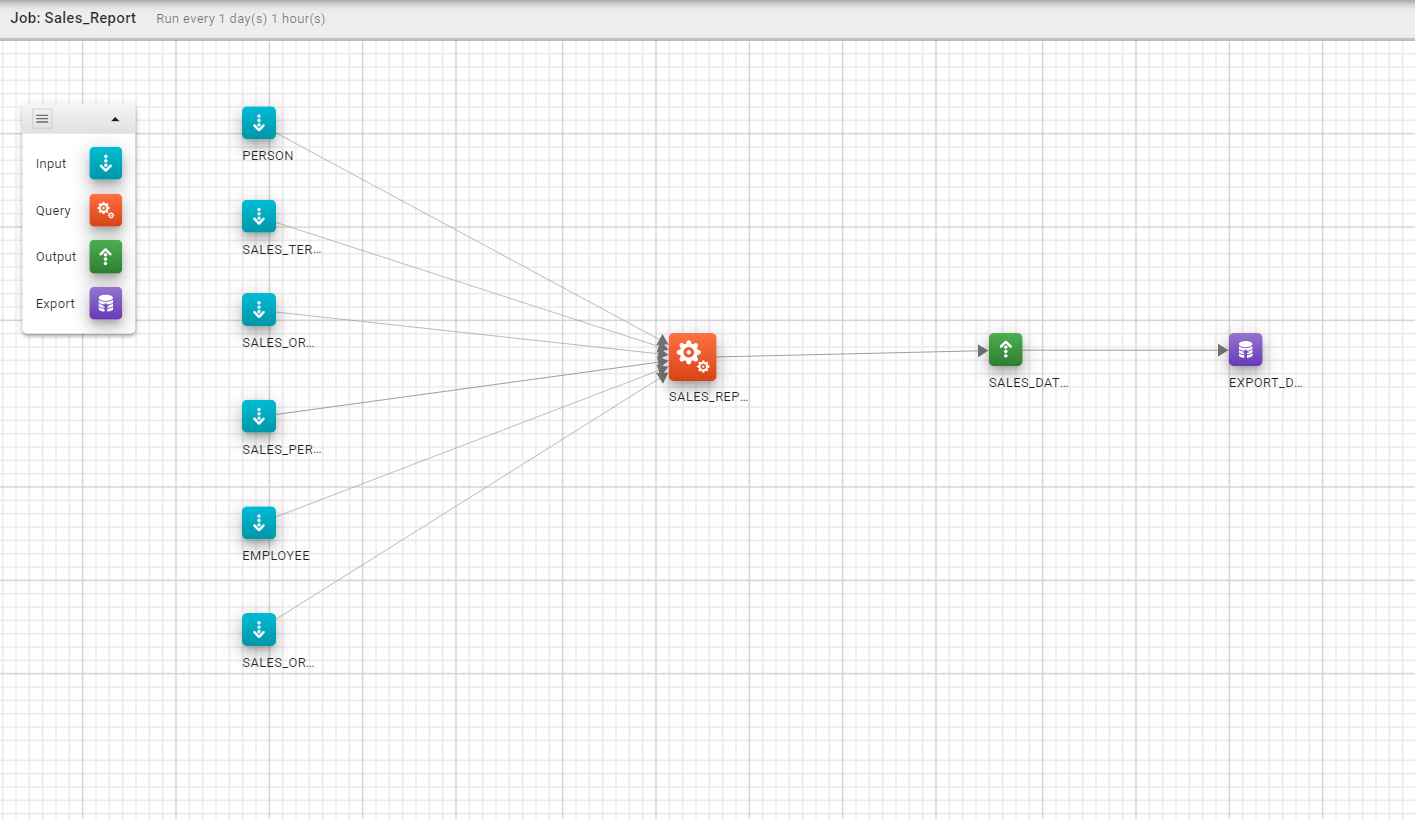
Pipeline
As mentioned earlier a pipeline is simply a number of tasks chained together that reside inside a job, within a single job there can be multiple independent pipelines. Please refer to the diagram below for an example of a pipeline.
Task
A BryteFlow Blend task is a single operation, this can be one of the following four types :
| Input | |
| Query | |
| Save | |
| Export |
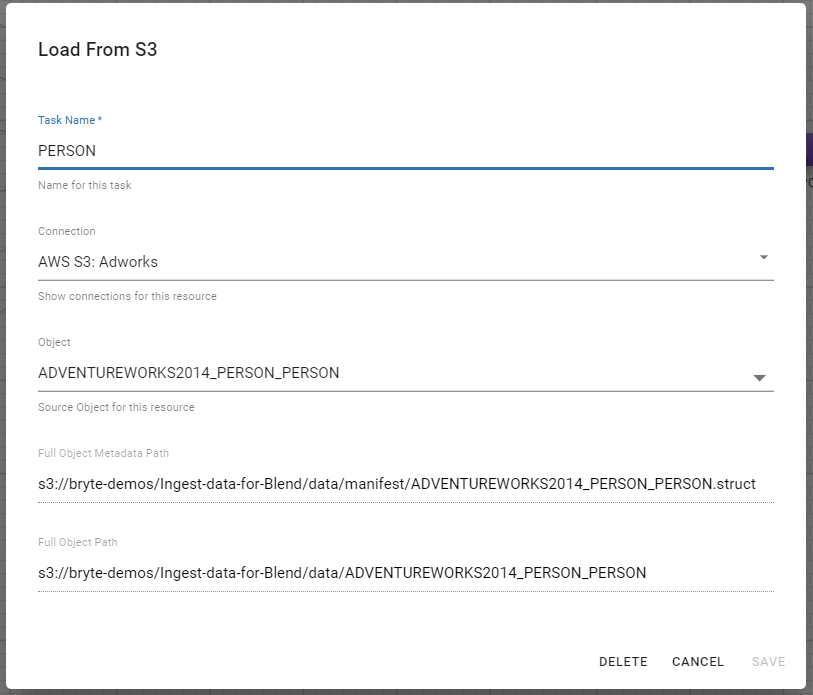
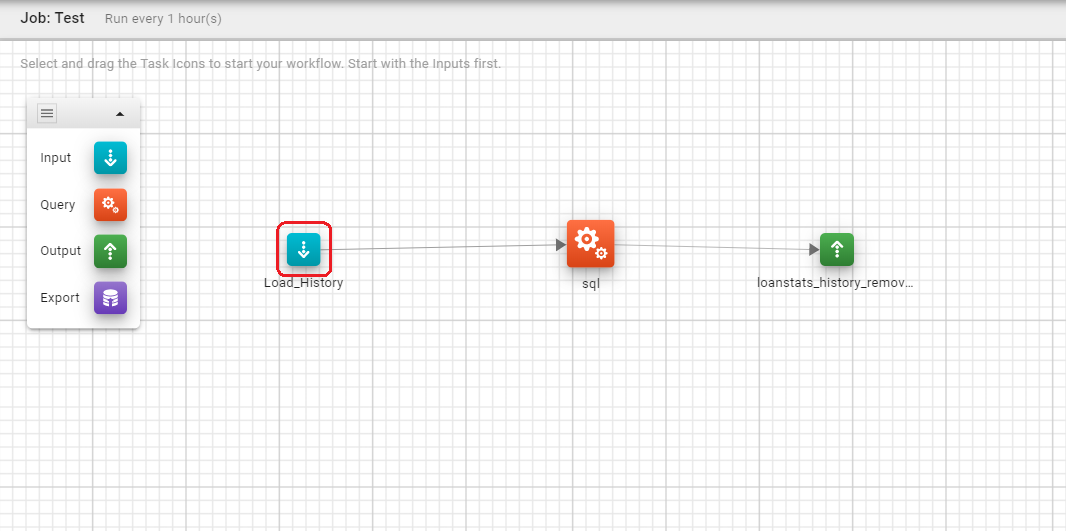
Input Task
The ‘Input’ task allows data to be loaded into BryteFlow Blend from AWS S3. When editing a you will need to select the AWS S3 connection you want to use to load data, you will also need to provide the S3 path to the data folder and the manifest folder where the data resides. Please refer to the following screenshot for an example.
Query Task
The Query Task allows the data from Input tasks or other Query Tasks to be transformed, filtered, or joined using regular ANSI SQL2. When editing a Query task you are able to use the editor to directly enter SQL statements.
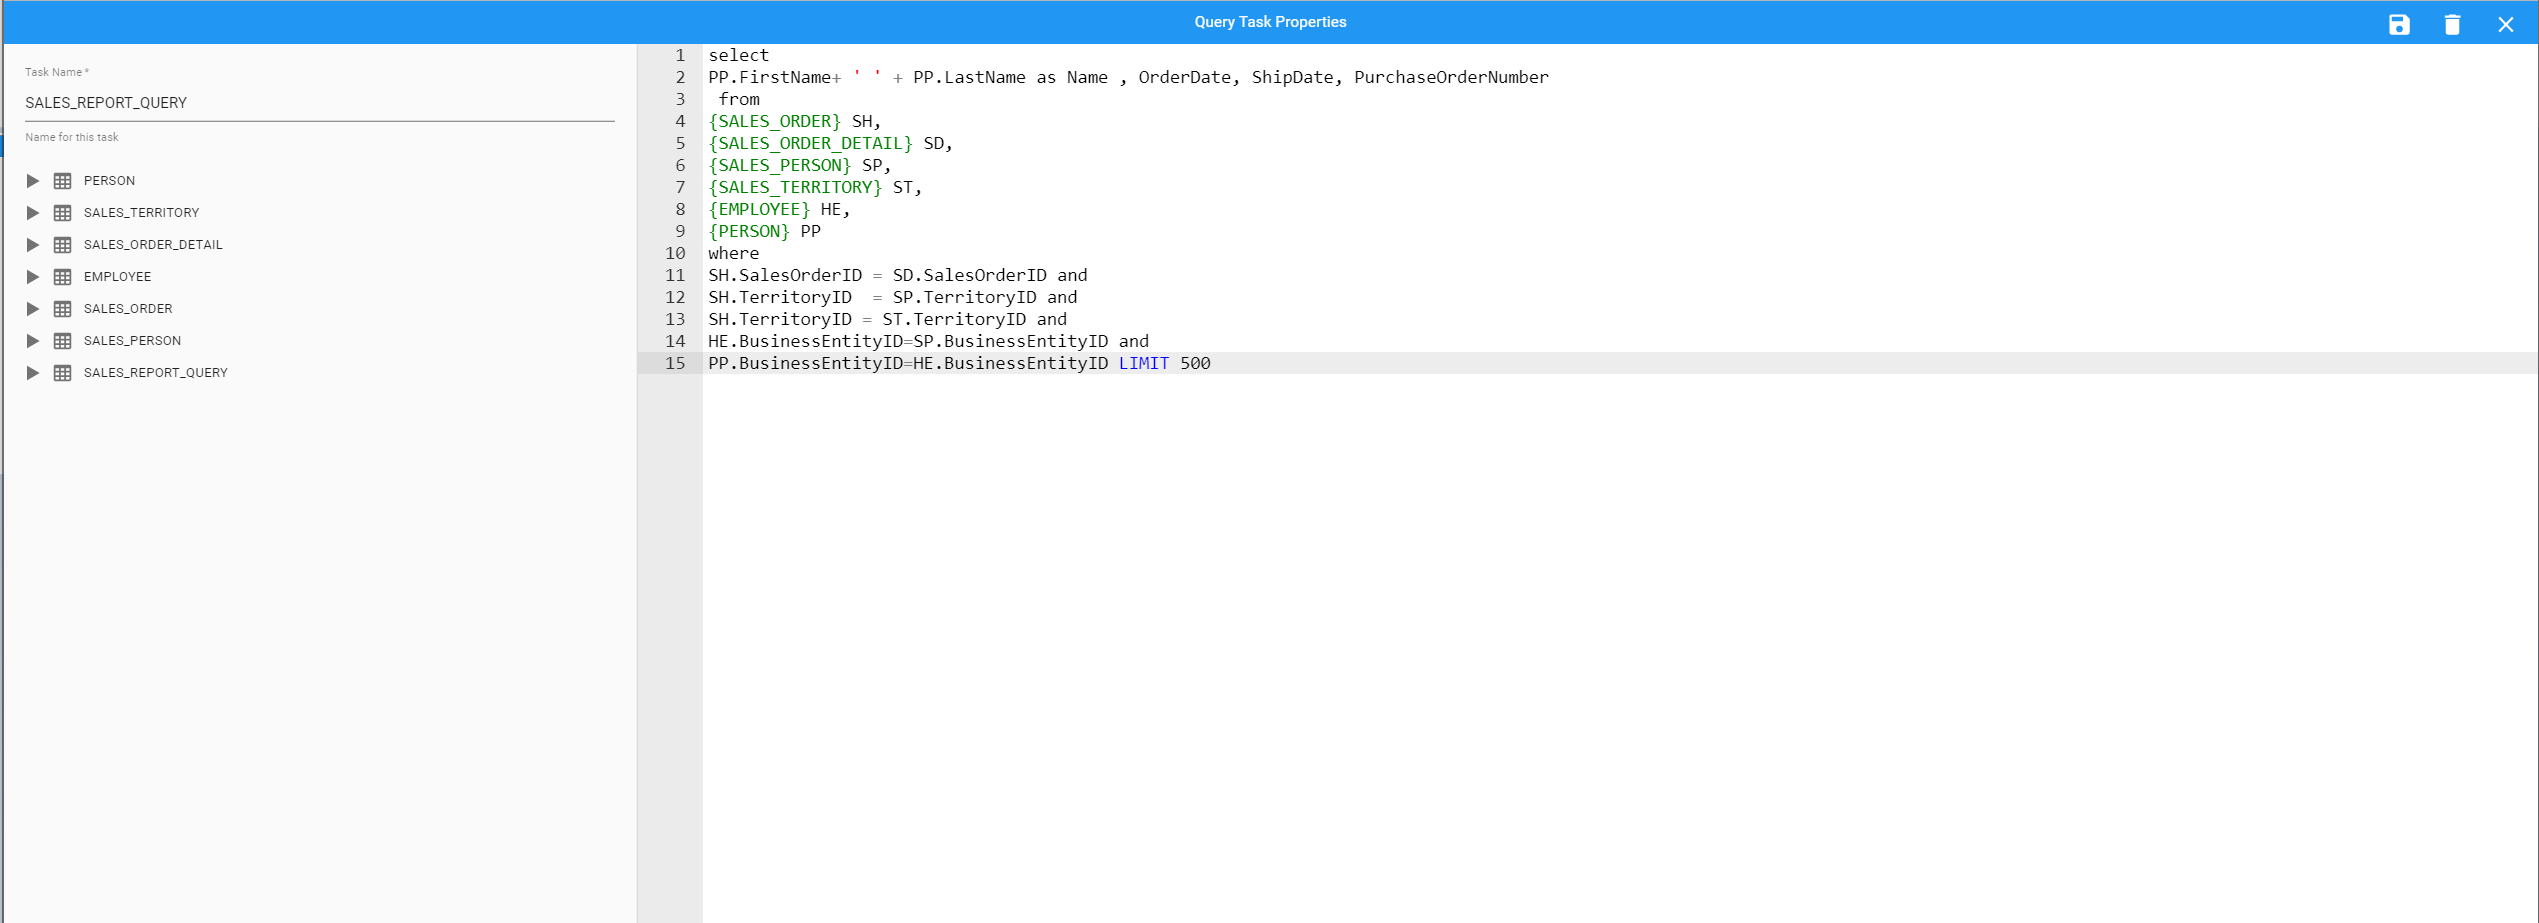
BryteFlow Blend allows you to reference the data from other preceding tasks as if they were regular tables using a curly brace notation. For example, if you had a Task named ‘My Data’ you can query the data from that Task with the following SQL:
SELECT * FROM {My_Data}
The BryteFlow Blend tool editor also provides hinting for synta and built in functions.
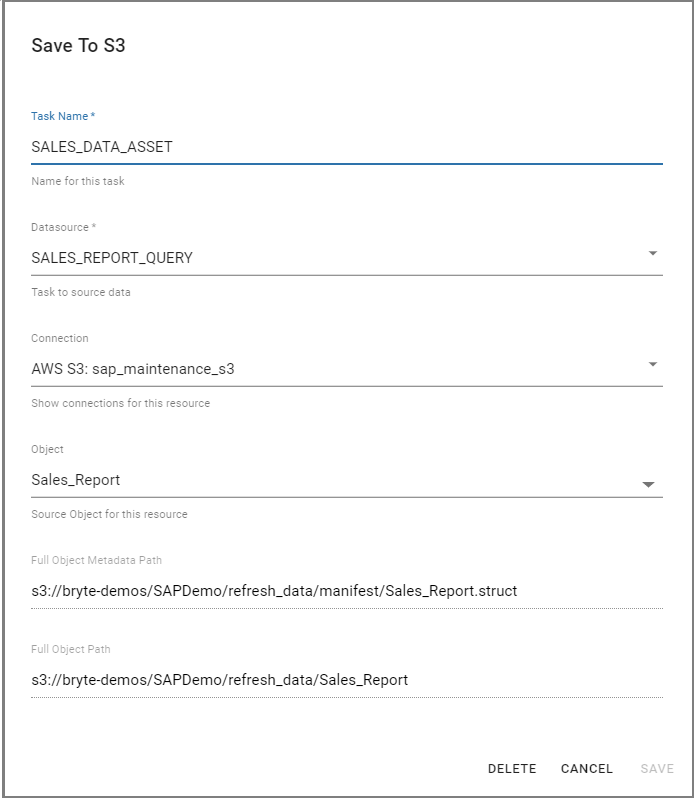
Save Task
The Save Task allows data to be saved from BryteFlow Blend back to AWS S3. The output of Query When editing a Save task you will need to choose BryteFlow Blend source task (from which to obtain the data) and the AWS S3 connection you want to use to save to. You will also need to provide the S3 path to the data folder and the manifest folder. Should data already exist (for example from a previous run) it will be dropped and recreated each time the job executes.
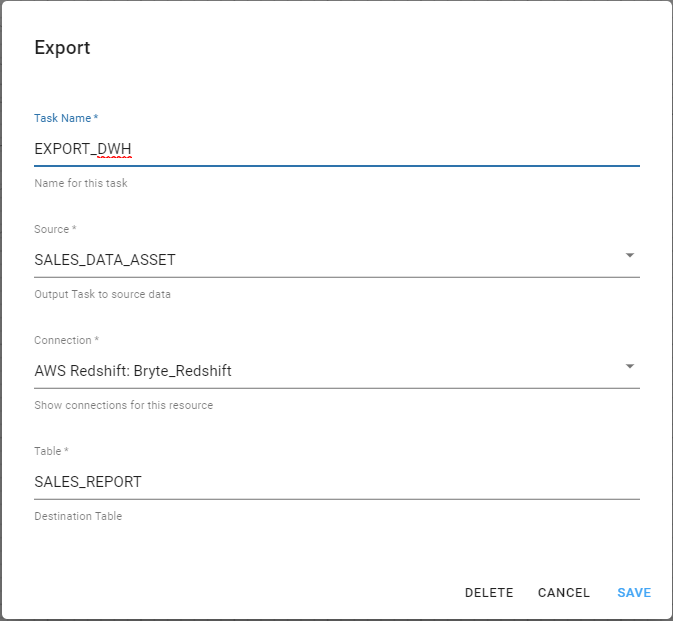
Export Task
The Export Task allows saved data to be exported to third-party systems. When editing a Save task you will need to choose the source Task from which to obtain the data and the connection you wnat to export to. Typically you will be asked for a destination name or table, however depending on the type of third-party system there may be other fields that need to be completed.
Task, Add
Tasks are added to pipeline by simple drag and drop method. The first action is to select the Job from the Job list (left panel), this will result in the pipeline(s) being displayed for the job in question (right panel).
You can now add a new task by simply dragging the required task icon into the Task Pipeline area.
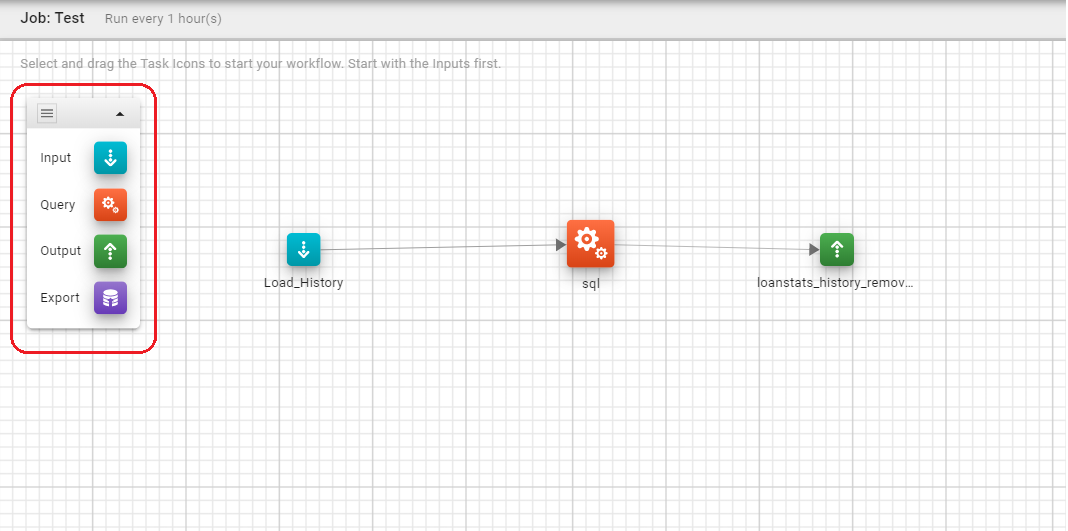
This will open the select Task Dialog where the name and other required details of the selected task can be entered.
Task, Edit
To edit the task simply click it in the Task Pipeline. This will open the Edit Task dialog box specific to the type of Task that you are editing. On desktop devices you are able to position the Task within the Task Pipeline by dragging the Task to a new position. This will automatically redraw any connection lines indicating the data flow.
The edit depends on which of the four types of task it to be edited, each will be addressed in turn
| Input | |
| Query | |
| Save | |
| Export |
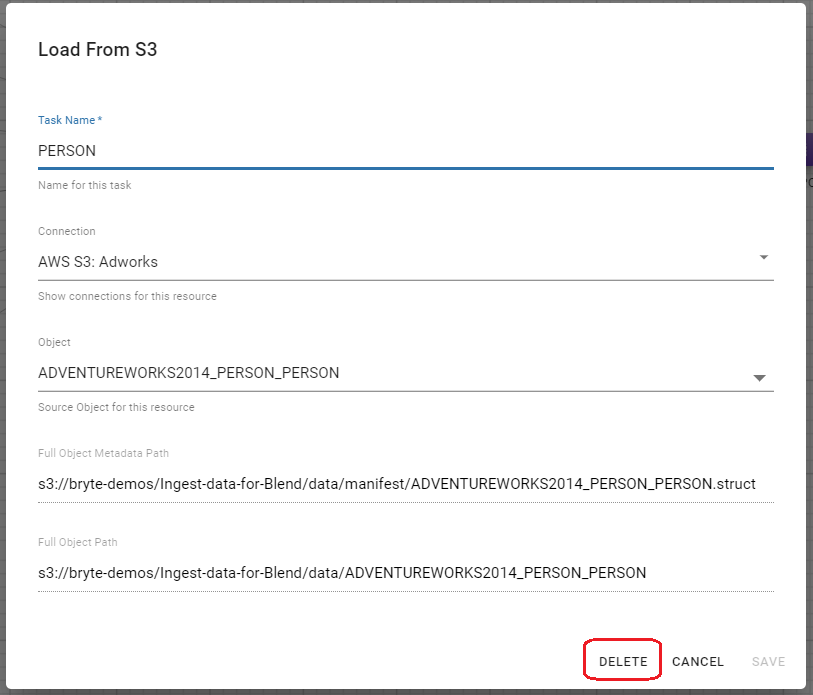
Task, Delete
This Edit task dialogs for each Task type also includes a DELETE button that will, after confirmation, delete the Task and associated data connections.
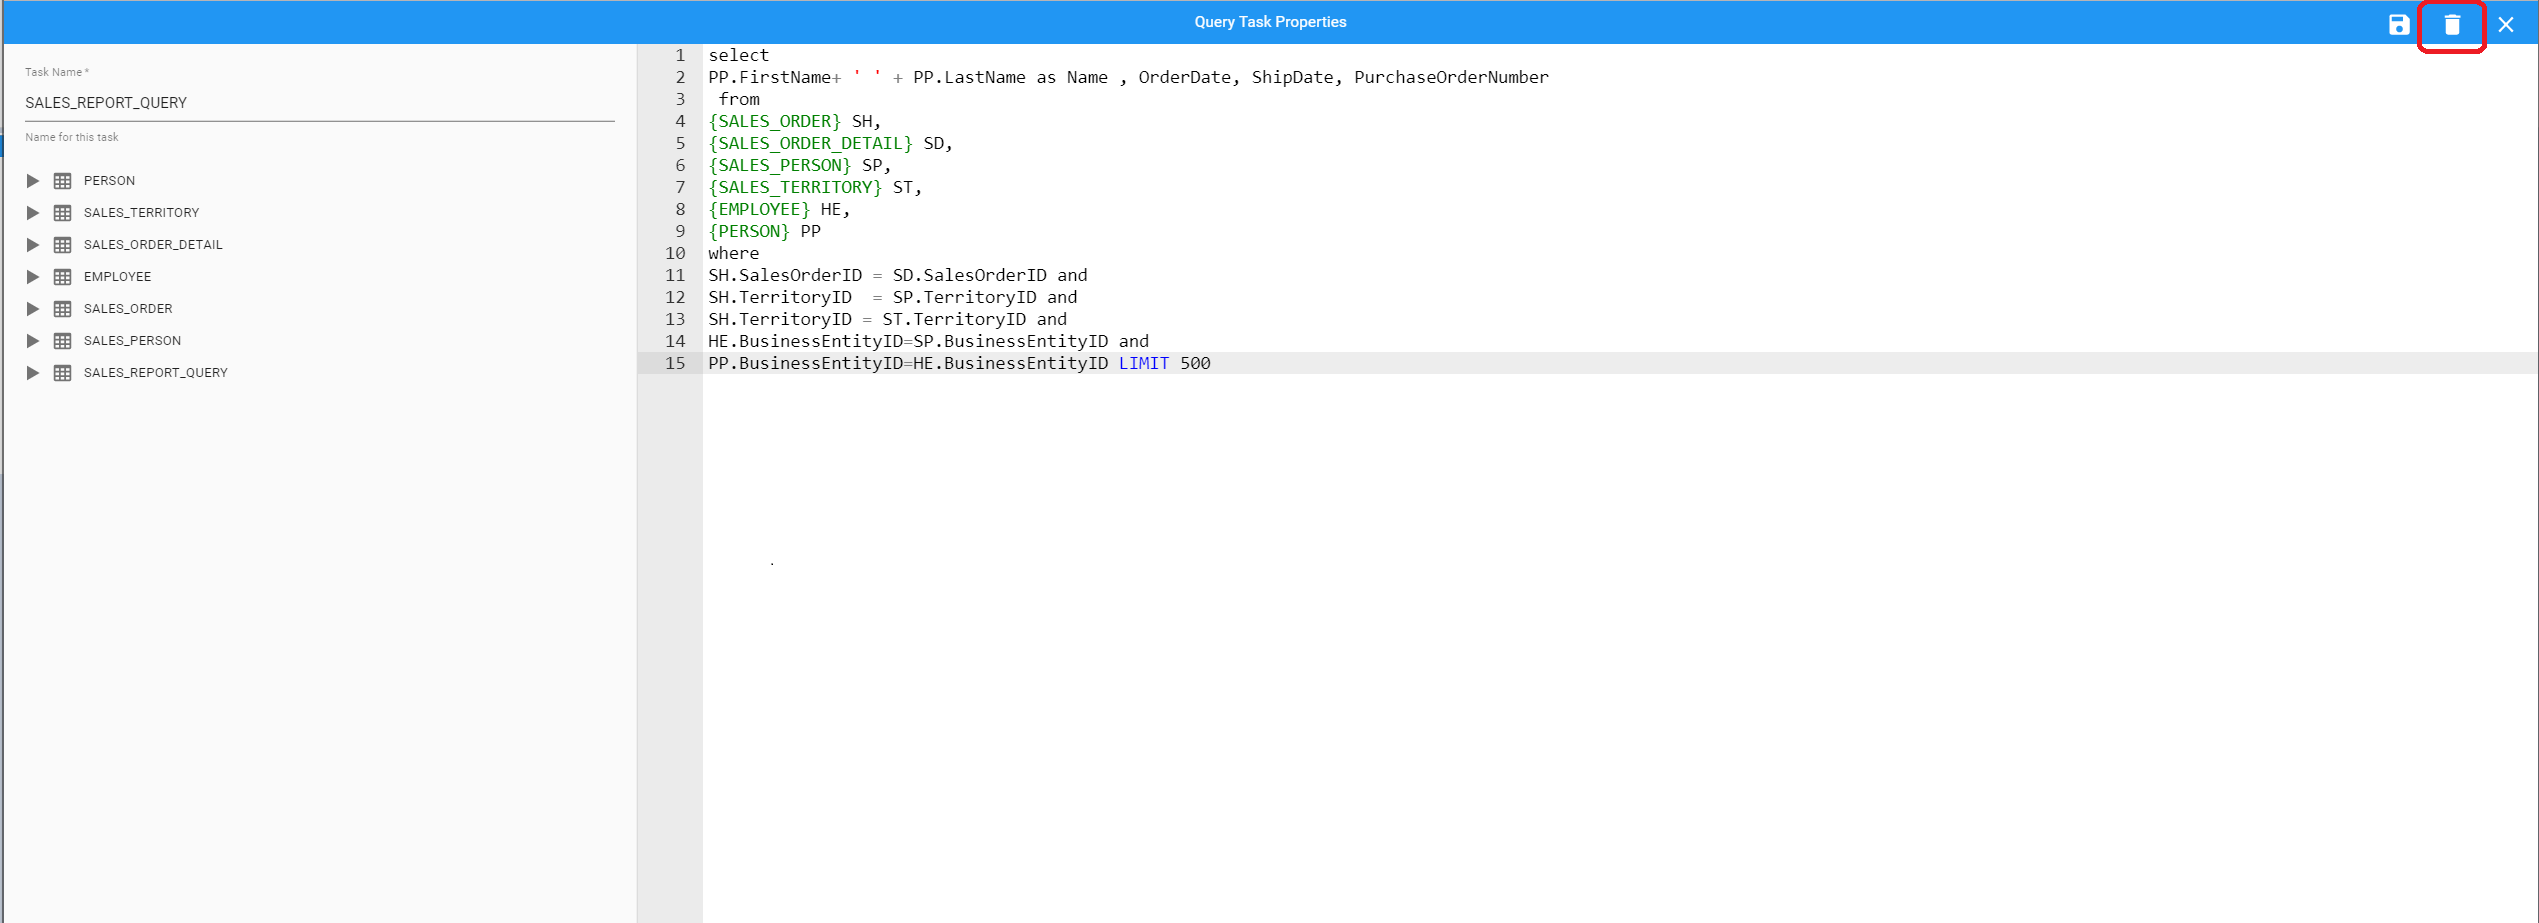
Additionally a query task can also be deleted while editing, by selecting the trash can icon at the top right of the screen
BryteFlow Blend Usage
The following sections discuss some of the execution and development scenarios for BryteFlow Blend.
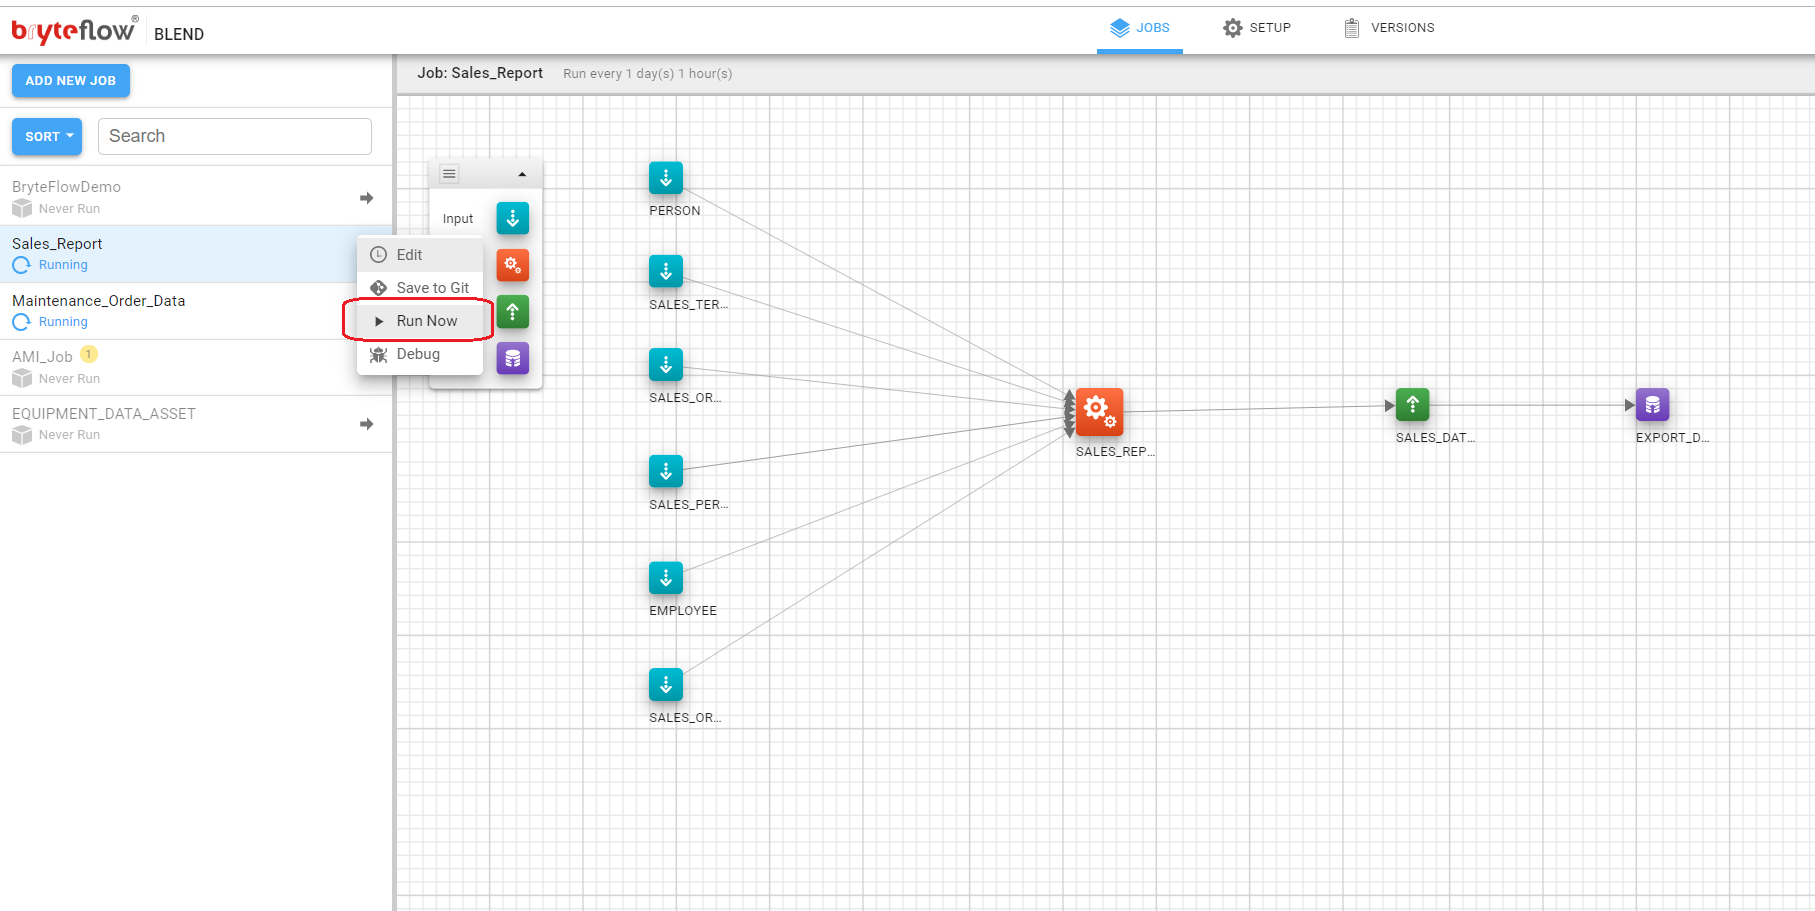
Run Now
Typically during development of a BryteFlow Blend job the developer will require immediate (rather than scheduled execution). BryteFlow Blend jobs can now be instantly triggered with the ‘Run Now’ feature. This forces a execution irrespective of the jobs status (enabled/disabled) and schedule. To invoke Run Now on any job, click on the menu next to the job and select ‘Run Now’.
A confirmation dialog will be presented, click RUN to confirm execution (or CANCEL if you wish to change your mind).
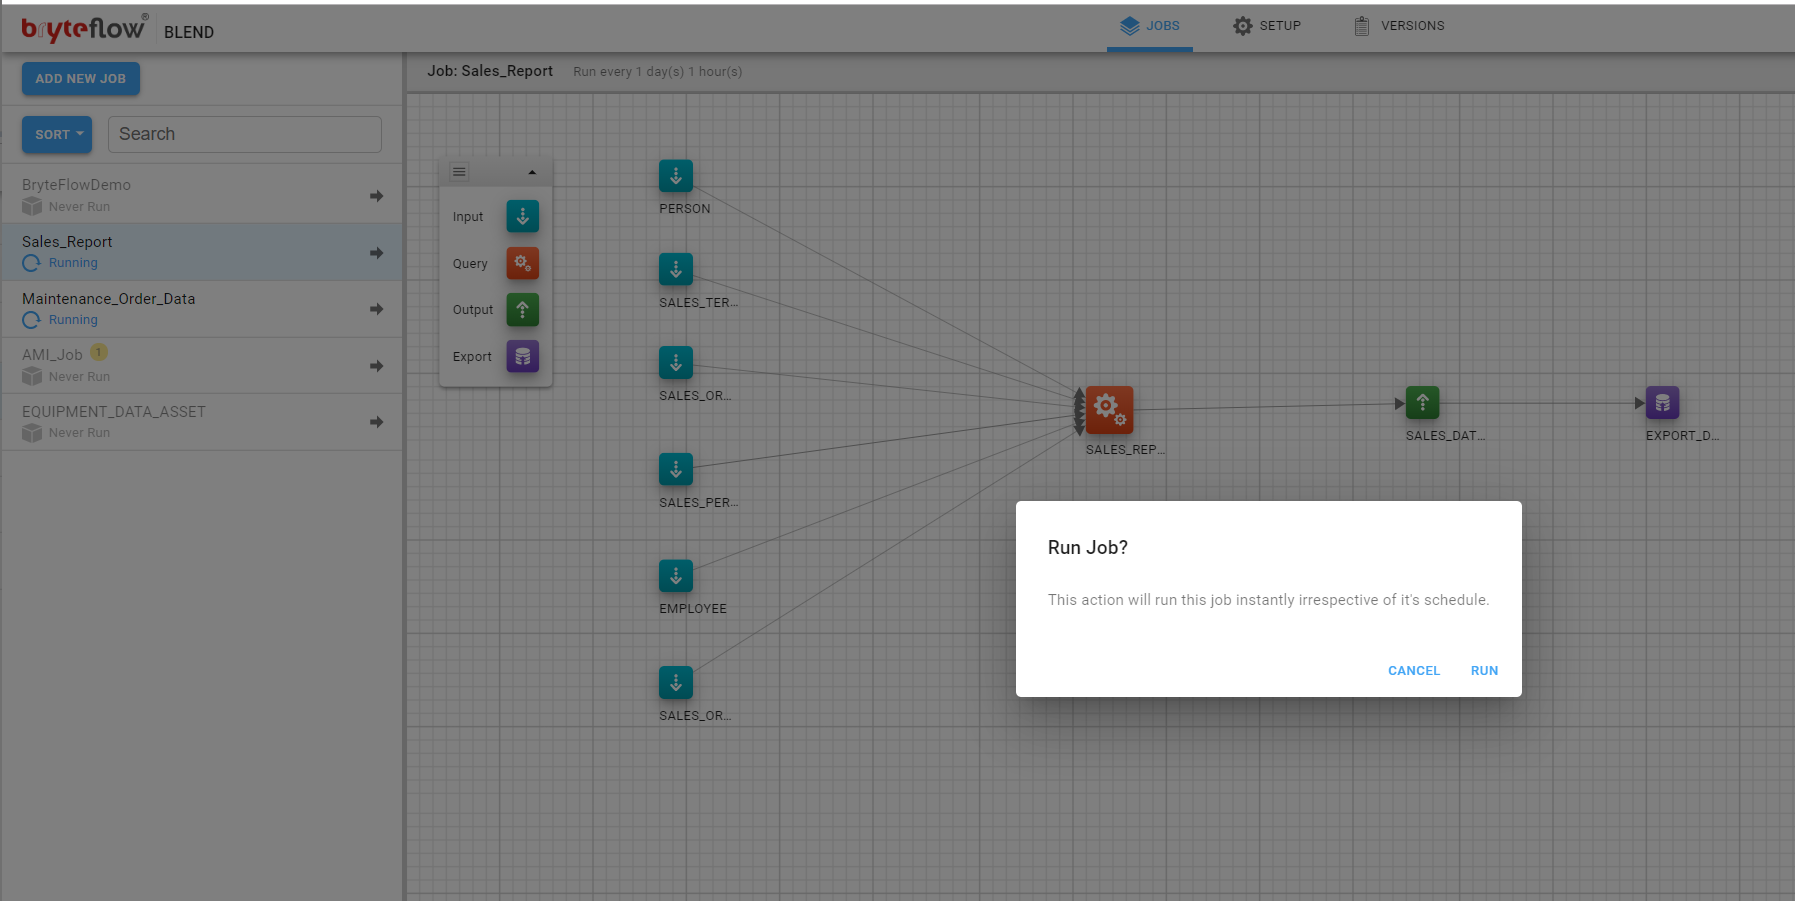
The job will be run next on the EMR instance. The status will be updated on the screen similar to a normal job run.
View S3 Files
All files associated with the following tasks can be viewed within BryteFlow Blend.
| Input Task | |
| Output Task |
The bottom panel in the Task pane is the S3 view. It shows the data view of the objects present in the ‘Input’ and ‘Output’ tasks of the selected job.
Switch between the object views by clicking the object names in the header of ‘S3 View’.
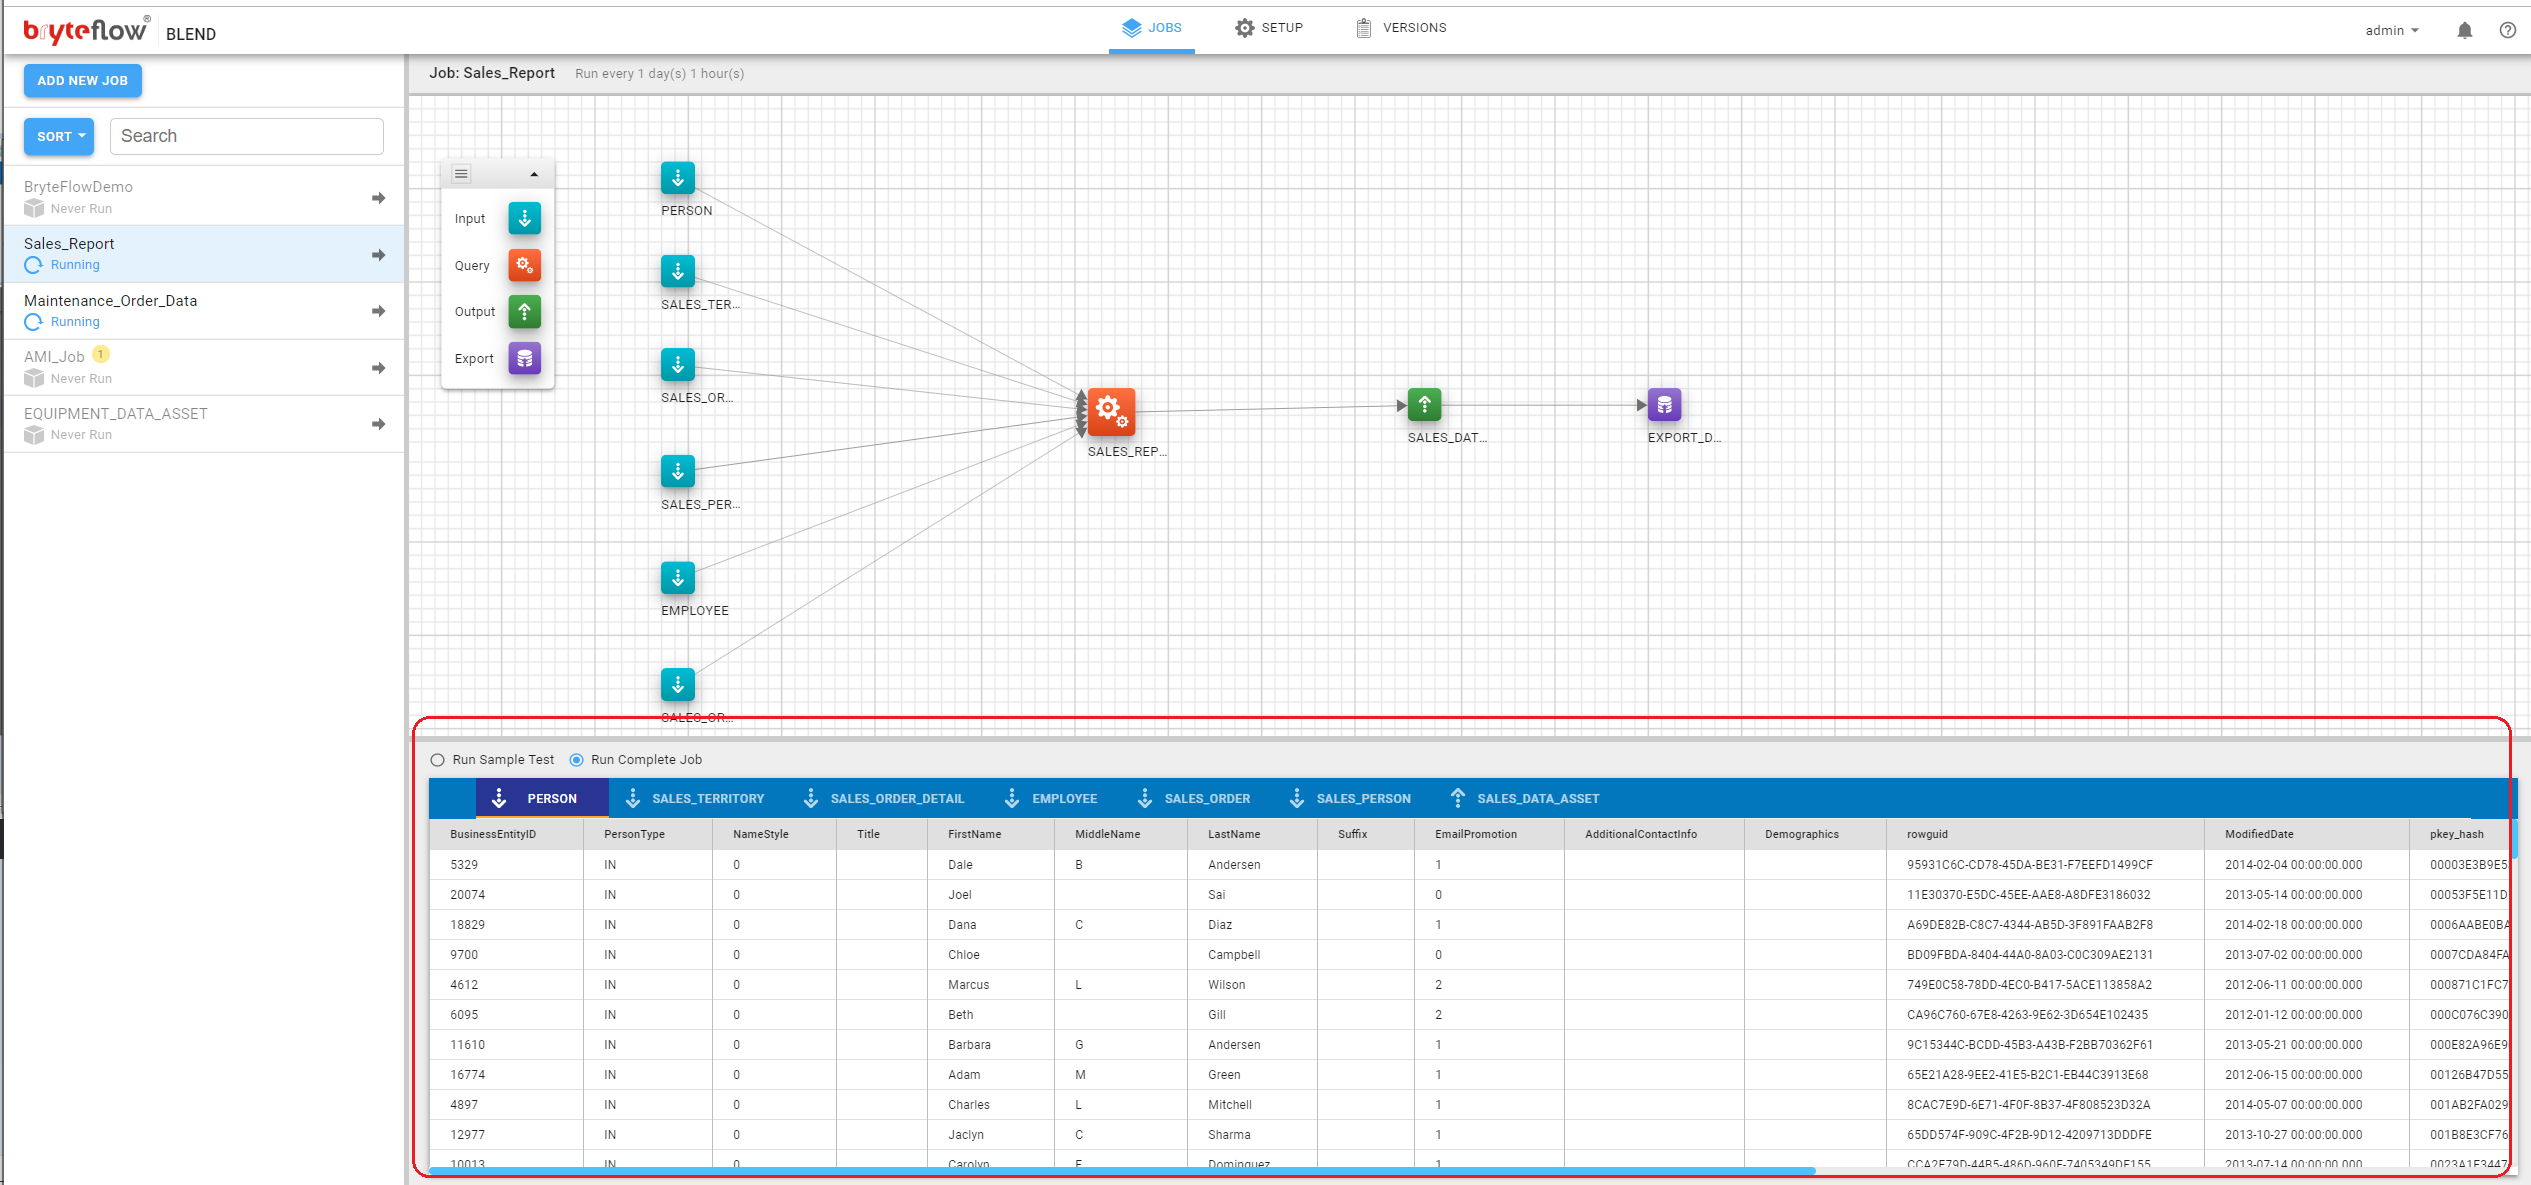
The top bar of the panel shows tabs for all input and output tasks with an icon next to it indicating the task type. Click on a tab to see the contents of the S3 file. The title bar shows the column names. In some cases, the job may not have yet been run and the output file may not exist. In that case, a message to that effect will appear in the data window.
Resize the ‘S3 View’ panel by doing simple click and drag the border line.
Debug
BryteFlow Blend allows a job to be run for debugging purposes. A small subset of the records in input files is used to reduce the run time of the trace process and unlike a normal run, all intermediate outputs are available.
To invoke a Run Trace, on any job, click on the menu next to the job and select Run Trace.
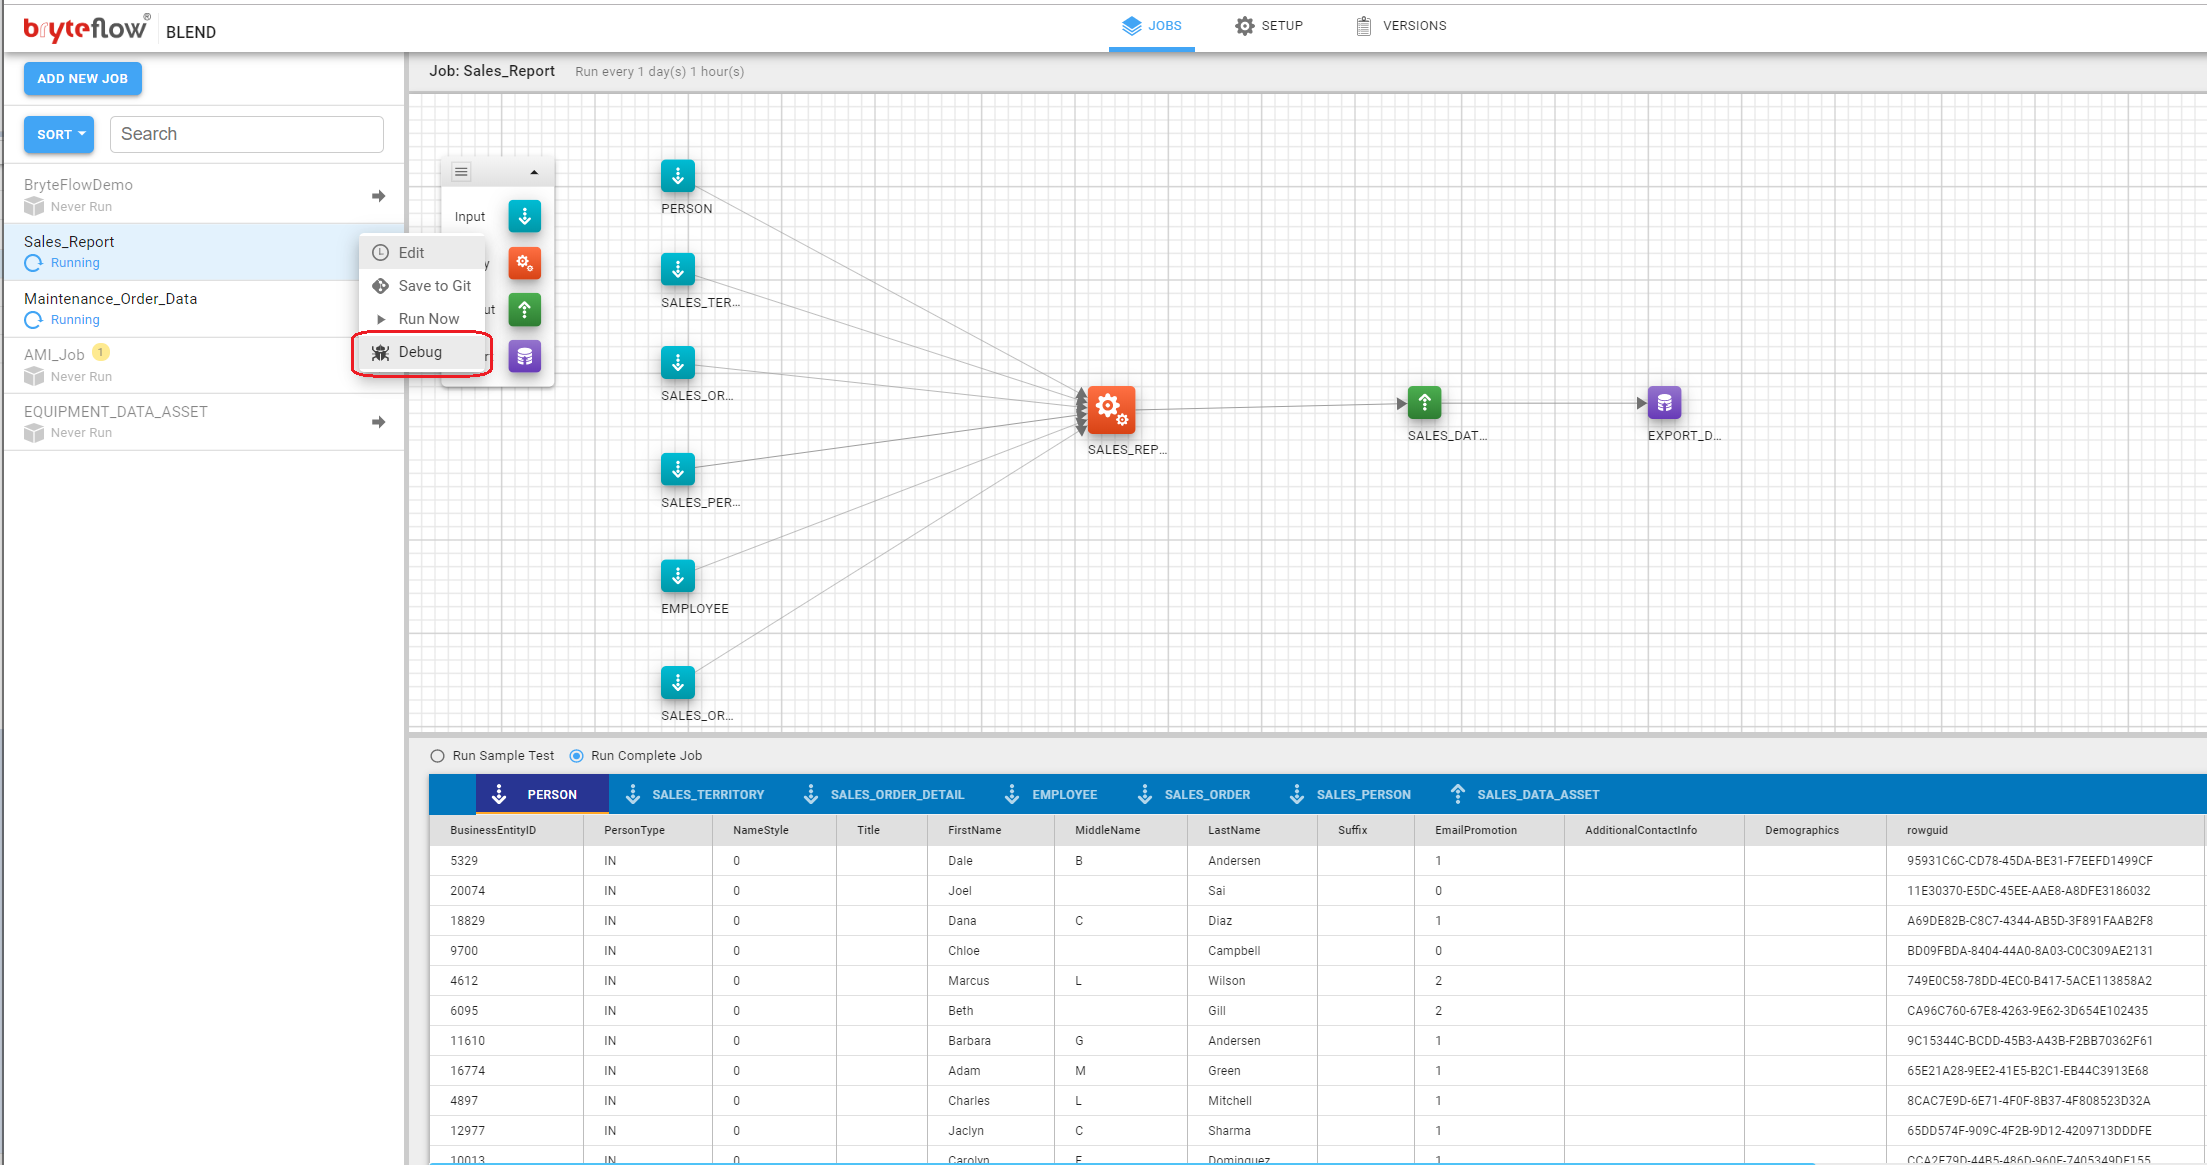
A confirmation dialog will be presented – click Run
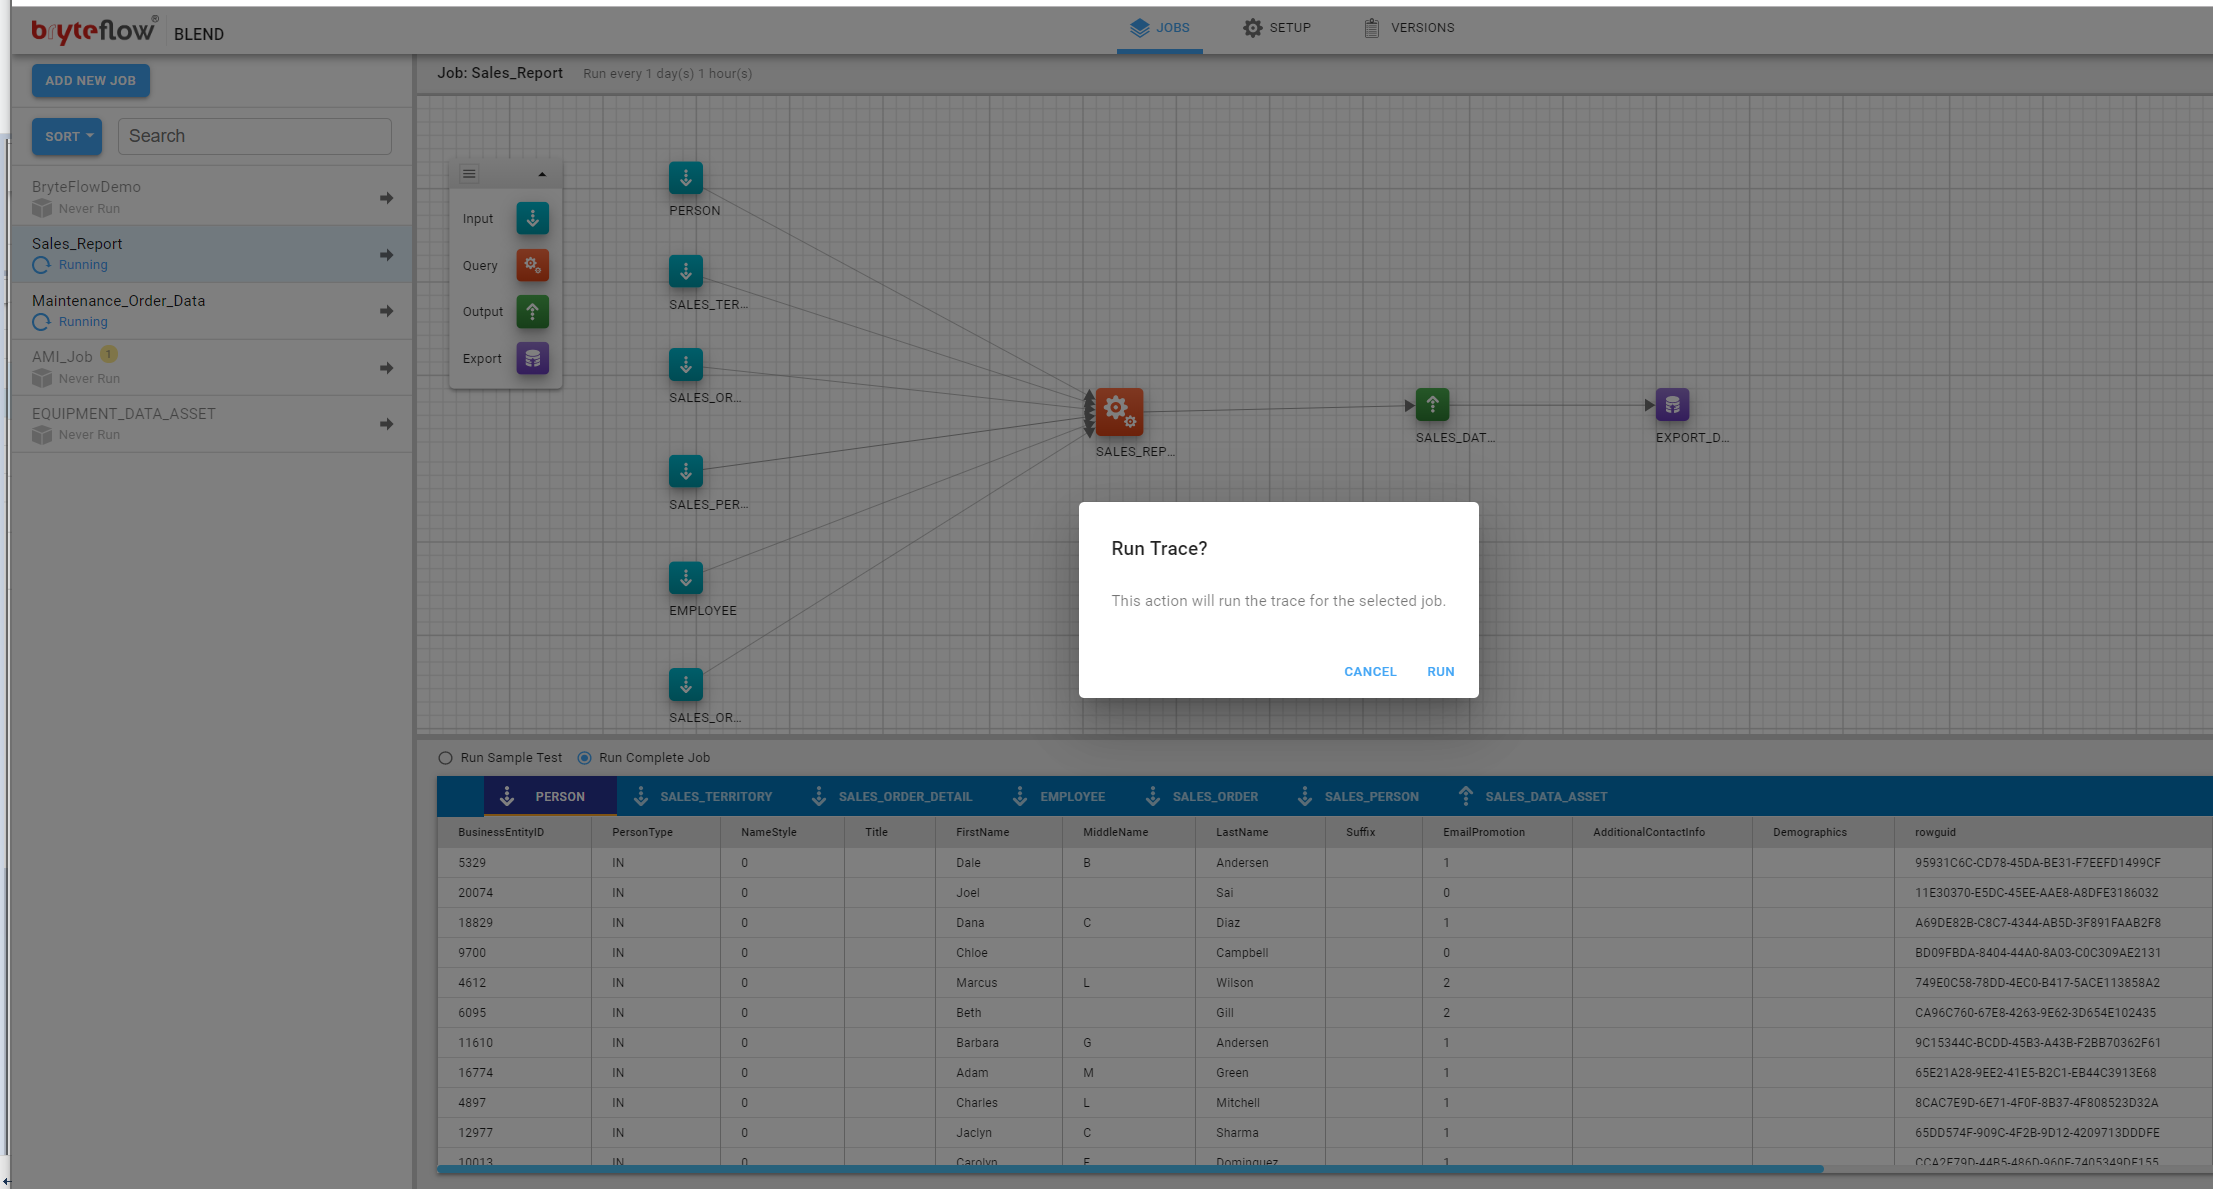
The status of the run will be displayed in the job status.
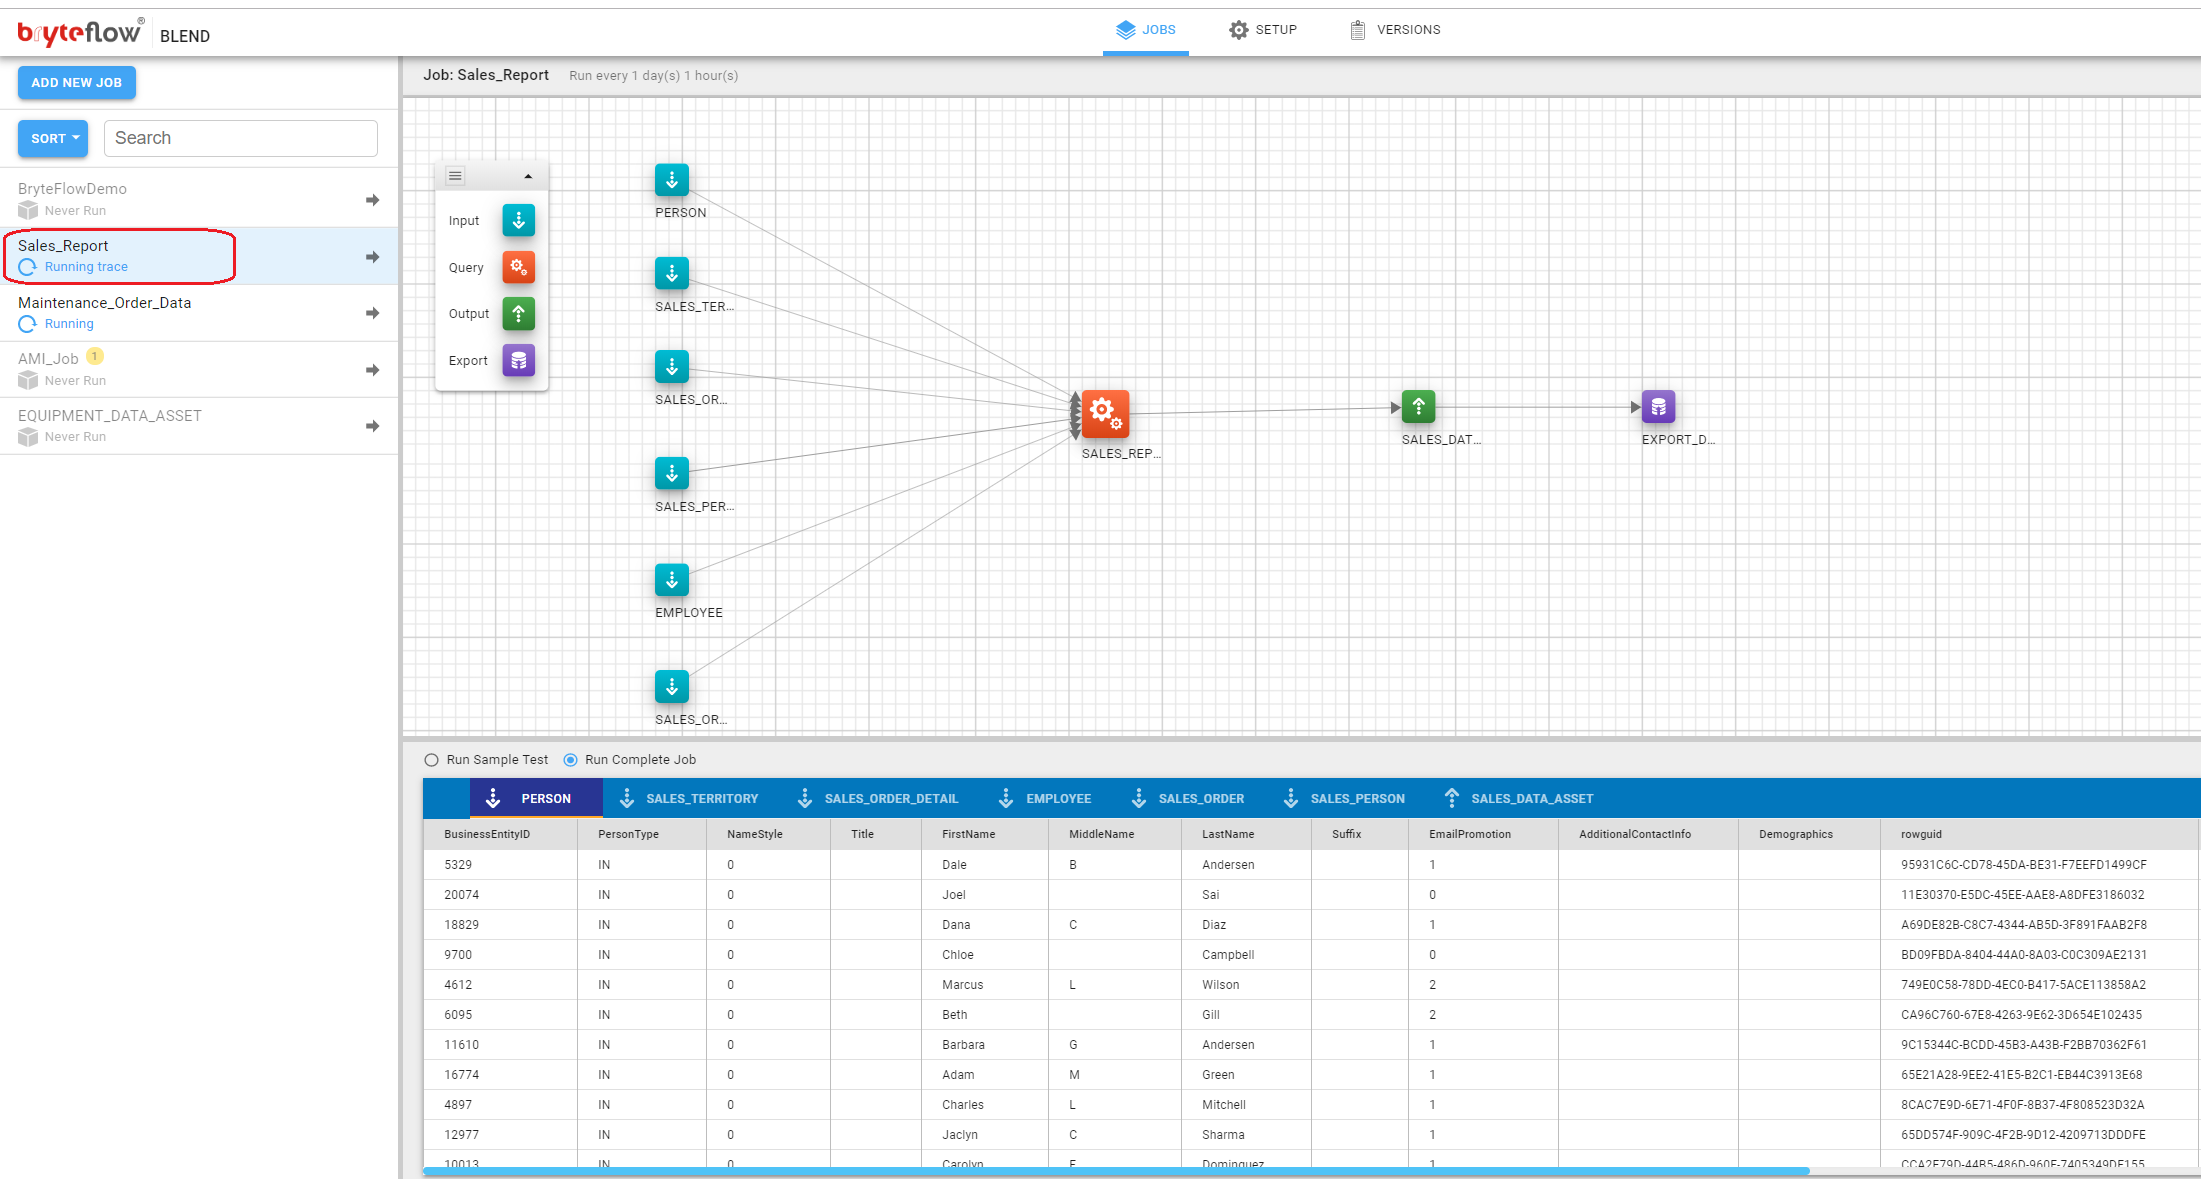
Once the run is complete, all data for each Input, Query and Output task will be available for viewing. Switch the display to the debug output by clicking on the view mode tab (as shown below) and select ‘View Sample Data’.
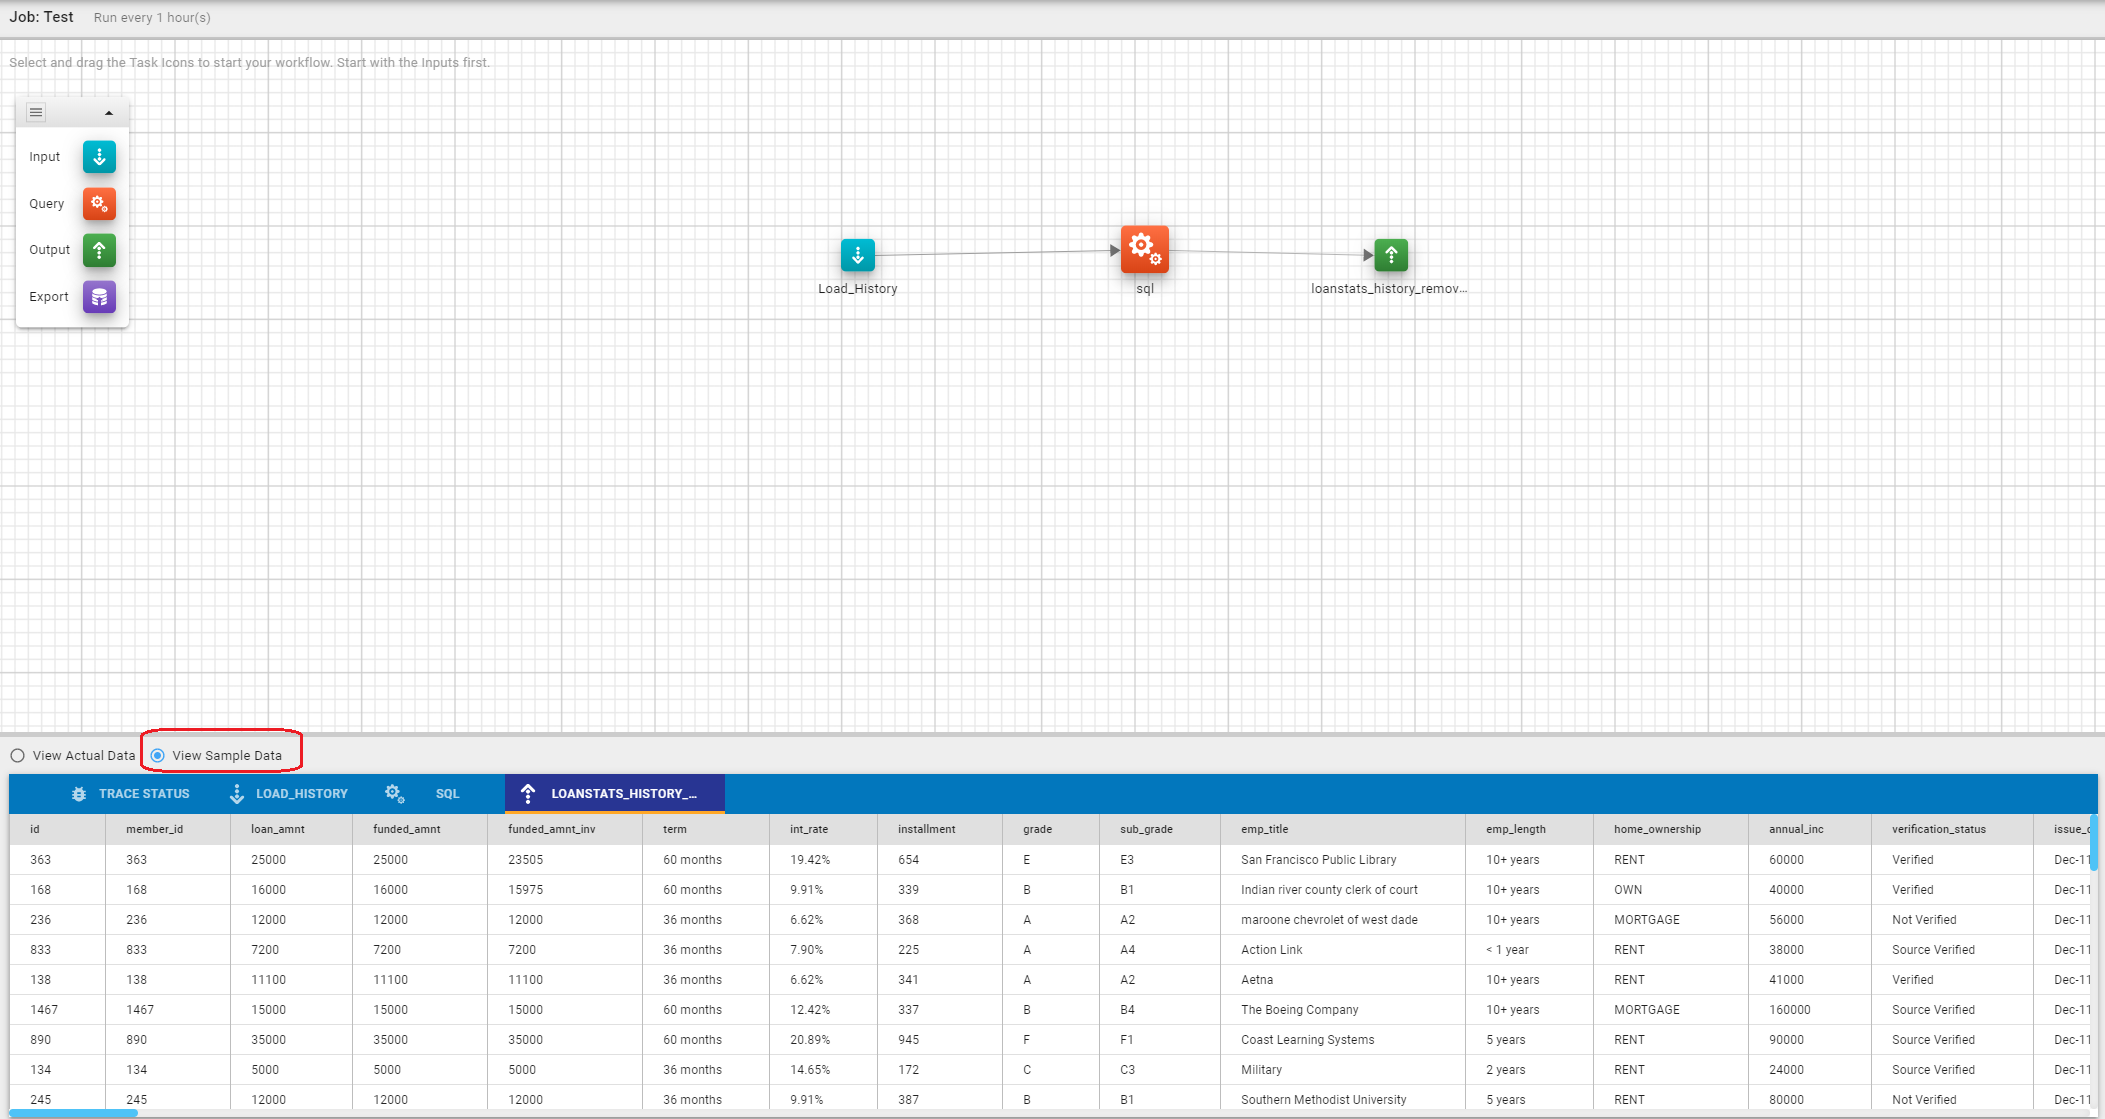
Once the debug mode is selected, the S3 file view is switched to the sample outputs.
The top bar of the panel shows tabs for all input, query and output tasks with an icon next to it indicating the task type. Click on a tab to see the contents of the debug output for that task. The title bar shows the column names.
Save Git
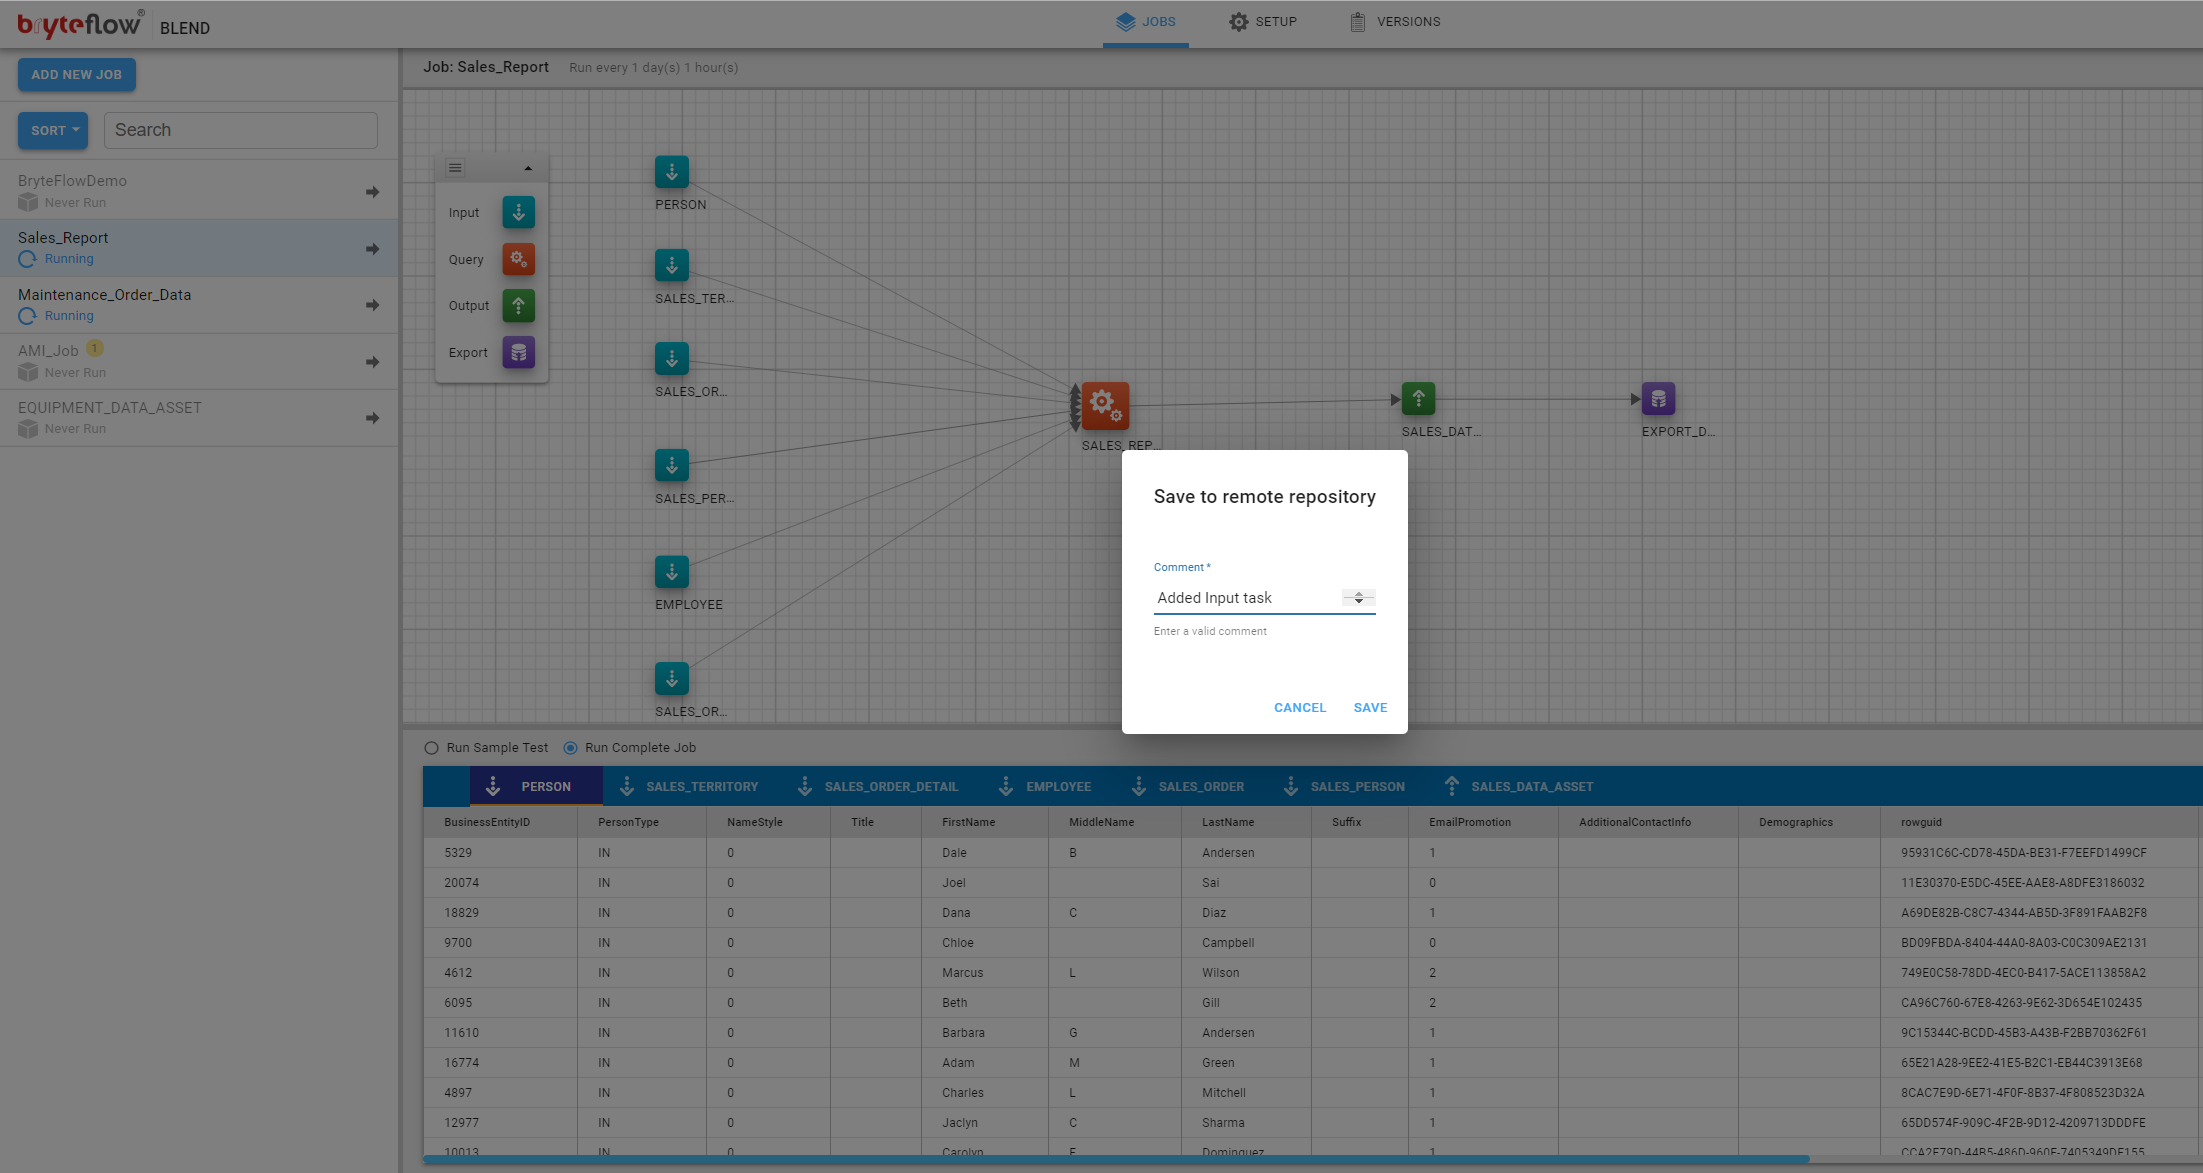
A job can be saved to Git by clicking on the icon to the right of the job name in the job list and selecting the Save to Git option.
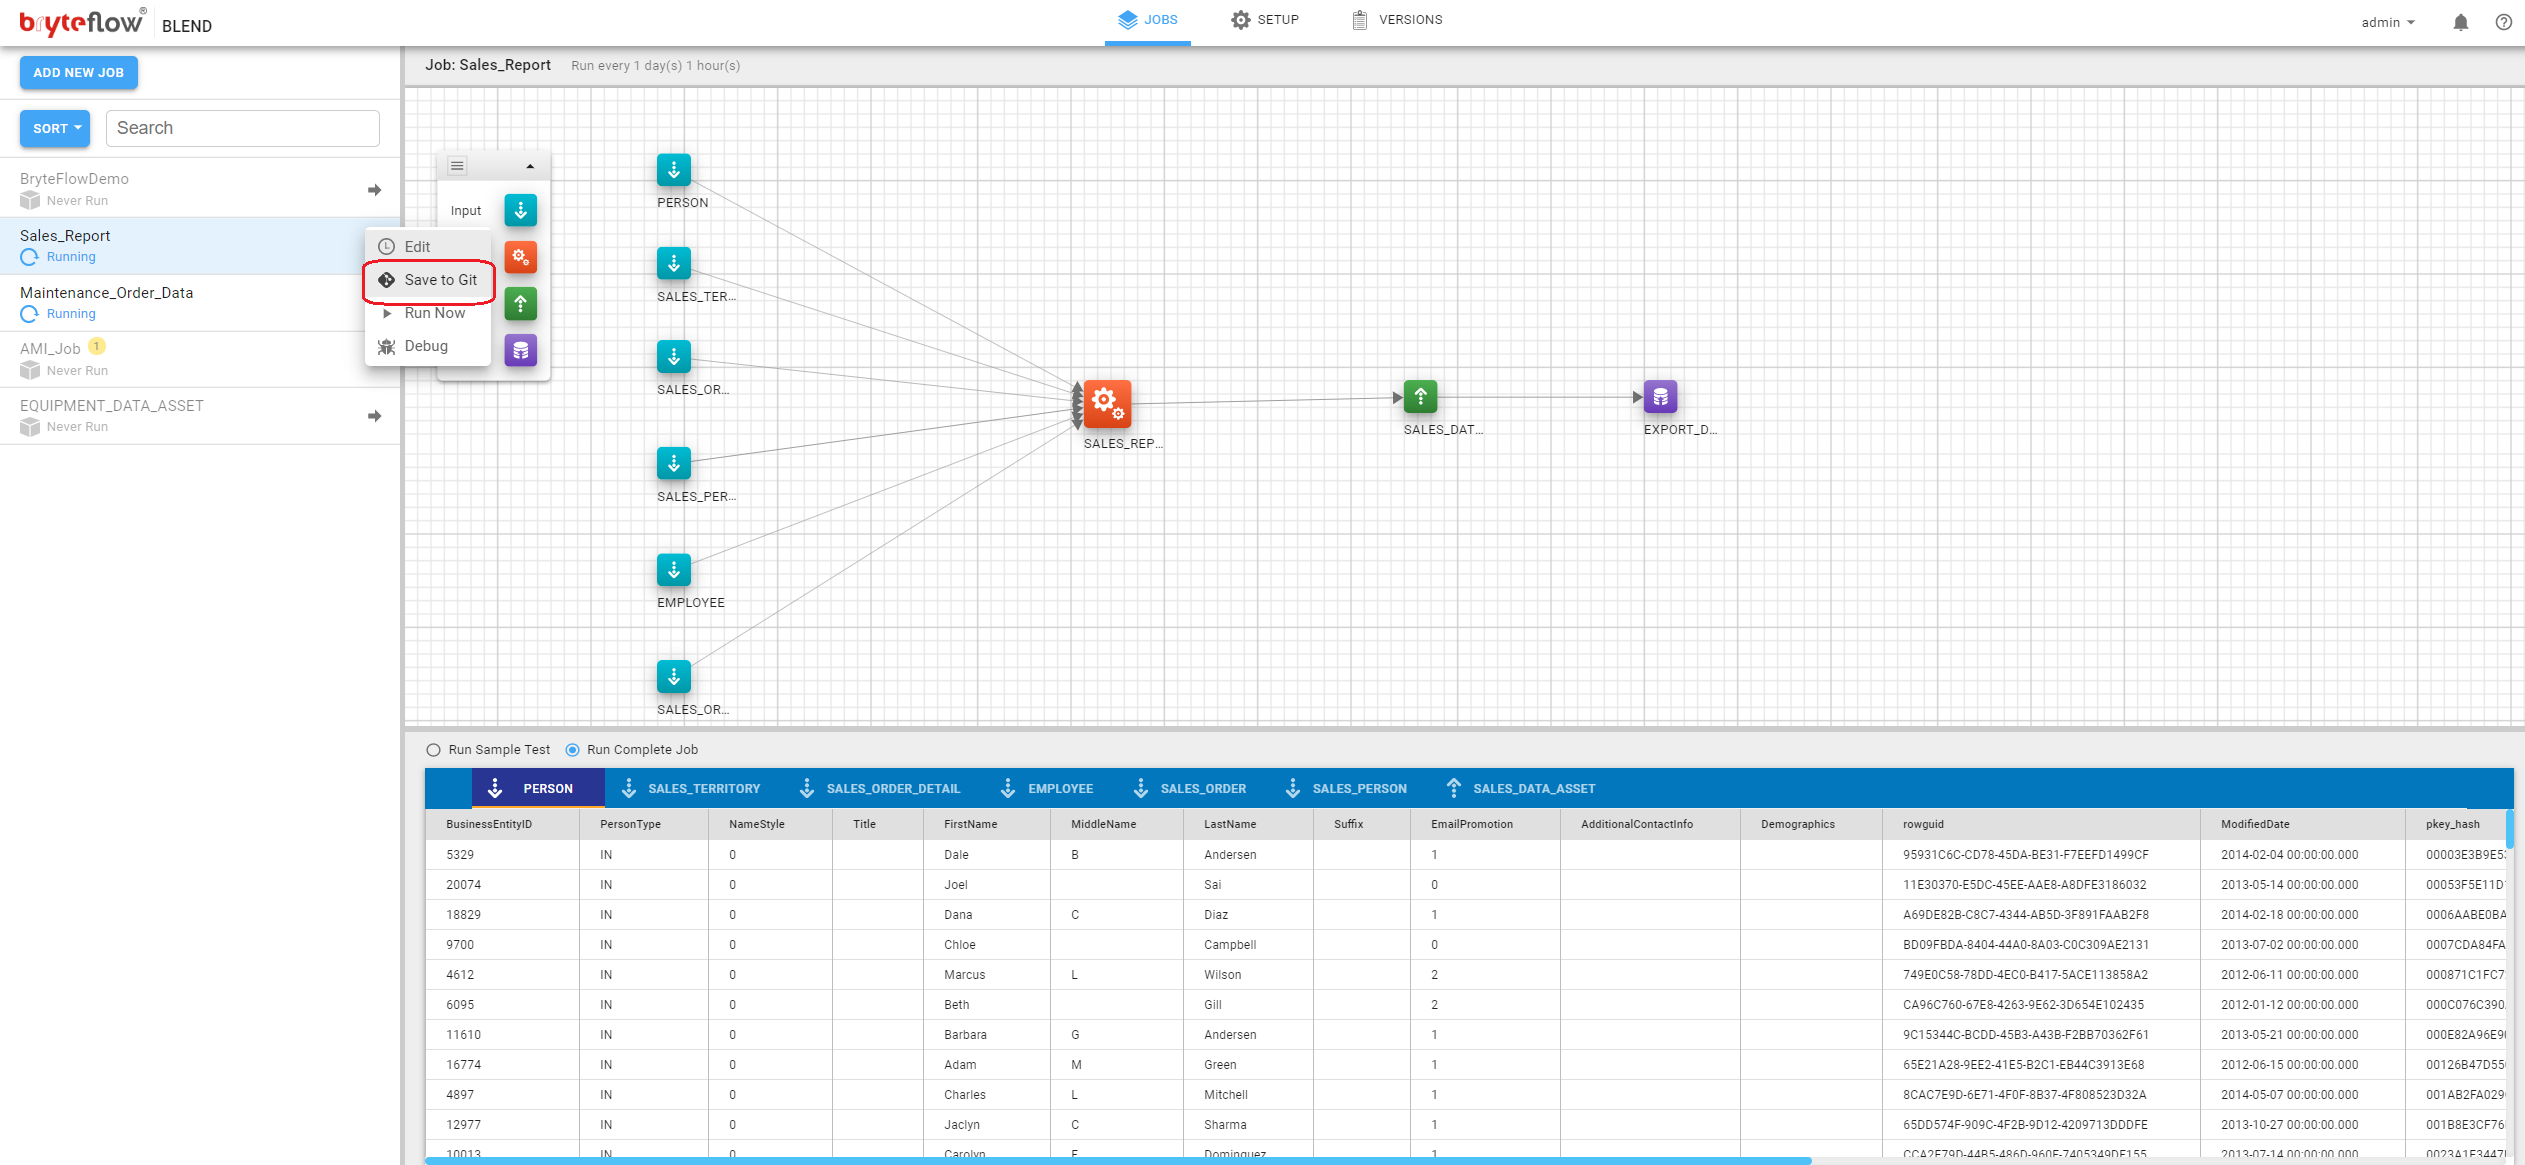
This will open the Save to remote Repository dialog where a comment for this version can be entered.
Retrieve Job from Git
A previously saved job can be retrieved from Git. This can be useful to transfer jobs from one instance of BryteFlow Blend to another. This is a recommended practice for releasing jobs from a development environment to a production environment.
To list all jobs in a Git repository, click on the top menu and select Versions.
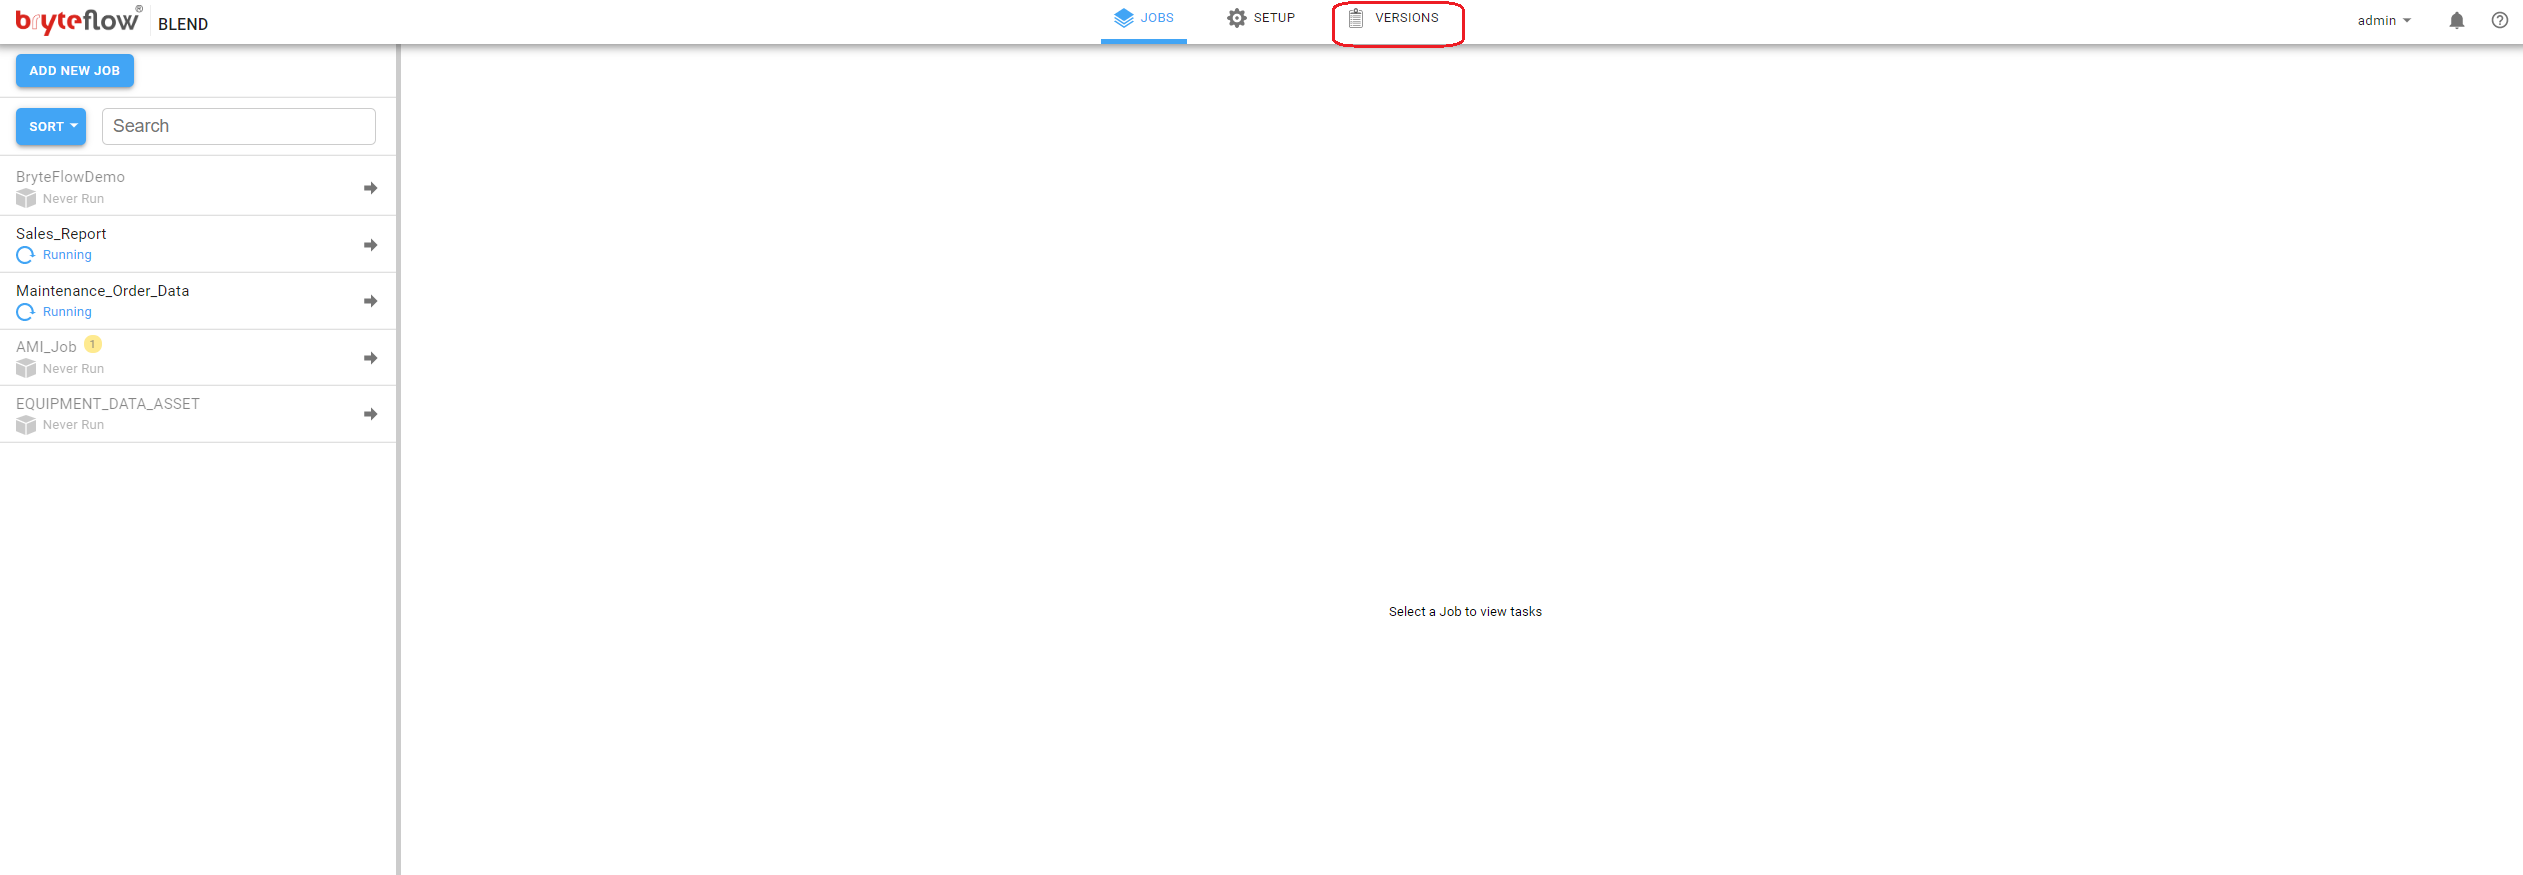
This displays a list of jobs stored in the Git repository. Click on a job to see all versions of that job.
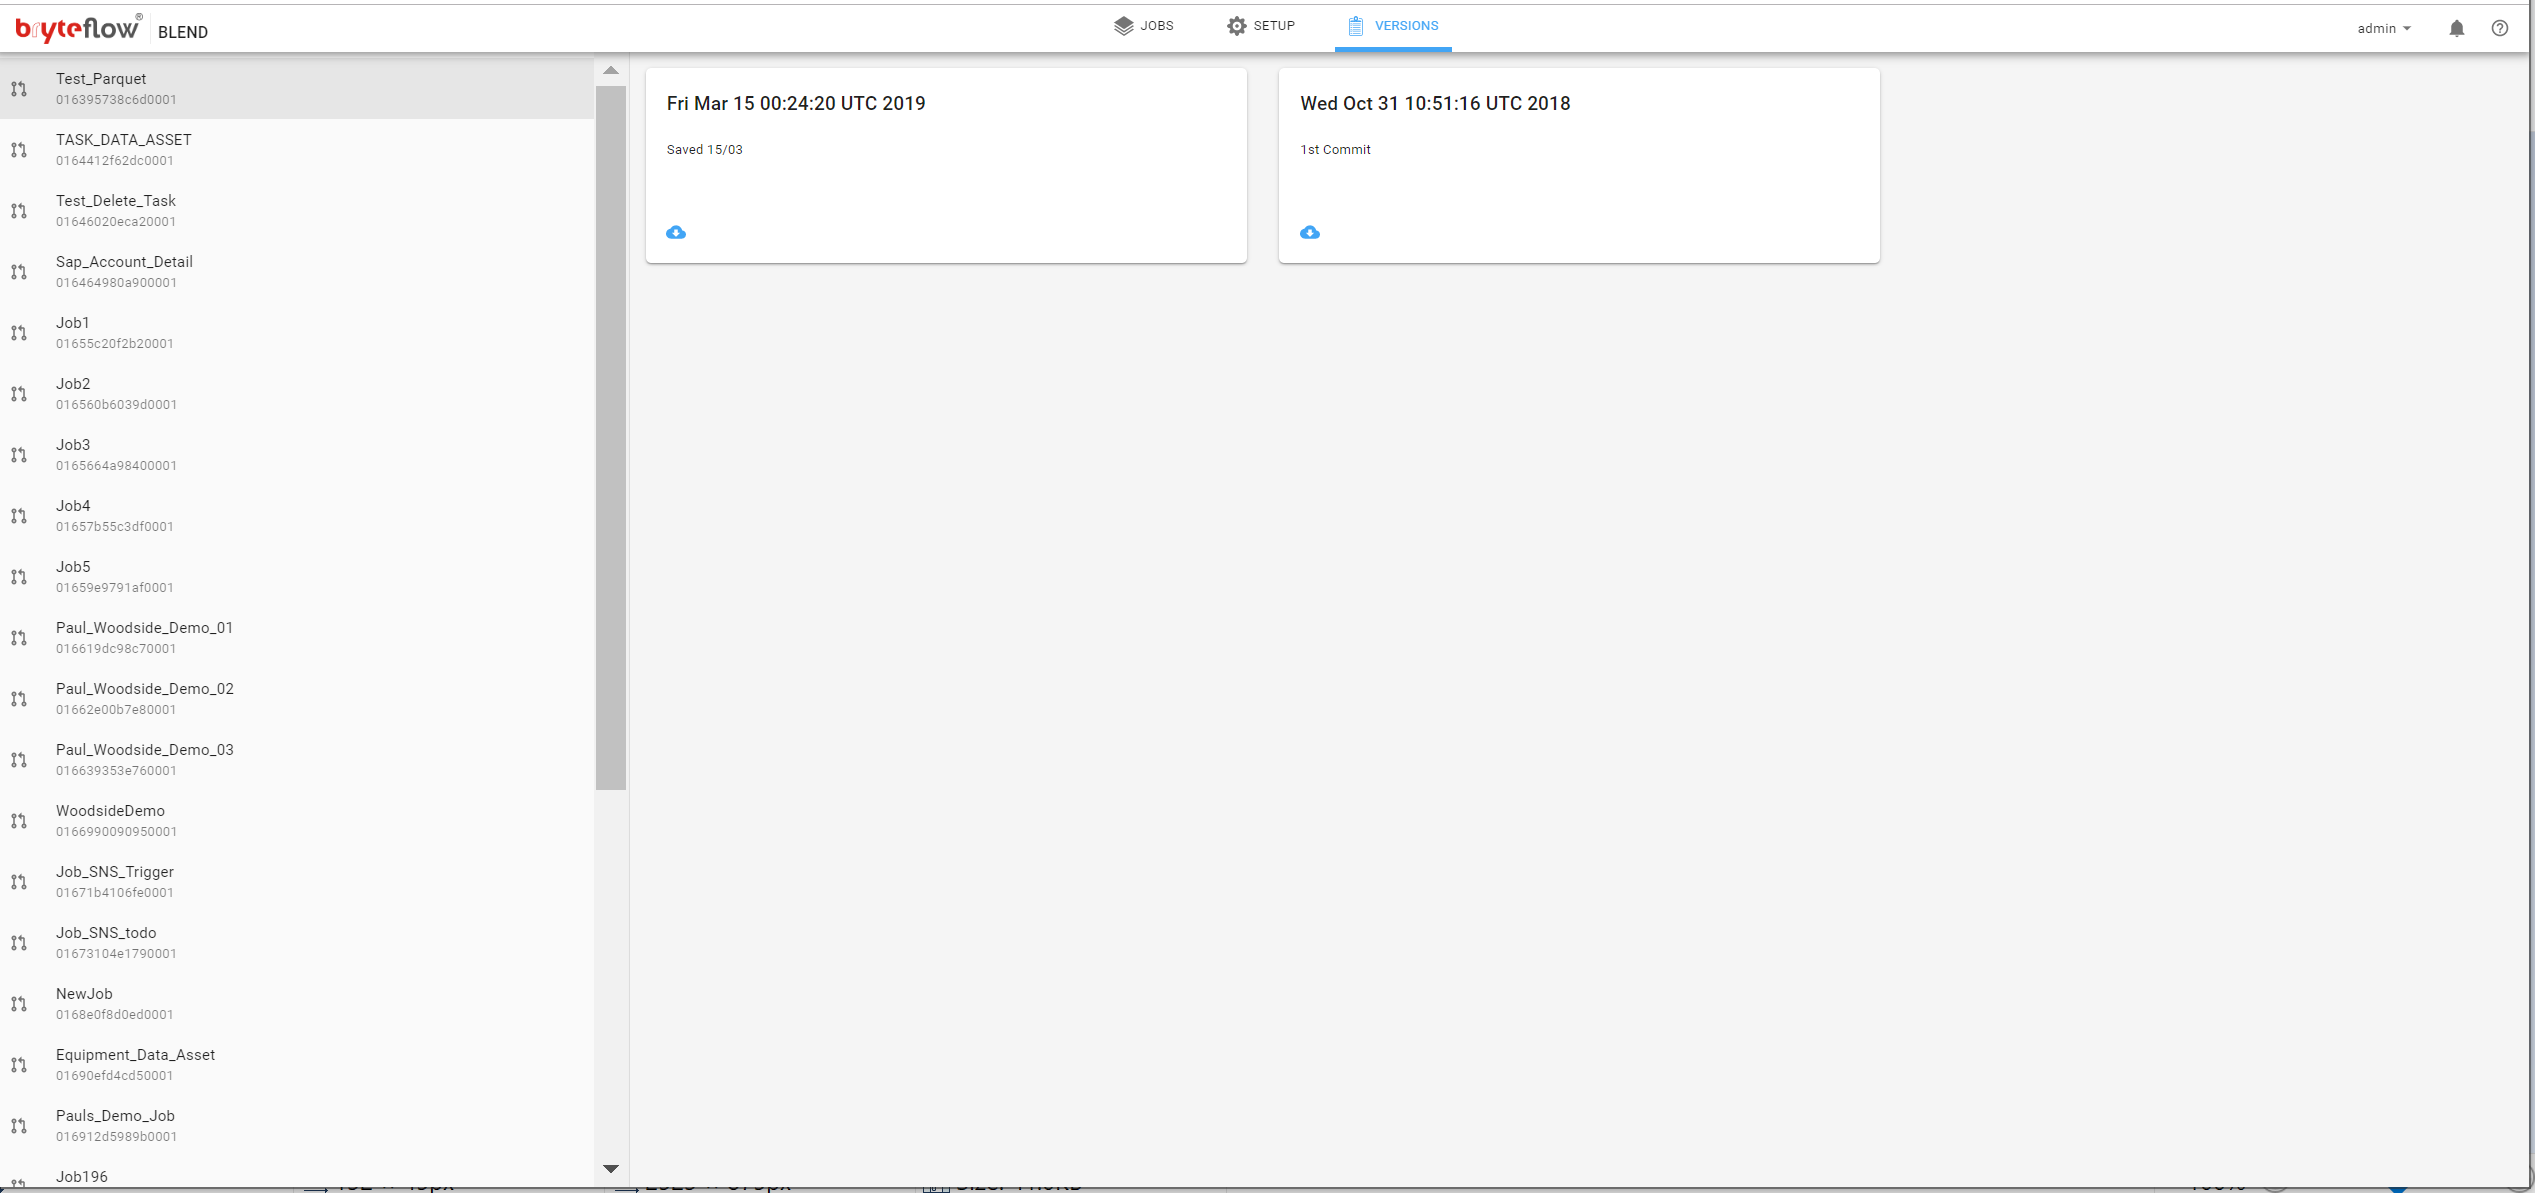
Select one of the versions to retrieve by clicking on the box for that version. This will show the download dialog. Select Download.
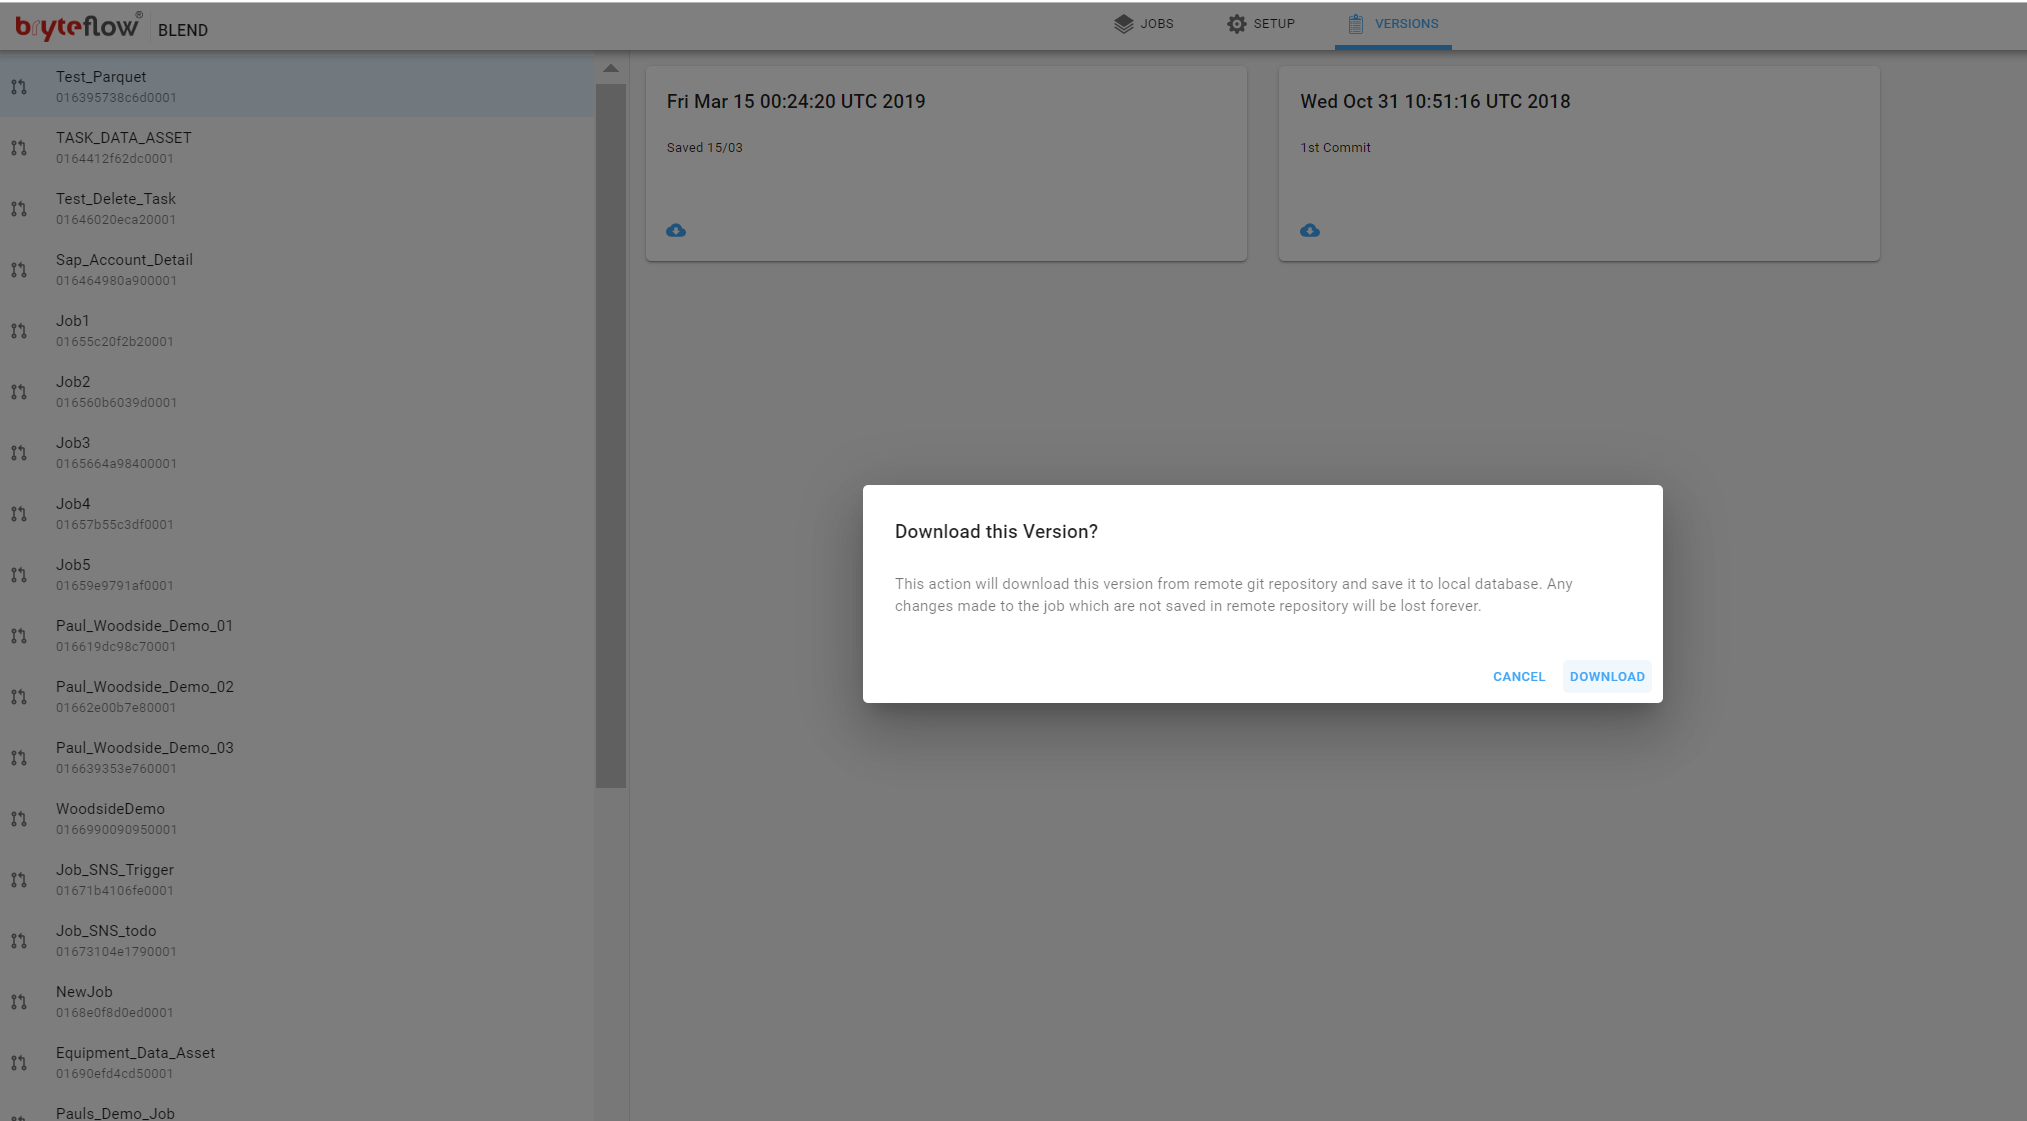
If the job does not exist, it will be downloaded and added to the list of jobs. If the job already exists, it will be replaced by the retrieved job.
Monitoring
Jobs within BryteFlow Blend can be in a number of states, the following section will detail these.
Job Status
Jobs within BryteFlow Blend can be in a number of states as represented by their status. Possible status values are as follows…
- Never Run, the Job has never been executed
- Pending, the Job has been queued to EMR however execution has not yet commenced
- Running, the Task Pipeline for the Job is being executed
- Completed, the execution of the Task Pipeline has completed successfully
- Logging, there was an error and the job aborted without completing, logging information is being prepared
- Error, there was an error and the job aborted without completing
The status of a job execution can be viewed in two ways.
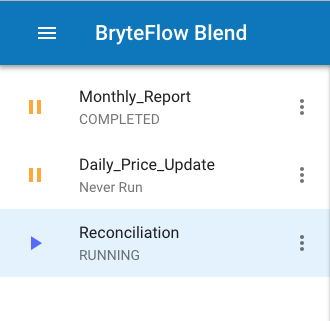
Job List status
The current status of a Job is displayed in a secondary line of text beneath the name of the Job in the Job List, in the example below the Reconciliation job is RUNNING.
Monitor View
If more detailed information is required, for example in the case of an error, the Monitor View can be accessed via the Job Item menu on the right side of the Job Item
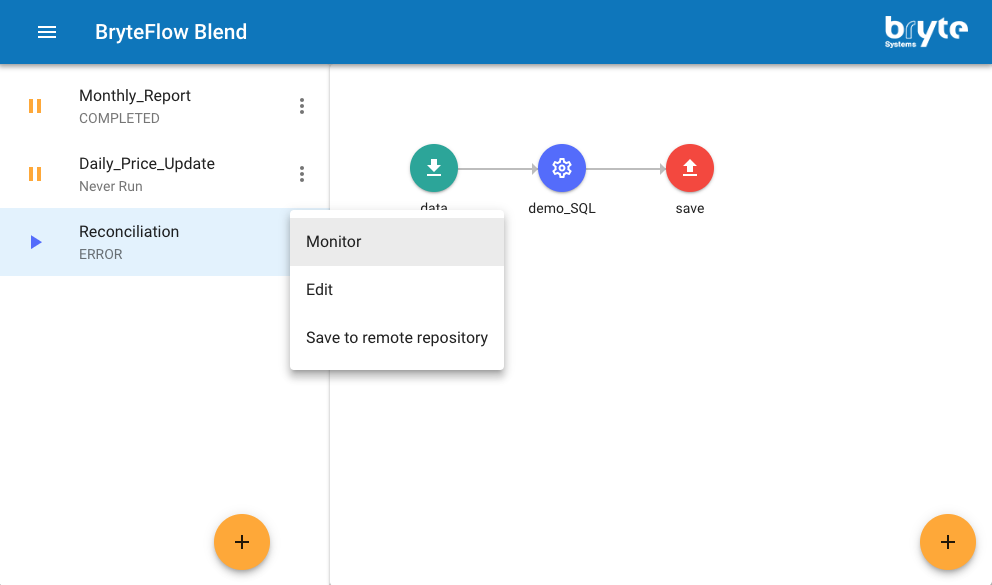
The monitor view shows the status information in addition to any error/exception information the Job has produced during execution.
Spark SQL in BryteFlow Blend
BryteFlow Blend gives the ability to execute SQL in the form of Spark SQL Query Task. Spark SQL in BryteFlow Blend is executed as distributed in-memory computation, on massive scale. The SQL contained in the Query Task is compatible with ANSI SQL2 and the editor provides auto suggestion for syntax and built in functions.
The SQL is contained in a Query Task. A Query Task enables the user to filter, join and transform data from Load tasks or other Query Tasks using regular SQL.
Query Tasks enable users to reference the data from other BryteFlow Blend tasks within the same job as if they were regular database tables though the use of curly brace ‘{ }’ annotation. For example, if there is an existing task called ‘MyData’…it can be queried upon in another SQL Query Task with the following SQL:
SELECT *

  FROM {MyData}
The following screenshot shows an example of the SQL in a SQL Query Task:
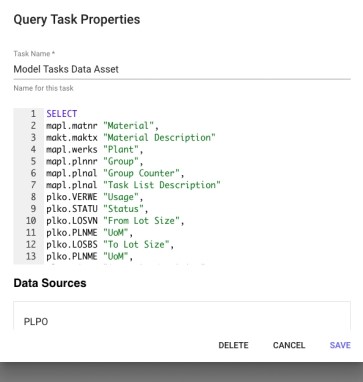
BryteFlow Blend uses SPARK SQL, this being compatible with ANSI SQL2 Standards and allows the developer to leverage existing skillsets. The standard set of SQL, functions and properties as listed as follows.
Column Functions and Properties
Below are some more functions supported in Spark SQL :
| Signature | Return Type | Description |
|---|---|---|
| ascii(STRING str) | INT | Returns the numeric value of the first character of str. |
| base64(binary bin) | STRING | Converts the argument from binary to a base 64 string |
| bin(bigint a) | STRING | Returns the number in binary format |
| decode(binary bin, string charset) | STRING | Decodes the first argument into a String using the provided character set (one of ‘US-ASCII’, ‘ISO-8859-1’, ‘UTF-8’, ‘UTF-16BE’, ‘UTF-16LE’, ‘UTF-16’). If either argument is null, the result will also be null. |
| encode(string src, string charset) | BINARY | Encodes the first argument into a BINARY using the provided character set (one of ‘US-ASCII’, ‘ISO-8859-1’, ‘UTF-8’, ‘UTF-16BE’, ‘UTF-16LE’, ‘UTF-16’). If either argument is null, the result will also be null. |
| expr(string expr) | COLUMN | Parses the expression string into the column that it represents. |
| format_number(number x, int d) | STRING | Formats the number X to a format like ‘#,###,###.##’, rounded to D decimal places, and returns the result as a string. If D is 0, the result has no decimal point or fractional part. |
| format_string(String Format, Arguments) | STRING | Formats the arguments in printf-style and returns the result as a string column. |
| get_json_object(string json_string, string path) | STRING | Extracts json object from a json string based on json path specified, and returns json string of the extracted json object. It will return null if the input json string is invalid. NOTE: The json path can only have the characters [0-9a-z_], i.e., no upper-case or special characters. Also, the keys *cannot start with a number.* |
| initcap(string A) | STRING | Returns string, with the first letter of each word in uppercase, all other letters in lowercase. Words are delimited by whitespace. |
| instr(string str, string substr) | INT | Returns the position of the first occurrence of ‘substr’ in ‘str’. Returns null if either of the arguments are null and returns 0 if ‘substr’ could not be found in ‘str’. Be aware that this is not zero based. The first character in string has index 1. |
| isnan(string str) | INT | Returns true if the input is Not a Number. |
| isnull( a ) | BOOLEAN | Returns true if a is NULL and false otherwise. |
| length(string A) | INT | Returns the length of the string. |
| levenshtein(string A, string B) | INT | Returns the Levenshtein distance between two strings. For example, levenshtein(‘kitten’, ‘sitting’) results in 3. |
| locate(string substr, string str[, int pos]) | INT | Returns the position of the first occurrence of ‘substr’ in str after position pos. |
| lower(string A) lcase(string A) | STRING | Returns the string resulting from converting all characters of B to lower case. For example, lower(‘sAmple’) results in ‘sample’. |
| lpad(string str, int len, string pad) | STRING | Returns str, left-padded with pad to a length of len. If str is longer than len, the return value is shortened to len characters. In case of empty pad string, the return value is null. |
| ltrim(string A) | STRING | Returns the string resulting from trimming spaces from the beginning (left hand side) of A. For example, ltrim(‘ sample ‘) results in ‘sample ‘. |
| nanvl(number col1, number col2) | NUMBER | Returns true if the input is Not a Number. |
| repeat(string str, int n) | STRING | “str” is the column name. Repeats each value in select column n times. |
| regexp_extract(string subject, string pattern, int index) | STRING | Returns the string extracted using the pattern. For example, regexp_extract(‘foothebar’, ‘foo(.*?)(bar)’, 2) returns ‘bar.’ |
| regexp_replace(string INITIAL_STRING, string PATTERN, string REPLACEMENT) | STRING | Returns the string resulting from replacing all substrings in INITIAL_STRING that match the java regular expression syntax defined in PATTERN with instances of REPLACEMENT. For example, regexp_replace(“sample”, “am|le”, “”) returns ‘sp.’ Note that some care is necessary in using predefined character classes: using ‘\s’ as the second argument will match the letter s; ‘\\s’ is necessary to match whitespace, etc. |
| reverse(string A) | STRING | Returns the reversed string. |
| rpad(string str, int len, string pad) | STRING | Returns str, right-padded with pad to a length of len. If str is longer than len, the return value is shortened to len characters. In case of empty ‘chr’ string, the return value is null. |
| rtrim(string A) | STRING | Returns the string resulting from trimming spaces from the end(right hand side) of A. For example, rtrim(‘ sample ‘) results in ‘ sample’. |
| split(string str, string chr) | ARRAY | Splits str around ‘chr’ (is a regular expression) |
| substring_index(string A, string delim, int count) | STRING | Returns the substring from string A before count occurrences of the delimiter delim. If count is positive, everything to the left of the final delimiter (counting from the left) is returned. If count is negative, everything to the right of the final delimiter (counting from the right) is returned. Substring_index performs a case-sensitive match when searching for delim. |
| substr(string|binary A, int start, int len) | STRING | Returns the substring or slice of the byte array of A starting from start position with length len. For example, substr(‘sample’, 4, 1) |
| substring(string|binary A, int start, int len) | STRING | Returns the substring or slice of the byte array of A starting from start position with length len. For example, substr(‘sample’, 4, 1) |
| translate(string src, strin matchingString, string replaceString) | STRING | Translate any character in the src by a character in replaceString. The characters in replaceString correspond to the characters in matchingString. The translate will happen when any character in the string matches the character in the matchingString |
| trim(string A) | STRING | Returns the string resulting from trimming spaces from both ends of A. For example, trim(‘ sample ‘) results in ‘sample’ |
| unbase64(string str) | BINARY | Converts the argument from a base 64 string to BINARY. |
| upper(string A) | STRING | Returns the string resulting from converting all characters of A to upper case. For example, upper(‘saMple’) results in ‘SAMPLE’. |
Conditional Functions and Properties
Below are the functions supported in Spark SQL for Conditional operations :
| Signature | Return Type | Description |
|---|---|---|
| coalesce(Column v1,Column v2, …) | Returns the first column’s value that is not NULL, or NULL if all v’s are NULL. This function can take any number of arguments. |
Date Functions and Properties
Below are the Date Time functions supported in Spark SQL :
| Signature | Return Type | Description |
|---|---|---|
| add_months(string start_date, int num_months) | STRING | Returns the date that is num_months after start_date . start_date is a string, date or timestamp. num_months is an integer. The time part of start_date is ignored. If start_date is the last day of the month or if the resulting month has fewer days than the day component of start_date, then the result is the last day of the resulting month. Otherwise, the result has the same day component as start_date |
| current_date | DATE | Returns the current date. |
| current_timestamp | TIMESTAMP | Returns the current timestamp |
| date_add(date startdate, tinyint/smallint/int days) | DATE | Adds a number of days to startdate: date_add(‘2008-12-31’, 1) = ‘2009-01-01’. |
| date_sub(date startdate, tinyint/smallint/int days) | DATE | Subtracts a number of days to startdate: date_sub(‘2008-12-31’, 1) = ‘2008-12-30’. |
| date_trunc(format: String, timestamp: Column) | DATE | Returns timestamp truncated to the unit specified by the format. |
| date_format(dateExpr: Column, format: String) | DATE | Converts a date/timestamp/string to a value of string in the format specified by the date format given by the second argument. |
| datediff(string enddate, string startdate) | INT | Returns the number of days from startdate to enddate: datediff(‘2009-03-01’, ‘2009-02-27’) = 2. |
| dayofmonth(date) | INT | Extracts the day of the month as an integer from a given date/timestamp/string. |
| dayofyear(date) | INT | Extracts the day of the year as an integer from a given date/timestamp/string. |
| dayofweek(date) | INT | Extracts the day of the week as an integer from a given date/timestamp/string |
| window(timeColumn: Column, windowDuration: String) | STRING | Generates tumbling time windows given a timestamp specifying column. Window starts are inclusive but the window ends are exclusive, e.g. 12:05 will be in the window [12:05,12:10) but not in [12:00,12:05). Windows can support microsecond precision. Windows in the order of months are not supported. The windows start beginning at 1970-01-01 00:00:00 UTC. |
| trunc(date: Column, format: String) | STRING | Returns date truncated to the unit specified by the format. |
| from_unixtime(bigint unixtime[, string format]) | STRING | Converts the number of seconds from unix epoch (1970-01-01 00:00:00 UTC) to a string representing the timestamp of that moment in the current system time zone in the format of “1970-01-01 00:00:00”. |
| from_utc_timestamp({any primitive type}*, string timezone) | TIMESTAMP | Assumes given timestamp is UTC and converts to given timezone. For example, from_utc_timestamp(‘1970-01-01 08:00:00′,’PST’) returns 1970-01-01 00:00:00. |
| hour(string date) | INT | Returns the hour of the timestamp: hour(‘2009-07-30 12:58:59′) = 12, hour(’12:58:59’) = 12. |
| last_day(string date) | STRING | Returns the last day of the month which the date belongs to. date is a string in the format ‘yyyy-MM-dd HH:mm:ss’ or ‘yyyy-MM-dd’. The time part of date is ignored. |
| minute(string date) | INT | Returns the minute of the timestamp. |
| month(string date) | INT | Returns the month part of a date or a timestamp string: month(“1970-11-01 00:00:00”) = 11, month(“1970-11-01”) = 11. |
| months_between(date1, date2) | DOUBLE | Returns number of months between dates date1 and date2. If date1 is later than date2, then the result is positive. If date1 is earlier than date2, then the result is negative. If date1 and date2 are either the same days of the month or both last days of months, then the result is always an integer. Otherwise the UDF calculates the fractional portion of the result based on a 31-day month and considers the difference in time components date1 and date2. date1 and date2 type can be date, timestamp or string in the format ‘yyyy-MM-dd’ or ‘yyyy-MM-dd HH:mm:ss’. The result is rounded to 8 decimal places. Example: months_between(‘1997-02-28 10:30:00’, ‘1996-10-30’) = 3.94959677 |
| next_day(string start_date, string day_of_week) | STRING | Returns the first date which is later than start_date and named as day_of_week . start_date is a string/date/timestamp. day_of_week is 2 letters, 3 letters or full name of the day of the week (e.g. Mo, tue, FRIDAY). The time part of start_date is ignored. Example: next_day(‘2015-01-14’, ‘TU’) = 2015-01-20. |
| quarter(date/timestamp/string) | INT | Returns the quarter of the year for a date, timestamp, or string in the range 1 to 4. Example: quarter(‘2015-04-08’) = 2. |
| second(string date) | INT | Returns the second of the timestamp. |
| to_date(string date) | DATE | Converts a string formatted like yyyy-MM-dd into a Date object. |
| to_utc_timestamp({any primitive type}*, string timezone) | TIMESTAMP | Assumes given timestamp is in given timezone and converts to UTC. For example, to_utc_timestamp(‘1970-01-01 00:00:00′,’PST’) returns 1970-01-01 08:00:00. |
| trunc(string date, string format) | STRING | Returns date truncated to the unit specified by the format. Supported formats: MONTH/MON/MM, YEAR/YYYY/YY. Example: trunc(‘2015-03-17’, ‘MM’) = 2015-03-01. |
| unix_timestamp() | BIGINT | Gets current Unix timestamp in seconds. This function is not deterministic and its value is not fixed for the scope of a query execution, therefore prevents proper optimization of queries – this has been deprecated since 2.0 in favour of CURRENT_TIMESTAMP constant. |
| weekofyear(string date) | INT | Returns the week number of a timestamp string: weekofyear(“1970-11-01 00:00:00”) = 44, weekofyear(“1970-11-01”) = 44. |
| year(string date) | INT | Returns the year part of a date or a timestamp string: year(“1970-01-01 00:00:00”) = 1970, year(“1970-01-01”) = 1970. |
Mathematics Functions and Properties
Below are the Mathematical functions supported in Spark SQL :
| Signature | Return Type | Description |
|---|---|---|
| abs(INT a) | INT | Returns the absolute value. |
| acos(INT a) | DOUBLE | Returns the arccosine of a if -1<=a<=1 or NULL otherwise. |
| asin(INT a) | DOUBLE | Returns the arc sin of a if -1<=a<=1 or NULL otherwise. |
| atan(INT a) | DOUBLE | Returns the arctangent of a. |
| bitwiseNOT(DOUBLE a) | DOUBLE | Computes bitwise NOT of the given integer. |
| cbrt(DOUBLE a) | DOUBLE | Returns the cube root of a double value |
| ceil(DOUBLE a) | BIGINT | Returns the minimum BIGINT value that is equal to or greater than a. |
| conv(BIGINT num, INT from_base, INT to_base) | STRING | Converts a number from a given base to another |
| conv(STRING num, INT from_base, INT to_base) | STRING | Converts a number from a given base to another |
| cos(DOUBLE a), cos(DECIMAL a) | DOUBLE | Returns the cosine of a (a is in radians). |
| cosh(DOUBLE a), cosh(DECIMAL a) | DOUBLE | Computes the hyperbolic cosine of the given value. |
| exp(DOUBLE a), exp(DECIMAL a) | DOUBLE | Computes the exponential of the given value. |
| expm1(DOUBLE a), expm1(DECIMAL a) | DOUBLE | Computes the exponential of the given value minus 1. |
| factorial(INT a) | BIGINT | Returns the factorial of a. |
| floor(DOUBLE a) | BIGINT | Returns the maximum BIGINT value that is equal to or less than a. |
| greatest(t v1, t v2, …) | Returns the greatest value of the list of values | |
| hex(BIGINT a) hex(STRING a) hex(BINARY a) |
STRING | If the argument is an INT or binary, hex returns the number as a STRING in hexadecimal format. Otherwise if the number is a STRING, it converts each character into its hexadecimal representation and returns the resulting STRING. |
| hypot(INT A, INT B) | DOUBLE | Computes sqrt(a^2^ + b^2^) without intermediate overflow or underflow. |
| least(t v1, t v2, …) | Returns the least value of the list of values | |
| log(DOUBLE base, DOUBLE a) | DOUBLE | Returns the base-base logarithm of the argument a. |
| log10(DOUBLE a) | DOUBLE | Returns the base-10 logarithm of the argument a. |
| log1p(String columnName) | DOUBLE | Computes the natural logarithm of the given column plus one. |
| log2(DOUBLE a) | DOUBLE | Returns the base-2 logarithm of the argument a. |
| negate(INT a) | INT/DOUBLE | Returns -a |
| negate(DOUBLE a) | INT/DOUBLE | Returns -a |
| not(String) | DOUBLE | Inversion of boolean expression, i.e. NOT. |
| pow(DOUBLE a, DOUBLE p), power(DOUBLE a, DOUBLE p) | DOUBLE | Returns ap. |
| rand(), rand(INT seed) | DOUBLE | Returns a random number (that changes from row to row) that is distributed uniformly from 0 to 1. Specifying the seed will make sure the generated random number sequence is deterministic. |
| rint(T type) | DOUBLE | Returns the double value that is closest in value to the argument and is equal to a mathematical integer. |
| round(DOUBLE a) | DOUBLE | Returns the rounded BIGINT value of a. |
| round(DOUBLE a, INT d) | DOUBLE | Returns a rounded to d decimal places. |
| sin(DOUBLE a), sin(DECIMAL a) | DOUBLE | Returns the sine of a (a is in radians). |
| sinh(DOUBLE a), sinh(DECIMAL a) | DOUBLE | Returns the hyperbolic sine of a (a is in radians). |
| tan(DOUBLE a), tan(DECIMAL a) | DOUBLE | Returns the tangent of a (a is in radians). |
| tanh(DOUBLE a), tanh(DECIMAL a) | DOUBLE | Returns the hyperbolic tangent of a (a is in radians). |
| toDegrees(String columnName) | DOUBLE | Returns the angle measured in radians to an approximately equivalent angle measured in degrees. |
| toRadians(String columnName) | DOUBLE | Returns the angle measured in degrees to an approximately equivalent angle measured in radians. |
| unhex(STRING a) | BINARY | Inverse of hex. Interprets each pair of characters as a hexadecimal number and converts to the byte representation of the number. |
Aggregate Functions and Properties
Below are the Aggregate functions supported in Spark SQL :
| Signature | Return Type | Description |
|---|---|---|
| MIN( expression ) | INT/BIGINT /DOUBLE | Finds the minimum value in a column given by expression |
| MAX( expression ) | INT/BIGINT /DOUBLE | Finds the maximum value in a column given by expression |
| AVG( expression ) | INT/BIGINT /DOUBLE | Computes the average value of a column given by expression |
| SUM( expression ) | INT/BIGINT /DOUBLE | Computes the summation value of a column given by expression |
| COUNT( expression ) | INT | Counts the rows defined by the expression |
| COUNT (*) | INT | Counts all rows in the specified table or view |
| DENSE_RANK( value_list ) WITHIN GROUP (ORDER BY sort_list ) | INT | Generates a dense rank (no ranks are skipped) for a hypothetical row ( value_list ) in a group of rows generated by GROUP BY |
| PERCENT_RANK( value_list ) WITHIN GROUP (ORDER BY sort_list ) | INT | Generates a relative rank for a hypothetical row by dividing that row’s rank less 1 by the number of rows in the group |
| RANK( value_list ) WITHIN GROUP (ORDER BY sort_list ) | INT | Generates a rank for a hypothetical row ( value_list ) in a group of rows generated by GROUP BY |
| approx_count_distinct(columnName: String, rsd: Double) | INT/BIGINT/ DOUBLE | Returns the approximate number of distinct items in a group. |
| countDistinct(columnName: String, columnNames: String*) | INT | Returns the number of distinct items in a group. |
| first(columnName: String) | ALL | Returns the first value of a column in a group. |
| grouping(columnName: String) | BOOLEAN | Indicates whether a specified column in a GROUP BY list is aggregated or not, returns 1 for aggregated or 0 for not aggregated in the result set. |
| last(columnName: String) | ALL | Returns the last value of the column in a group. |
| mean(e: Column) | INT/BIGINT/ DOUBLE | Returns the average of the values in a group. Alias for avg |
| sumDistinct(columnName: String) | INT | Aggregate function: returns the sum of distinct values in the expression. |
| lag(e: Column, offset: Int, defaultValue: Any) | ALL | Returns the value that is offset rows before the current row, and defaultValue if there is less than offset rows before the current row. For example, an offset of one will return the previous row at any given point in the window partition. |
| lead(e: Column, offset: Int, defaultValue: Any) | ALL | Returns the value that is offset rows after the current row, and defaultValue if there is less than offset rows after the current row. For example, an offset of one will return the next row at any given point in the window partition. |
| row_number() | INT | Returns a sequential number starting at 1 within a window partition. |
Miscellaneous Functions and Properties
Below are some more functions supported in Spark SQL :
| Signature | Return Type | Description |
|---|---|---|
| crc32(string/binary) | BIGINT | Computes a cyclic redundancy check value for string or binary argument and returns bigint value. Example: crc32(‘ABC’) = 2743272264. |
| desc(String columnName) | COLUMN | Returns a sort expression based on the descending order of the column. |
| explode(Row) | ROWS | Creates a new row for each element with position in the given array or map column. |
| input_file_name | FILE | Creates a string column for the file name of the current Spark task. |
| json_tuple(jsonStr, k1, k2, …) | TUPLE | Creates a new row for a json column according to the given field names. |
| lit(literal) | COL | Creates a Column of literal value. |
| md5(string/binary) | STRING | Calculates an MD5 128-bit checksum for the string or binary. The value is returned as a string of 32 hex digits, or NULL if the argument was NULL. Example: md5(‘ABC’) = ‘902fbdd2b1df0c4f70b4a5d23525e932’. |
| monotonically_increasing_id | COLUMN | A column expression that generates monotonically increasing 64-bit integers. |
| sha1(string/binary) | STRING | Calculates the SHA-1 digest for string or binary and returns the value as a hex string, Example: sha1(‘ABC’) = ‘3c01bdbb26f358bab27f267924aa2c9a03fcfdb8’. |
| sha2(string/binary, int numBits) | STRING | Calculates the SHA-2 family of hash functions of a binary value and returns the value as a hex string. NumBits controls the number of bits in the message digest. |
| shiftLeft(int a, int b) | INT | Bitwise left shift, Shifts a b positions to the left. |
| shiftRight(int a, int b)) | INT | Bitwise Right shift, Shifts a b positions to the Right. |
| shiftrightunsigned(int a, int b) | INT | Bitwise unsigned right shift |
| signum(String columnName) | COLUMN | Computes the signum of the given column. |
Reserved Words in Spark SQL
| ALL | BETWEEN | DISTINCT | GROUP | INTO |
| AND | BY | FALSE | HAVING | IS |
| APPROXIMATE | COUNT | FROM | INNER | LIMIT |
| AS | CACHE | FIRST | IF | JOIN |
| ASC | CAST | LAST | IN | LEFT |
| AVG | DESC | FULL | INSERT | MAX |
| MIN | LIKE | OUTER | TABLE | INTERSECT |
| NOT | RLIKE | RIGHT | TIMESTAMP | EXCEPT |
| NULL | UPPER | SELECT | TRUE | SUBSTR |
| ON | LOWER | SEMI | UNCACHE | SUBSTRING |
| OR | REGEXP | STRING | UNION | SQRT |
| OVERWRITE | ORDER | SUM | WHERE | ABS |
Release Notes
BryteFlow Blend is under continual evolution, we receive feedback from new and established users of BryteFlow Blend and use this communication to produce the product road-map, this leads to continual improvements and additions.
Our Release Notes contain the information you’ll need to keep updated on the latest improvements and additions. Stay up to date and get an overview of the new features included in the releases.
BryteFlow Blend 2.5.1
Release Notes BryteFlow Blend – v2.5.1 Build 539
Released November 2019
- New Features
- New UI
- Display Lineage for a table
- Login page has been removed
- Ability to define an input that includes all partitions of a table
- Trigger job on a companion Ingest Table or Full Load
- Support for Export to Snowflake
- User defined namespace for Cloudwatch Metrics
- Data Viewer now handles Parquet and ORC files
- Exponential backoff on throttling of EMR access
- Ability to use EMR clusters using a tag instead of instance id
- Jobs still running during shutdown are marked as in error on startup
Bug Fixes
- Support for UTF-8 characters in data
- Column names correctly identified for SQL queries using the UNION keyword
Known Issues
- Timestamps may be converted to integers in Parquet files in some cases
- Data Viewer may not display some CSV files correctly
- Exporting Parquet and ORC files to Redshift or Snowflake may fail in some cases
BryteFlow Blend Version 2.3
Release date
01-Sep-2018
What’s New in 2.3 ?
- S3 Data View
- Git Support
- Run Now
- Run Trace
For additional information please refer to the following link